
Last updated: November 10, 2026. Learning how to move an infrared sauna is mostly about taking it apart in the right order, protecting the parts that break easily, and putting it back together the same way it came apart. Most home infrared saunas are built from flat panels that slot together, so they are made to be taken apart. The job is still awkward, because heater panels are heavy and fragile, glass doors chip, and a single mislabelled cable can turn reassembly into a long guessing game.
This guide walks through the whole move, from the first photograph to the first test session in the new spot. You will learn what to measure before you lift anything, how to take the cabin apart step by step, how to pack panels and glass so they survive the trip, which transport option fits your model, and how to test the sauna safely after you rebuild it. It also covers the mistakes that cause most damage, and when paying a professional is the better choice.
A quick warning up front: never rush the power step. Unplug the sauna and keep it unplugged for the whole disassembly. If your model has wiring beyond simple plug-in connectors, stop and call a licensed electrician. The rest of this guide assumes a standard plug-in cabin, and it says so clearly wherever that assumption matters.
Please read first, general guidance only. This article is general guidance, not a substitute for local code or a licensed professional. Check your local permit and code office if the new location needs one, and use a licensed electrician for any electrical work. Follow your own model’s manual first, because it overrides anything general written here.


#Paid Links
Key takeaways
- Photograph and label everything before you touch a screw, because your photos are the reassembly manual you will actually use.
- Unplug the sauna first and keep it unplugged, and never work on live wiring or bypass a safety device.
- Take the cabin apart in reverse build order: glass door, roof, heater panels, bench, then wall panels.
- Heater panels and glass need two people, moving blankets, and a flat, dry load, never a stack of heavy boxes on top.
- Measure every doorway, stair turn, lift, and vehicle opening before moving day, and measure the new room twice.
- Reassemble in build order, reconnect every cable to its labelled mate, then run a short, empty test session before anyone sits inside.
Can you move an infrared sauna yourself?
Yes, in most cases. A typical two to four person home cabin is a flat pack that was assembled in the room, so it can be taken apart in the same room and rebuilt somewhere else. The makers design the panels, bench, roof, and door to come apart with basic tools. That is the good news.
The hard part is not the screws. It is the size and weight of the panels, the fragile heater elements inside some of them, and the glass door. One dropped heater panel can crack an element that costs real money to replace.

#Paid Links
One chipped glass edge can turn a door into a safety risk. Two careful people with a plan will beat four rushed people without one, every time.
Some moves are not do-it-yourself jobs. If the sauna is hardwired into your home, if it is built into a wall, if it weighs far more than a standard cabin, or if the route out involves a narrow spiral stair, hire help. The section near the end of this guide, on when to hire a professional, lists the exact signs to look for.
Before you start: the manual, the photos, and the labels
Good moves are won before the first panel comes off. Spend an hour on preparation and you will save several hours, and probably a broken part, on the other side. This is the least exciting part of the job, and the most valuable.
Find your model’s manual first
Find the manual for your exact model before you start. The label is usually on the back panel, on the roof, or inside the control box. Search the maker name and model number on their website if the paper copy is gone. Download it and keep it open on a phone or tablet during the move.


#Paid Links
The manual tells you three things no general guide can: which panels come off first on your model, which connectors unplug and which ones need a tool, and whether any part needs a particular screw type or torque. If the manual and this guide disagree, follow the manual.
Your model may have a roof panel that lifts off, or one that slides. It may have heater panels that unplug, or ones that are wired in place. Do not guess.
Photograph every step before you take it apart
Take wide photos of the whole cabin from all four sides, then close photos of every joint, cable, and connector. Photograph the back of the control panel, the power inlet, each heater cable, and the bench supports. Take a photo after each part comes off, so you can see what was behind it.
Use your phone and back the photos up before moving day. A lost phone with the only copy of your cable photos is a real problem. Share the album with your helper, so both of you can check it during reassembly. A short video walkaround helps too, especially if you narrate what each cable connects to as you film it.
Label every cable, connector, and panel
Buy a roll of masking tape and a thick marker. Label each cable at both ends with the same code, such as R1 for the right wall heater, B2 for the bench heater, and C for the control panel. Label each panel on its inside face with its position, such as Back Left, Front Right, or Roof Front. Write on tape, never directly on the wood or glass.
Put every screw, bolt, and small bracket into a labelled zip bag as you remove it. One bag per panel is the simplest system, and it stops the classic problem of a jar of mixed screws at the end. Tape the bag to its panel, or keep all the bags together in one box that travels in your car, not in the moving van.
Measure everything twice, then measure the new room
Measure the assembled sauna, each large panel, and every doorway, hallway turn, stair, lift, and gate on the route out. Then measure the same things at the new location, plus the vehicle you plan to load. A panel that fits through a door on its edge may not fit around a stair landing, and a roof panel may not fit in a car boot even when it fits through the front door.
Write the numbers down and carry the list on moving day. Measure the narrowest point, not the widest, because the narrowest point is what decides whether a panel passes. Check ceiling height at both ends of a stair, and check the lift door and lift cabin size if the sauna is going up or down in a lift. If you are moving to an apartment, check the building rules as well, because some buildings limit moving hours and lift bookings.
Now measure the new spot itself. Leave space to open the door fully, to stand outside the cabin while someone else sits inside, and to reach the power outlet without stretching a cable across a walkway. Check the floor is level and strong enough, and that the outlet matches the model. If you are still choosing the spot, our guides to an infrared sauna in an apartment and an infrared sauna in a basement cover power, ventilation, moisture, and headroom checks that apply to a new room too.
Tools and helpers: what to have ready
You do not need a workshop. You need the right small tools, enough blankets and straps, and at least one strong helper. Gather everything before you start, because stopping halfway to buy a screwdriver wastes the daylight you need for the heavy lifting.
- Your model manual, printed or on a charged phone, plus the photos and labels described above.
- Phillips and flathead screwdrivers, plus the Allen keys your model uses, in the sizes the manual lists.
- A cordless drill with a driver bit, used gently, and a small socket set if your model uses bolts.
- Masking tape, a thick marker, zip bags, and a small parts box for screws and brackets.
- Moving blankets, bubble wrap, cardboard corner protectors, and stretch wrap for panels and glass.
- Ratchet straps or strong tie downs, a furniture dolly or hand truck, and a step stool for the roof panel.
- Work gloves for grip, and soft cloths for cleaning dust off heater faces before packing.
- A vacuum or soft brush for dust inside the cabin, and a torch for seeing connectors behind panels.
Plan for two people at minimum, and three for a three or four person cabin. Heater panels are the heaviest single parts in most models, and the roof panel is awkward rather than heavy. One person steadies while the other lifts, and nobody carries a heater panel alone. Keep children and pets out of the work area, and keep the route clear of rugs, cables, and clutter.
Allow a full day for a local move, and two days if the sauna is large, the stairs are tight, or you are also moving house. Disassembly takes two to four hours for most home cabins, packing and loading takes one to two hours, and reassembly takes about the same time as disassembly. A calm pace protects the panels, and it protects your back.
Step by step disassembly: take it apart in reverse build order
Most cabins are built from the floor up, so you take them apart from the top down. That means the roof comes off before the walls, and the walls come off before the floor. Follow your manual where it differs, but this order works for most standard plug-in cabins, and it keeps the structure stable while you work.
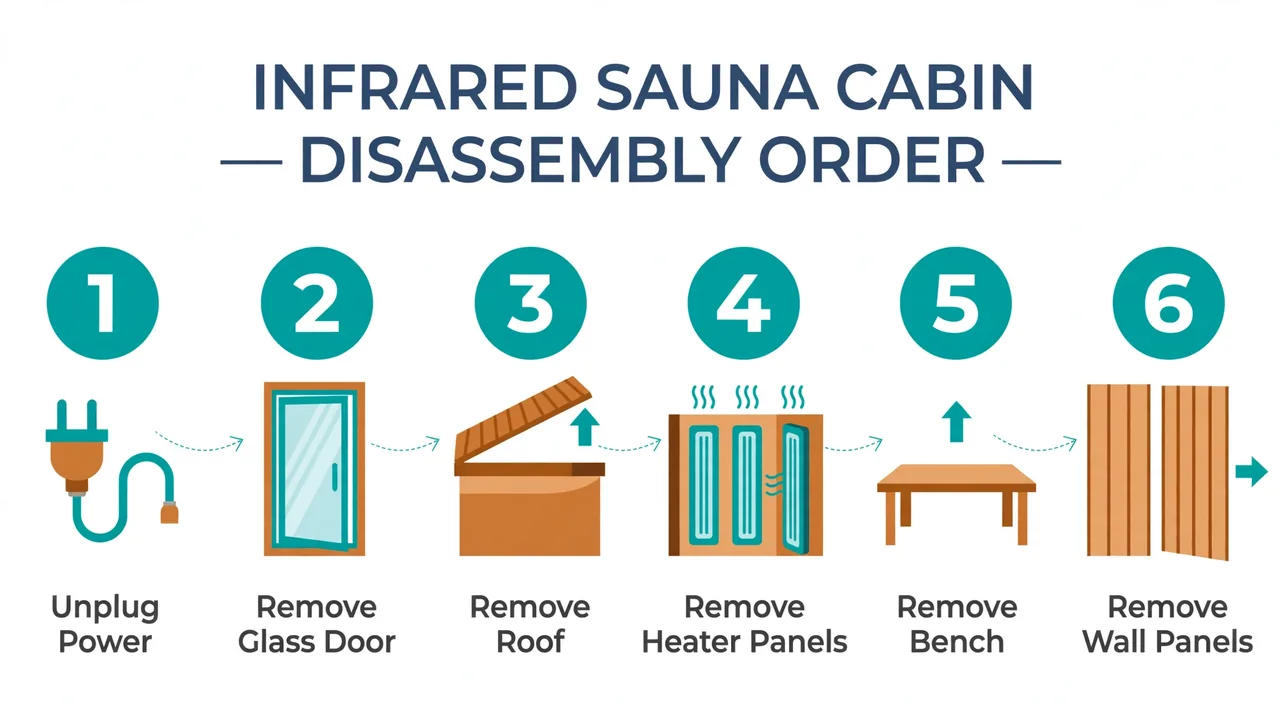
Step 1: Cool down, empty, and unplug
Let the sauna cool fully if it has been used recently, then empty it. Take out the thermometer, bucket, backrest, cushions, and anything stored inside. Vacuum the floor and wipe the bench, because dust and grit scratch panels during packing.
Switch the sauna off at its control panel, then unplug it from the wall outlet. Keep the plug visible and out of the way, and do not plug it back in until reassembly is complete and you are ready for the test run. If the sauna is hardwired rather than plug-in, stop here and call a licensed electrician to disconnect it safely.
Step 2: Disconnect and label the cables
Open the control box or roof cover where the cables meet, following your manual. Photograph the connections first, then label each cable at both ends before you unplug it. Pull plugs by the plug body, never by the cable, and never force a connector that resists. If a connector will not release, check for a clip, a latch, or a screw you missed.
Coil each cable loosely and tape the coil so it cannot snag. Keep the control panel and its cables together in one labelled bag or box, because the control panel is the part you least want to lose. Note which cable went to which heater while you work, because heater cables often look identical.
Step 3: Remove the glass door
Remove the glass door early, before the frame gets wobbly. One person holds the door while the other removes the hinge screws, from the top hinge down. Lift the door straight off its hinges and carry it upright, never flat, with both hands on the frame or edges.
Wrap the door at once in a moving blanket, then bubble wrap, and tape cardboard over the corners. Lean it upright against a wall in a safe spot, away from the work area, and do not stack anything against it. Glass edges chip easily, and a chipped edge can spread into a crack later. If the door has a handle, remove it and bag the screws, or wrap it well so it cannot catch on a blanket.
Step 4: Remove the roof panel
With the door out, take the roof panel off next. On most models the roof lifts straight up once its screws or clips are released. One person stands on a steady step stool, the other steadies the panel from below, and you lift together. Keep the roof flat while you carry it, and lay it face up on blankets.
The roof often holds lights, speakers, or a vent, so check for cables before you lift. Unplug any roof cable first and label it. If the roof feels stuck, look for hidden screws at the corners rather than forcing it, because forcing a stuck roof cracks the panel edge.
Step 5: Remove the heater panels
Heater panels are the most fragile part of the move. They look like plain wood panels from the outside, but the heating element sits just behind the surface. Handle them by the frame, keep them upright, and never press on the heater face or rest a tool on it.
Unplug each heater panel, label the cable, then remove the screws that hold the panel. Two people lift each panel out together, keeping it upright and level. Wrap it at once in a moving blanket, heater face inward and protected, and stand it upright against a wall. Do not lay heater panels flat under other panels, and never stack anything on top of one.
Check each heater face before you wrap it. A small mark or crack now is far easier to explain to an insurer or a mover than one found after the trip. Note any existing damage in your photos, with the date, so there is no argument later about when it happened.
Step 6: Remove the bench and its supports
Lift the bench out next, after the heater panels that sit behind or below it are free. The bench usually lifts off its supports or unscrews from the wall panels. Photograph the supports before you remove them, because their position is easy to forget and hard to guess later.
Bag the bench screws separately and label them. The bench is lighter than the heater panels, but it is long, so carry it flat with a person at each end. Wrap it if it has to travel against other panels, because its corners dent soft wood.
Step 7: Take down the wall panels, then the floor
Work around the cabin one wall at a time, starting with the front panel that held the door. Remove the screws or buckles that join each wall panel to its neighbour, and lift the panel straight up and out. Keep one person steadying the remaining walls while the other removes the next panel, because the frame gets less stable as panels come off.
Lift the floor panel last. It is the base the whole cabin sat on, and it often has the power inlet or a cable channel underneath. Check for cables before you lift it, and label anything you unplug. Sweep the old spot before you leave, and keep the floor panel dry and flat for the trip.
How to pack and protect panels, glass, and small parts
Packing is where most moving damage happens, and it is also where a little care saves the most money. Panels are not as tough as they look. Wood dents, corners crush, heater faces scratch, and glass chips. Wrap every large piece, even for a short trip across town, because a panel can slide and scratch in a five minute drive.
Wrap each panel like it is the heater panel
Wrap heater panels first, with a soft layer against the heater face and a moving blanket outside it. Tape the blanket closed, but never tape directly onto wood or a heater face, because tape can pull off finish or leave marks. Use stretch wrap over the blanket to hold it in place, and add cardboard corner protectors.
Wrap plain wall panels in moving blankets too, with cardboard on the corners. Stand panels upright in the vehicle, heater faces protected, with blankets between them so wood never rubs on wood. If a panel has to lie flat, lay it heater face up on blankets, with nothing heavy on top.
Glass needs its own plan
Glass travels upright, wrapped, and wedged so it cannot fall or slide. Wrap it in bubble wrap and a blanket, tape cardboard over the corners and edges, and load it last so it comes out first. Never lay a glass door flat under a panel, and never lean tools against it. If the glass is already chipped, consider replacing it before the move rather than risking a break in transit.
Keep small parts in one safe box
Put every labelled screw bag, bracket, hinge, handle, and remote in one strong box, and carry that box in your own car. Tape the box shut and write Sauna Parts on the outside in large letters. If a mover is handling the panels, hand them the box separately and tell them it travels with you, not in the van.
Pack the control panel and the power cable in the same box, wrapped in a soft cloth. These are small, valuable, and easy to lose in a house move, and a lost control panel can stop the whole rebuild. Take a photo of the packed box before you close it, as a final check that nothing was left behind.
Panel sizes and weights: plan the load before you lift
Panel sizes vary a lot by maker and model, so treat the figures below as typical planning ranges, not as facts about your sauna. Check your own manual for the exact weight and size of your largest panel, and plan the vehicle and the helpers around that panel, not around the average one.
| Part | Typical size, approximate | Typical weight, approximate | Handling note |
|---|---|---|---|
| Wall panel, two person cabin | About 120 to 180 cm tall | About 10 to 25 kg | Two person carry, upright |
| Wall panel, three to four person cabin | About 150 to 200 cm tall | About 15 to 30 kg | Two person carry, upright |
| Heater panel | Varies by model | About 8 to 20 kg | Two person carry, heater face protected |
| Roof panel | Full cabin footprint | About 15 to 35 kg | Two person lift, keep flat |
| Glass door | About 170 to 190 cm tall | About 10 to 20 kg | Two person carry, upright, corners protected |
| Bench | Full cabin width | About 10 to 25 kg | Two person carry, flat |
| Whole cabin, two person model | About 120 by 120 cm footprint | About 100 to 180 kg in total | Move as separate panels, never as one unit |
The key point from that table is simple: no single panel is usually too heavy for two adults, but the whole cabin is far too heavy to move assembled. That is why disassembly is not optional for most moves. It also explains why a dolly helps on flat ground but cannot replace a second pair of hands on stairs.
Transport options: your car, a van, or professional movers
Choose the vehicle by the size of your largest panel, not by the size of the smallest one. A roof panel and a tall wall panel are the parts that usually decide the answer. Measure them, then measure the vehicle opening, the load length, and the load height, before you book anything.
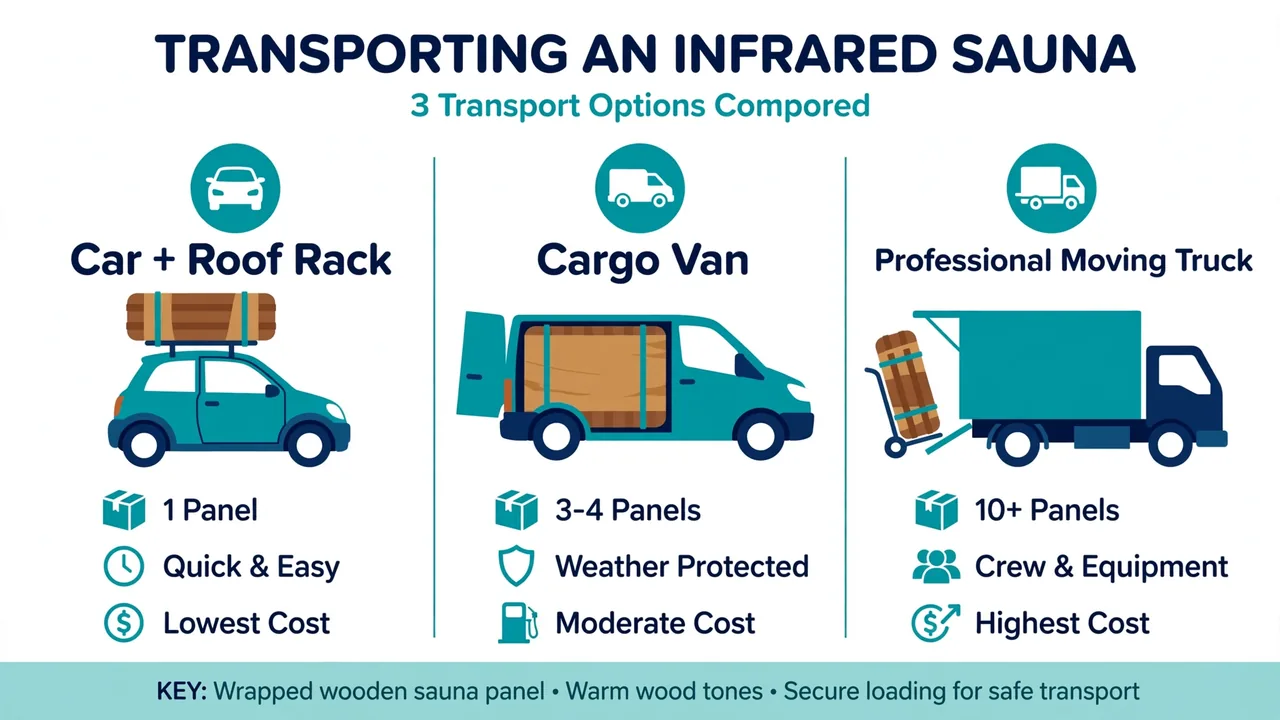
| Option | Fits which models | Typical strengths | Typical drawbacks |
|---|---|---|---|
| Your own car, panels on roof rack or in boot | Small one to two person cabins, or a dome model | Lowest cost, full control, parts travel with you | Most panels will not fit, roof loads need care and straps, weather risk |
| Hired cargo van | Most two to four person cabins, taken apart | Panels travel upright and dry, room for blankets and a dolly, one trip for most models | You drive and load it yourself, van hire and fuel add cost, check the load length first |
| Small moving truck | Large cabins, long distance moves, house moves | Most space, panels stay upright, ramps help with heavy parts | Highest vehicle cost, harder to park, needs a confident driver |
| Professional movers | Any size, including stairs, lifts, and long distance | They lift, load, and carry, often insured, best for stairs and tight turns | Highest total cost, book early, check what their insurance covers for heater panels |
Loading the vehicle safely
Load panels upright, in the order you will need them at the other end, with the floor panel near the door and the wall panels behind it. Put a moving blanket between every panel, strap the load so it cannot slide or fall, and wedge the glass door so it cannot move at all. Nothing heavy goes on top of a heater panel, and nothing sharp touches a wrapped panel.
Drive gently, especially around corners and over bumps. A panel that slides a few centimetres can dent a corner or scratch a heater face. If the trip is long, stop once to check the straps, because straps loosen as blankets settle. Keep panels dry, and never transport them in rain without a cover or a closed vehicle.
What about moving it without taking it apart?
Moving a cabin whole is tempting, and it sometimes works for a small move across one room, with four people and a clear flat floor. It is rarely a good idea for a move out of a house, up or down stairs, or into a vehicle. An assembled cabin is heavy, awkward, and hard to grip, and its joints are not built to take the twisting force of a carry through a doorway.
If you do move it whole across a room, empty it, unplug it, remove the glass door first, and use a furniture dolly on a flat floor. Do not tilt it far, do not drag it, and do not lift it by the roof. For anything beyond one room, take it apart. The extra hour of disassembly is cheaper than a cracked panel.
Reassembly: rebuild it in build order
Reassembly is disassembly in reverse, and your photos and labels make it straightforward. Work in a clean, clear space, lay the parts out in order, and check the floor is level before you start. A cabin built on an uneven floor will have a door that sticks and walls that do not sit square.
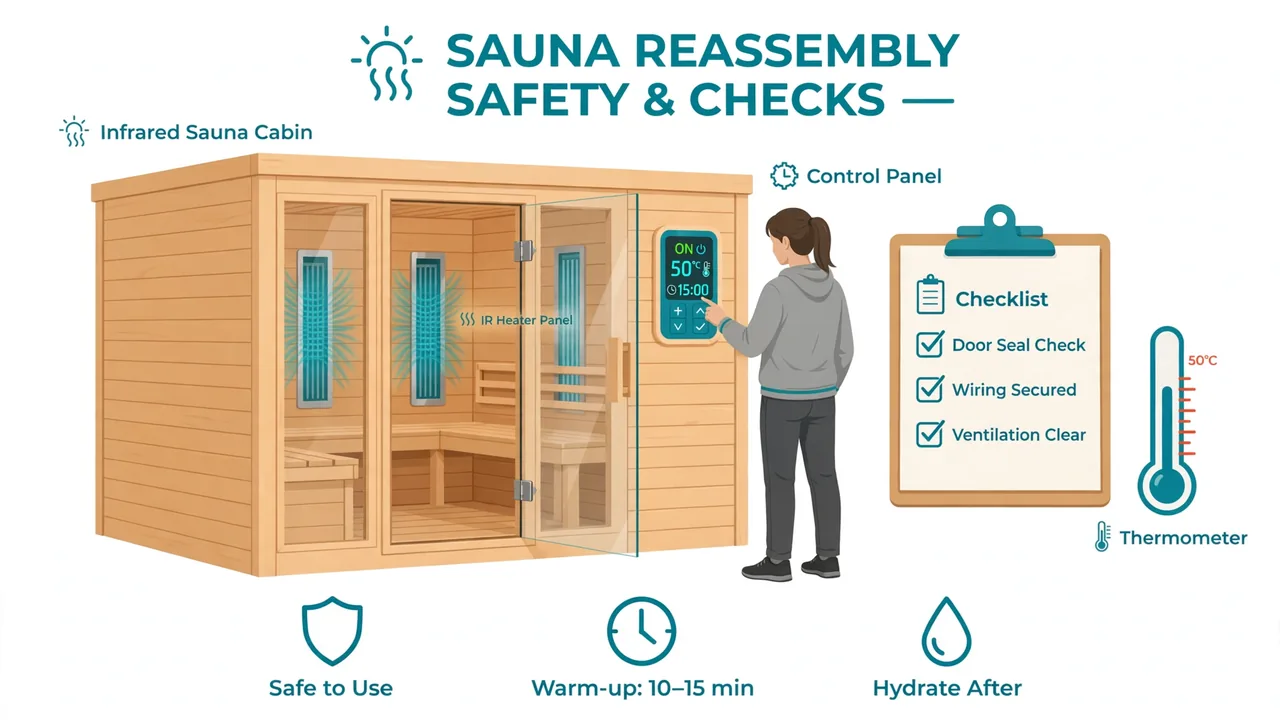
Lay out the floor and check it is level
Put the floor panel down first, in its final position. Check it with a spirit level in both directions, and shim it if the manual allows that. The floor must sit flat, with no rocking, because every wall panel sits on it. Vacuum the floor panel and the new room floor before you build, so grit does not get trapped under the cabin.
Raise the walls one at a time
Fit the back wall first, then the side walls, then the front wall, following your manual and your labels. Slot each panel into the floor and join it to its neighbour with the buckles or screws that came off it. One person holds the panel square while the other fastens it, and you check that each joint is tight before moving to the next panel.
Do not force a panel that will not sit square. Step back and check that the floor is level, that the panel is the right way round, and that no cable is trapped in the joint. Forcing a panel cracks the edge or strips the screw holes, and both are hard to fix well.
Fit the bench, then the heater panels
Fit the bench and its supports next, using your photos to get the supports in the right place. Then fit each heater panel, matching every cable to its label. Connect the cables before you screw the panel fully home, because you need the slack to plug them in without pulling on them.
Check that no cable is pinched behind a panel and that every connector clicks or sits fully home. A loose connector is the most common cause of a heater that does not work after a move, and it is also the easiest problem to prevent. Keep the cables tidy and away from any hot surface, as the manual directs.
Fit the roof, then the glass door
Lift the roof panel on last, with two people, and reconnect any roof cables for lights or speakers before you fasten it. Then hang the glass door, starting with the top hinge, and check that it opens and closes freely. Adjust the hinges in small steps if the door rubs, rather than forcing it, and check the handle and any magnetic catch.
Walk around the cabin and check every joint, screw, and buckle. Push each wall gently to check it is firm, and look for gaps at the corners. A small gap is usually a panel that is not seated, not a broken part, so loosen the neighbour, reseat the panel, and tighten again.
Electrical reconnection and the first test run
Do not plug the sauna in until the cabin is fully rebuilt, every cable is connected, and no tools are left inside. Check the outlet matches the model, and check that the power cable is not trapped, kinked, or stretched. If anything about the wiring looks wrong, or if a cable was cut or damaged in the move, do not plug it in. Call a licensed electrician.
For a fuller picture of what your model needs from its supply, see our guide to how much electricity an infrared sauna uses, and the infrared sauna installation guide for placement and power checks at a new location.
First test run checklist
- Plug in, switch on, and check the control panel lights up and responds to every button.
- Set a low temperature and a short time, then check that every heater panel warms up evenly.
- Hold a hand near each heater, without touching it, and note any panel that stays cold.
- Check the lights, speakers, and fan if your model has them, and check the door closes and seals.
- Listen for buzzing, smell for burning, and switch off at once if either appears.
- Let the cabin cool, then check every cable and connector again before the first real session.
Run the first test empty, with nobody inside, for a short session only. If everything warms evenly and the controls work, the move has gone well. If a heater stays cold, switch off, unplug, and check its cable and connector first, because that is the most likely cause. The troubleshooting section below covers the next steps.
Keep the first real session short and gentle. Sit for a shorter time than usual, drink water before and after, and leave at once if you feel dizzy or unwell. Do not drink alcohol before or during a session.
If you are pregnant, live with a heart or circulation condition or low blood pressure, or take medication that affects heat tolerance, check with a doctor first. This is a test session, not a full routine, so treat it that way.
Common mistakes and troubleshooting after a move
Most problems after a move come from the same short list: a loose connector, a panel that is not seated, a cable in the wrong socket, or a part that was damaged in transit. Work through them in order, with the power off and unplugged, before you assume a heater has failed.
A heater panel does not heat
Unplug the sauna and check that heater cable first. Push the connector fully home, check it matches its label, and look for a bent pin or a damaged plug. Swap nothing between sockets unless the manual says the sockets are identical, because a wrong swap can damage the control board. If the cable and connector look fine and the panel still stays cold, contact the maker with the model number and the panel label.
The control panel is dead or shows an error
Check the power outlet with another device, check the plug and the fuse or breaker, and check the control panel cable at both ends. Note the exact error code, if one shows, and look it up in the manual before you reset anything. Do not open the control box beyond what the manual allows. Error codes and deeper fixes are covered in our infrared sauna troubleshooting guide.
The door will not close or the cabin feels draughty
A door that rubs or gaps usually means the floor is not level, or a wall panel is not seated square. Check the floor level first, then loosen the front wall, reseat it, and tighten again in small steps. Adjust the hinges a little at a time, and check the magnetic catch lines up. Do not plane or cut a door to make it fit, because that voids most warranties and weakens the glass frame.
Uneven heat or a strange smell
Uneven heat often means one heater is unplugged or loose, so check every panel with the power off. A new smell can be dust burning off a heater face, but a sharp electrical smell or smoke means switch off at once, unplug, and call a professional. Never keep running a sauna that smells of burning electrics. Wipe heater faces gently with a dry cloth before the test run, and clean the cabin properly before regular use, following our guide on how to clean an infrared sauna.
Mistakes to avoid next time
- Skipping the photos and labels, then guessing which cable goes where.
- Carrying a heater panel alone, or laying it flat under a stack of boxes.
- Forcing a stuck panel instead of looking for the hidden screw or clip.
- Mixing screws from different panels in one jar, then finding the wrong screw for a heater.
- Plugging the sauna in before reassembly is finished, to test one heater early.
- Moving the cabin whole through a doorway, and twisting a joint that was never built to twist.
When to hire a professional instead
Hire help if the sauna is hardwired, built in, or larger than a standard four person cabin. Hire help if the route involves a steep stair, a spiral stair, a narrow lift, or a long carry across uneven ground. Hire help if you have a bad back, no strong helper, or no vehicle that fits the largest panel.
A professional mover or a sauna installer can disassemble, transport, and rebuild the cabin in one visit. Ask what their price covers, whether heater panels and glass are covered by their insurance, and whether they will test the sauna after rebuilding it. Get the answer in writing, and check reviews for other sauna or fragile furniture moves, not just general house moves.
If you are moving house at the same time, ask your house mover early whether they will take a disassembled sauna, and what they need from you. Some movers will take the panels if you disassemble and wrap them, while others will not touch heater panels at all. Knowing that before moving day stops a last minute scramble.
How much does it cost to move an infrared sauna?
Costs vary widely by region, model size, distance, and whether you hire help, so treat the figures below as 2026 planning estimates only, not as quotes. Get local quotes for your move, and check exactly what each quote covers, because a cheap quote that excludes heater panels or glass may not be cheap at all.
| Move type | What it usually includes | 2026 planning estimate, approximate |
|---|---|---|
| Do it yourself, same building | Blankets, tape, straps, and your own time | About $30 to $100 for packing materials |
| Do it yourself, local, hired van | Van hire and fuel, plus packing materials | About $80 to $250 for a day, varies by city |
| Professional movers, local | Disassembly, transport, and reassembly | About $200 to $600, varies by size and stairs |
| Professional movers, long distance | Disassembly, transport, reassembly, and insurance | About $500 to $1,500 or more, varies by distance |
| Replacement heater panel | One panel, if one is damaged in the move | About $100 to $400, varies by maker and model |
| Replacement glass door | One door, if glass is chipped or cracked | About $150 to $500, varies by maker and model |
The cheapest move is the one where nothing breaks, so the packing materials and the extra helper are worth the money. A single replacement heater panel can cost more than the whole van hire, and a cracked glass door can cost more than the professional mover you decided not to book.
If you are moving because you are changing homes, check whether the new home is the right place for the sauna at all. A model that fits a house may not suit a flat, and a model that needs a dedicated outlet may not suit a rented room. Our guides to building and placement, including how to build an infrared sauna and the garage and closet conversion guide, can help you judge the new spot before you commit to the move. If you are still choosing between formats, the dome versus cabin versus blanket guide is a useful check, because a dome or blanket is far easier to move than a cabin.
Frequently asked questions
Can you move an infrared sauna without taking it apart?
Across one room, sometimes, with four people and a flat floor, after removing the glass door. For a move out of a house, up or down stairs, or into a vehicle, take it apart. An assembled cabin is too heavy and awkward to carry safely, and its joints can twist and crack.
How long does it take to move an infrared sauna?
Allow a full day for a local move. Disassembly takes two to four hours for most home cabins, packing and loading takes one to two hours, and reassembly takes about the same time as disassembly. Large cabins, tight stairs, and long distance moves take longer.
Do you need an electrician to move an infrared sauna?
Not usually for a standard plug-in model, which you simply unplug and plug back in. You do need a licensed electrician if the sauna is hardwired, if wiring must be disconnected beyond plug-in connectors, or if anything about the wiring looks damaged. Never work on live wiring yourself.
How do you protect heater panels during a move?
Carry each heater panel upright with two people, holding the frame and never pressing on the heater face. Wrap it in a soft layer and a moving blanket, stand it upright in the vehicle with blankets between panels, and never stack anything on top of it.
Will an infrared sauna fit in a car or a van?
Most cabins will not fit in a car once taken apart, because the roof and wall panels are too long. A hired cargo van fits most two to four person cabins taken apart. Measure your largest panel and the vehicle opening before you book, because the largest panel decides the answer.
What if a heater does not work after the move?
Unplug the sauna and check that heater cable and connector first, because a loose or mislabelled connector is the most common cause. Check the outlet and the control panel cable too. If the cable looks fine and the panel still stays cold, contact the maker with the model number and panel label.
How much does it cost to move an infrared sauna?
A do it yourself local move costs about $30 to $100 for packing materials, plus van hire of about $80 to $250 for a day. Professional local movers cost about $200 to $600, and long distance moves cost about $500 to $1,500 or more. These are 2026 planning estimates only, and prices vary by region, brand, and mover, so get local quotes.
Conclusion
Moving an infrared sauna is a careful job, not a difficult one. Find the manual, photograph and label everything, measure the route and the vehicle, and take the cabin apart from the top down. Protect the heater panels and the glass as if they were the most expensive parts in the room, because they usually are.
Rebuild in the reverse order, reconnect every cable to its labelled mate, and run a short, empty test before anyone sits inside. If a heater stays cold or a code appears, check the connectors first, then the manual, then the maker. And if the sauna is hardwired, built in, or too large for your stairs and your vehicle, hire a professional. A good move ends with a working sauna in a new room, and a move done slowly and in order is the one most likely to end that way.
Sources and further reading: Your own model’s manual is the primary source for disassembly order, connector types, and panel weights. For placement and power checks at the new location, see the installation and electricity guides linked in this article. For problems after the move, see the troubleshooting guide linked above. All cost and size figures in this article are labelled as typical planning ranges or 2026 estimates, and readers should check their own manual and get local quotes before deciding.