
Steam first, cold second, warm to finish — that short sentence answers most of the steam sauna cold plunge question, but the details are what make the routine safe and enjoyable. A steam room is not a dry sauna with extra water. It is a smaller, sealed, very humid space where heat feels heavier, sweat does not evaporate in the usual way, and your body can warm up faster than you expect.
That difference changes the order, the timing, and the steps in between. If you copy a dry-sauna cold-plunge protocol straight into a steam room, you are likely to stay in too long, skip the drying-off step, and jump into cold water while you are still dripping wet and overheated. This guide gives you a steam-specific routine instead: how to warm up, how to leave the steam room properly, how to enter cold water gradually, and how to finish warm and settled.
Important disclaimer: This article is for general information only and is not medical advice. Saunas and cold plunges are wellness tools, not treatments, and they do not detox your body, cure illness, or guarantee recovery. If you are pregnant, live with a heart or circulation condition or low blood pressure, or take medication that affects heat or cold tolerance, check with a doctor before trying contrast therapy.


Paid Links - As an Amazon Associate, I earn from qualifying purchases.
Why steam + cold plunge is different from dry sauna + cold plunge
A dry sauna heats the air and the room surfaces, and the air stays relatively dry, so sweat can evaporate from your skin. A steam room works the other way round: a generator boils water and fills a sealed room with steam, so the air is close to saturated with moisture. You feel warm quickly, your skin stays wet, and the room itself feels thick and close.


Paid Links - As an Amazon Associate, I earn from qualifying purchases.
That humidity matters for three practical reasons. First, you cannot judge how hot you are by how much you are sweating, because condensation is already sitting on your skin. Second, breathing humid air can feel harder than breathing dry hot air, especially if you sit close to the steam outlet. Third, when you step out of the steam room you are wet through, which changes how cold water will feel and how quickly you will chill.
The contrast part — moving from heat to cold and back again — is the same idea as in other sauna routines, but the steam version needs its own pauses. You need time to cool down a little, dry off, and let your breathing settle before you plunge. You also need a proper warm finish afterwards, because wet skin and damp hair lose heat fast once you leave the plunge.
If you are new to steam rooms in general, start by learning how steam affects the body before you add cold water at all. Our guide to what a steam sauna does to your body explains the humidity, warmth, and breathing effects in plain terms, and it is a useful read before your first contrast session.
The best order, in one clear sequence
For most healthy adults trying a steam sauna cold plunge routine, the order that works best is: warm shower, short steam session, exit and rest, towel dry, brief cold plunge, warm rest, and then either one more gentle round or a warm finish. Ending on warmth is the key detail many routines skip, and it is especially important after steam, because you start the plunge already wet.
Do not start with the cold plunge. Plunging cold before you have warmed up does not “prepare” you for steam in any useful way, and it leaves you cold, tense, and less able to judge how the steam is affecting you. Warming up first also gives you a baseline: you know how you feel at rest, you know how you feel in the steam, and you can notice more clearly if something feels wrong after the plunge.
Do not go straight from steam to plunge either. The few minutes in between are not wasted time. They let your heart rate come down a little, let you drink some water, let you dry the worst of the moisture off your skin, and let you walk to the plunge calmly instead of rushing while dizzy or breathless. A rushed transition is where most avoidable mistakes happen.


Paid Links - As an Amazon Associate, I earn from qualifying purchases.
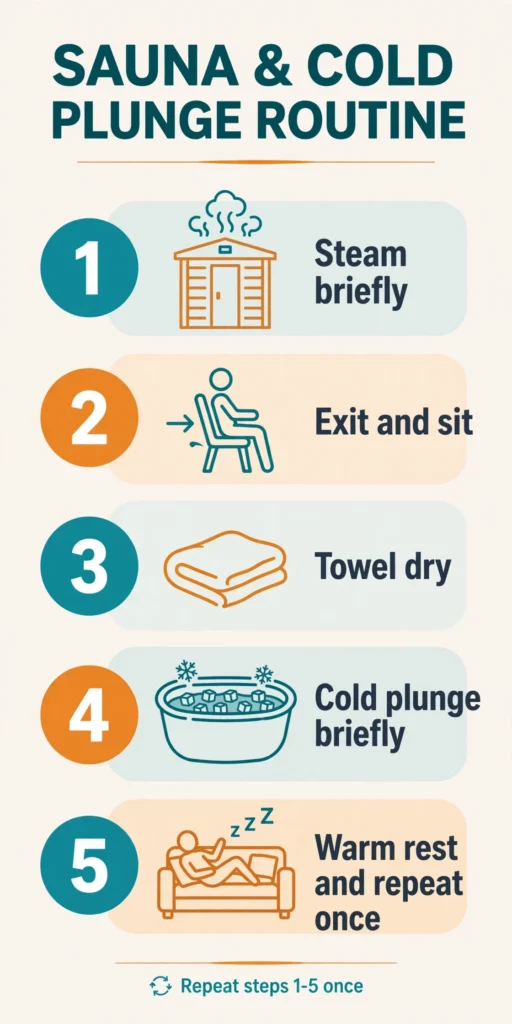
A steam-specific contrast routine, step by step
The routine below is a starting framework for a healthy adult who is already comfortable in a steam room. Treat every time and round as a starting point, not a target to beat. Shorter is always the right choice if you feel dizzy, nauseous, breathless, or unwell at any stage.
Step 1: Prepare before you start
Drink water before your session, and keep water nearby for afterwards. Eat a light meal or snack if you need one, but avoid a heavy meal immediately before heat and cold. Do not drink alcohol before or during the session, and do not combine a contrast session with a workout that has already left you dehydrated or exhausted.
Set up your space in order before you get in. You want a towel, drinking water, a dry robe or towel for the finish, and a clear, non-slip path from the steam room to the plunge. If the plunge is outdoors or in another room, check that route while you are still dry and steady on your feet.
Step 2: Warm shower and a short first steam
Take a warm shower first. This rinses off lotions and sunscreen, warms your skin gradually, and means you enter the steam room clean. Sit down in the steam room rather than standing, keep away from the direct steam outlet, and breathe normally through your nose where you can.
For a first contrast session, keep the steam short — shorter than a steam-only session you are used to. Many beginners find a first steam of around five to ten minutes is plenty, and there is no benefit in forcing yourself to stay longer. If the room feels oppressive, if your breathing feels tight, or if you feel light-headed, leave straight away. Those are signals to stop, not to push through.
Step 3: Leave the steam room properly
Do not jump up and hurry out. Sit up slowly, stand slowly, and step out into cooler air. Sit for a few minutes in a rest area or on a bench outside the steam room. This pause is part of the routine, not a break from it, and it is the moment to check in with yourself: Is my breathing settling? Do I feel steady? Am I thirsty?
Take a few sips of water. Avoid gulping a large amount at once, which can feel uncomfortable after heat. If you feel dizzy, stay seated, keep cool, and skip the plunge entirely. You can always try contrast on another day; there is no session so important that it is worth ignoring dizziness.
Step 4: Dry off — the step dry-sauna routines skip
This is the most steam-specific step in the whole routine, and it is the one people most often forget. Towel dry your body and hair as much as you reasonably can before you approach the plunge. You will not be perfectly dry, and you do not need to be, but removing the layer of warm condensation changes the plunge in two useful ways.
First, you enter the cold water on your own terms, rather than already dripping and chilled by evaporation on the walk over. Second, you are less likely to slip on wet tiles, and you can grip steps and handrails properly. Keep a second dry towel ready for after the plunge, because you will want it immediately.
Drying off is also good steam-room housekeeping. A steam room that is left wet, with the door shut and no ventilation, stays damp for hours. Leaving the door open or the ventilation running after your session, and wiping down surfaces where your routine allows, helps prevent the musty, mould-prone conditions that no home steam room owner wants. For the longer-term side of that care, see our guide to steam generator maintenance, descaling, and hard-water care.
Step 5: Enter the cold plunge gradually
Walk in slowly, using steps or a handrail. Sit down into the water in stages — feet and legs first, then waist, then shoulders — rather than jumping in or dunking your head straight away. The sudden shock of cold water can make you gasp, and gasping while your head is under water is dangerous. Keep your head above water, at least for your first sessions.
Focus on slow, steady breathing out. A long exhale helps you stay calm while your body adjusts to the cold. Keep your first plunge brief: well under a couple of minutes is plenty, and many beginners are comfortable with a plunge of around thirty seconds to a minute. If you feel panicky, numb, or intensely uncomfortable, get out. Discomfort that is sharp or frightening is a stop signal, not a badge of toughness.
Never plunge alone. This rule matters more than any timing tip in this article. Cold shock, dizziness, or a slip can turn serious very quickly, and you need another person nearby who can help you out and call for help if needed. If no one is with you, skip the plunge and use a cool shower instead.
Step 6: Warm rest, then decide on a second round
Step out carefully, wrap up in your dry towel or robe, and sit somewhere warm. This warm rest should last longer than the plunge itself — several minutes at least — and it is when your body settles back towards normal. Sip water, breathe normally, and notice how you feel before you decide anything else.
One round is a complete session. If you feel good and you are experienced with both steam and cold water, a second gentle round — short steam, rest, dry off, brief plunge, warm rest — is a reasonable maximum for most people on a given day. Do not stack round after round chasing a stronger feeling. More rounds do not mean more benefit, and fatigue builds quietly across rounds.
Finish warm, every time. A warm shower, dry clothes, and a warm drink are a better ending than a final plunge, especially in cooler weather or if you are heading outside afterwards. Ending cold and wet is how people leave feeling chilled for an hour afterwards, even if the plunge itself felt refreshing.
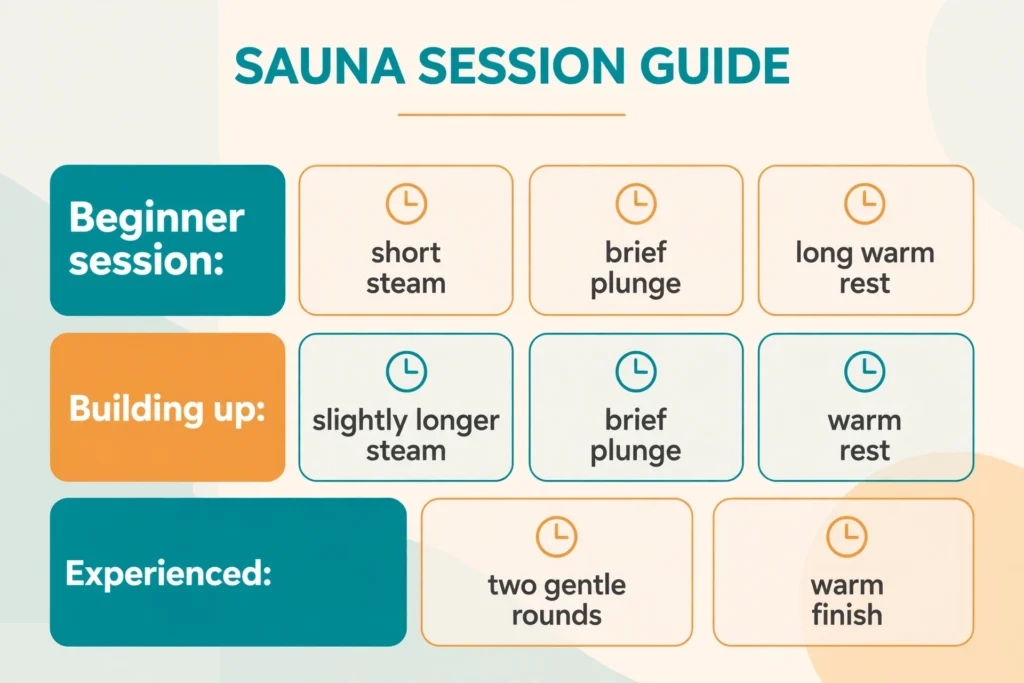
Timing at a glance: a beginner framework
Timing questions usually mean two different things: how long each stage lasts, and how many rounds to do. The table below keeps both simple. Remember that these are starting points for a healthy adult who is already used to steam, not prescriptions, and your own tolerance on the day matters more than any number here.
- First steam: short — around five to ten minutes for a first contrast session, less if you feel uncomfortable.
- Exit rest and dry-off: a few minutes — long enough for breathing to settle and skin to be towel-dried.
- First plunge: brief — around thirty seconds to a minute for most beginners, never with your head under water on a first try.
- Warm rest: several minutes — longer than the plunge, until you feel steady and comfortably warm again.
- Second round (optional): one gentle repeat only, with the same pauses, and a warm finish to end.
- Total session: keep it modest. A satisfying contrast session does not need to be long, and a shorter session you enjoy is better than a long one that leaves you drained.
As you gain experience, you may find you prefer a slightly longer steam or a slightly longer plunge. Build up gradually, one small change at a time, and only if previous sessions felt comfortable throughout. If a longer plunge makes you shiver hard for a long time afterwards, feel exhausted, or dread the next session, you went too far — scale back next time.
Timing within the day matters too. Many people prefer contrast sessions when they are not rushed, not straight after a large meal, and not immediately before bed if they find the cold wakes them up. Our guide to the best time to use a steam sauna covers morning, evening, and post-exercise timing in more detail, and the same common-sense points apply once you add a plunge.
Cold shock: what it is and how to respect it
Cold shock is your body’s rapid response to sudden immersion in cold water. It can cause a gasp, fast breathing, a spike in heart rate, and a feeling of panic, even in people who are fit and used to cold showers. It is strongest in the first moments of immersion, which is exactly why gradual entry and controlled breathing matter so much.
You can reduce the risk, but you cannot remove it entirely. Enter slowly, keep your head above water, breathe out slowly, and stay only briefly. Never plunge alone, never plunge after drinking alcohol, and never try to “beat” the shock by forcing yourself to stay in longer. If you have a heart or circulation condition, high or low blood pressure, or any condition that affects how your body handles sudden temperature change, talk to a doctor first — this is not a routine to test out on your own.
Children, older adults, and anyone who is pregnant should be especially cautious, and should only try cold immersion with medical advice and close supervision. The same caution applies if you take medication that affects blood pressure, heart rate, or heat and cold tolerance. A contrast routine is optional wellness, never something you need to do to be healthy.
What contrast therapy can — and cannot — do for you
It is easy to find bold claims about contrast therapy online: faster recovery, better immunity, fat burning, detoxing, and all kinds of performance promises. The honest picture is much more modest. Some people find alternating heat and cold refreshing, invigorating, and relaxing, and that subjective feeling is a perfectly good reason to enjoy a session. But the evidence for specific health outcomes from steam-plus-cold-plunge routines in particular is limited.
Much of the contrast research people quote comes from athletes using dry saunas, ice baths, or cold-water immersion in training settings, not from home steam rooms. Those studies also vary widely in timing, temperature, and who took part, so their results do not transfer neatly to a home steam routine. Where sauna research is discussed more broadly, well-known observational studies — such as the Finnish cohort studies of traditional dry sauna use — show associations, not proof that sauna use causes a particular outcome, and they were not studies of steam-plus-plunge routines.
So enjoy contrast therapy for what it reliably offers: a structured, mindful way to warm up, cool down, and finish feeling refreshed, with time built in to rest and hydrate. Do not use it as a treatment for pain, illness, injury, or any medical condition, and do not let a routine replace rest, proper training, medical care, or sleep. If you are using heat or cold because something hurts or feels wrong, get that checked instead of trying to plunge it away.
Common steam + plunge mistakes
Most mistakes in a steam sauna cold plunge routine are not dramatic. They are small shortcuts that add up: staying in the steam too long because the humidity hides how hot you are, rushing the transition, skipping the dry-off, or adding too many rounds. Watching for these five will cover most of them.
- Copying a dry-sauna protocol. Dry heat and humid heat feel different and warm you differently. Use a steam-specific routine, with shorter first steams and a proper dry-off step.
- Going straight from steam to plunge. A few minutes of rest, water, and drying off makes the plunge calmer and safer, and gives you time to notice dizziness before you are in cold water.
- Dunking your head on the first plunge. Keep your head above water while you learn how your body reacts, and enter in stages rather than jumping in.
- Plunging alone. Cold water and dizziness are a risky combination without someone nearby. No plunge is worth doing solo.
- Ending cold. Always finish warm and dry. A cold finish feels bracing in the moment and chilled for a long time afterwards, especially after steam.
Two more practical mistakes are worth naming. The first is using scented oils or products in the steam room that are not made for steam use, which can irritate airways in a small humid room and leave residue in the generator. The second is forgetting the room after you leave: a steam room needs ventilation and drying time, or dampness and odour build up over weeks. Neither mistake ruins a single session, but both quietly make the next one worse.
Setting up a home steam + plunge space
You do not need a spa-sized setup to try a steam sauna cold plunge routine at home, but the layout matters. The steam room, a rest spot with towels and water, and the plunge should be close together, with a non-slip floor throughout. If you have to cross a long, wet, or cold corridor between stages, the routine becomes rushed and slippery — the opposite of what you want.
Before you buy or build anything, get the basics right. A steam generator must be sized to the room, and the room needs proper electrical and plumbing work by licensed professionals. Our guides to how to size a steam generator and steam sauna electrical and plumbing requirements explain the general principles, but local codes and your own home’s wiring and drainage decide the details — always check with your local code or permit office and use licensed electricians and plumbers for installation work.
Running costs are the other practical question people ask about first, and they depend on generator size, electricity rates, session length, and how often you use the room. Our guide to the cost to run a steam sauna walks through the factors that move the bill up or down, so you can estimate your own use rather than relying on a single figure that may not match your home.
For the plunge itself, a dedicated cold plunge tub, a cold bath, or a cool shower can all serve as the cold stage, as long as entry and exit are safe and supervised. A cool shower is a sensible first cold stage if you have never immersed in cold water before: you can control the temperature and duration, keep your head out of the coldest water, and step out instantly. Once you are comfortable with cool showers and short supervised plunges, you can decide whether a dedicated tub is worth it for you.
After the session: rewarm, rehydrate, and look after the room
After your warm finish, keep drinking water and eat normally. You may feel pleasantly tired, alert, or relaxed — all are normal responses to heat and cold, and none of them means the session “worked” or “failed” in a medical sense. If you feel shivery for a long time, headachy, nauseous, or unusually exhausted, note what you did differently and scale back next time, and seek medical advice if symptoms persist.
Look after your skin and hair too. Steam and cold water can leave skin feeling dry or tight, especially in winter, so a gentle moisturiser after you are fully dry is usually welcome. Rinse off any steam-room products, dry your hair properly before going outside in cold weather, and change into dry clothes rather than sitting around in a damp robe.
Finally, give the steam room a few minutes of care. Leave the door open or ventilation running until surfaces have dried, and follow your generator maker’s maintenance schedule. Hard water in particular leaves scale that builds up quietly and shortens generator life if it is ignored. Regular descaling and water care, covered in the maintenance guide linked above, cost far less attention than a repair.
Who should skip contrast therapy — or get advice first
Contrast therapy is not for everyone, and skipping it is a sensible choice, not a failure. Get medical advice first if you are pregnant, live with a heart or circulation condition, have low or high blood pressure, have a condition that affects temperature regulation, or take medication that affects heat or cold tolerance. The same applies if you have ever fainted in heat or cold water, or if you have a skin condition, open wound, or infection that cold immersion could worsen.
Skip the plunge on any day when you feel unwell, dizzy, dehydrated, hungover, or exhausted, and skip the whole session if you have a fever or are recovering from illness. Heat and cold are stressors, even in small doses, and adding them on a day when your body is already struggling does not help recovery. Rest, fluids, and sleep will do more for you on those days than any routine.
If you are ever unsure whether contrast therapy is safe for you, the safest answer is to ask your doctor and describe exactly what you plan to do: short steam, brief supervised plunge, warm finish. A clinician who knows your history can give you a far better answer than any general article, including this one.
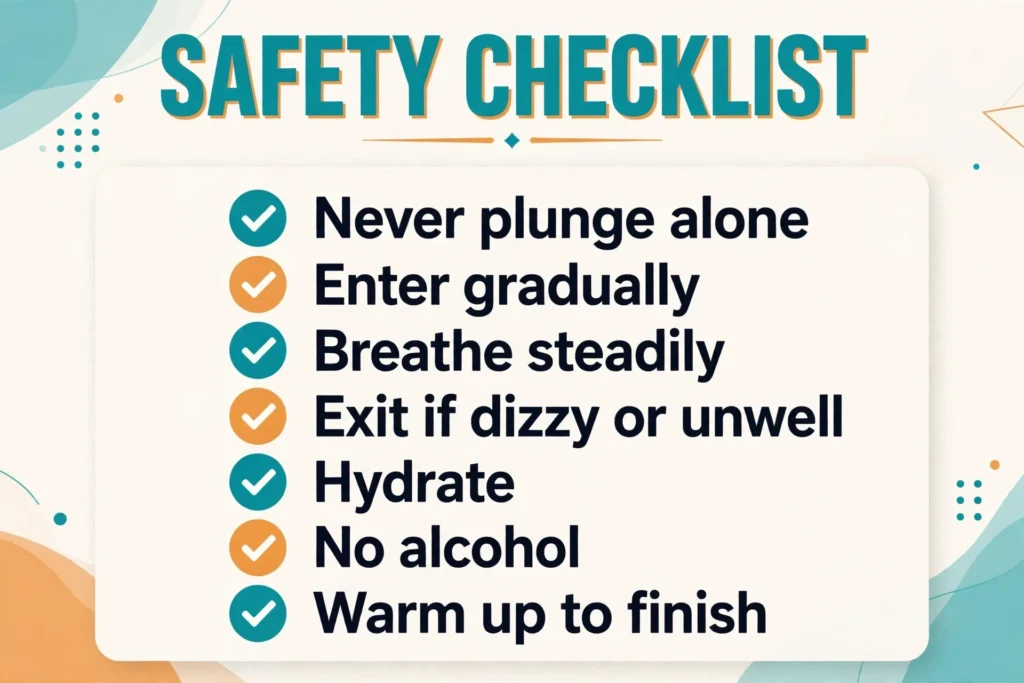
A simple first-timer checklist
Use this checklist for your first steam sauna cold plunge session, and keep using it until the routine feels automatic:
- Someone else is present for the plunge, and knows you are plunging.
- Water, two towels, a robe, and a non-slip path are ready before you start.
- You have eaten lightly, hydrated, and had no alcohol.
- First steam is short, and you leave immediately if you feel dizzy, breathless, or unwell.
- You rest, sip water, and towel dry before approaching the plunge.
- You enter the plunge gradually, head above water, breathing slowly.
- Your plunge is brief, and you get out at the first sign of panic, numbness, or sharp discomfort.
- You warm up, dry off fully, and finish warm — never cold and wet.
That checklist, followed calmly, is the whole routine in miniature. Everything else — longer steams, extra rounds, a dedicated tub — is optional refinement for later, once the basics feel easy.
Frequently asked questions
Should I do the steam sauna or the cold plunge first?
Do the steam sauna first, then the cold plunge, then finish warm. Warming up first lets you judge how the heat affects you, and the rest and dry-off between stages makes the plunge calmer and safer.
How long should I stay in the steam room before a cold plunge?
Keep the first steam short, around five to ten minutes for most beginners, and leave sooner if you feel dizzy, breathless, or uncomfortable. Shorter is always the right choice if anything feels wrong.
How long should a cold plunge last after a steam sauna?
Keep the first plunge brief, around thirty seconds to a minute, with your head above water. Build up only gradually, and get out at once if you feel panicky, numb, or intensely uncomfortable.
Do I need to dry off between the steam room and the plunge?
Yes, towel dry as much as you reasonably can. It makes the plunge more controlled, reduces slipping on wet floors, and stops you from arriving at the cold water already dripping and chilled by evaporation.
Is it safe to do a steam sauna and cold plunge on the same day every day?
Daily contrast sessions are not necessary, and they are not suitable for everyone. Listen to your body, take rest days, and get medical advice first if you have a heart or circulation condition, low blood pressure, are pregnant, or take medication affecting heat or cold tolerance.
Can I end on the cold plunge instead of warming up?
You can, but finishing warm is the safer and more comfortable choice after steam, especially in cooler weather. A warm shower and dry clothes help you rewarm properly after wet skin and damp hair have lost heat.
What should I do if I feel dizzy during a contrast session?
Stop immediately, sit or lie down in a cool place, sip water, and skip the plunge. If dizziness persists, or you feel faint, chest discomfort, or unwell, seek medical help promptly.