
An off-grid sauna is a simple idea with a satisfying payoff. You heat a small wooden room with fire, you splash water on hot stones, and you step outside to cool air, snow, or a cold plunge. There is no mains power to plug in and no tap to turn on. That freedom is the appeal, and it is also the work.
This guide explains how an off-grid sauna works in practice. It covers site choice, wood stove setup, water supply, drainage, freeze protection, and a safe session routine. It is written for a backyard cabin, a lakeside plot, or a remote property where you bring your own heat, water, and common sense.
It is not a replacement for your stove manual or your local rules. Stove models differ, sites differ, and local requirements differ. Read the manual for your exact stove, check with your local permit office before you build, and get licensed help for any electrical or plumbing work you do add later.


Paid Links - As an Amazon Associate, I earn from qualifying purchases.
Please read this first: This article is general guidance only. It is not a substitute for local building or fire codes, and it is not a substitute for a licensed professional. Sauna use is a wellness activity, not medical treatment. This article is not medical advice. Check with a doctor first if you are pregnant, if you live with a heart or circulation condition or low blood pressure, or if you take medication that affects heat tolerance. Start with short sessions, drink water before and after, and leave the sauna at once if you feel dizzy, nauseous, or unwell.
What an Off-Grid Sauna Means in Practice
In plain terms, off-grid means no mains electricity and no mains water. Heat comes from a wood stove. Light, if you want it, comes from a battery lantern, a small solar light, or a window that catches daylight. Water comes from a container you fill, carry, store, or collect.
That changes how you plan a session. An electric sauna can be switched on and left to warm while you do something else. A wood-fired off-grid sauna asks for a little more attention at the start. You light the fire, you feed it, you watch the stones, and you learn how your own stove behaves in your own climate.
It also changes what can go wrong. A power cut does not matter, because there is no power to cut. A frozen pipe does not matter, because there is no pipe. The risks you must manage instead are fire, burns, smoke, poor ventilation, dehydration, and water that freezes, spills, or runs where it should not.
Site and Foundation: Keep It Simple and Dry
Pick a spot that is level, well drained, and easy to reach in all seasons. A sauna that is lovely in July and unreachable in January will not get used. Think about the path to the door, the place where you will stack wood, and the place where you will cool down.
Keep the sauna clear of overhanging branches, dry brush, and stored fuel. Give yourself working room around the building for chimney care, snow clearing, and repairs. A small deck or gravel apron at the door helps a lot. It keeps mud out of the hot room and gives bare feet a clean place to stand.


Paid Links - As an Amazon Associate, I earn from qualifying purchases.
For a fuller look at groundwork, see our guide to the best foundation for an outdoor sauna. If you are unsure whether your project needs approval, read do you need a permit for an outdoor sauna and ask your local permit office directly. Do not guess at local rules, and do not copy a rule from another town or country and assume it applies to you.
Wood Stove Selection Basics
Most off-grid saunas use a wood-burning sauna stove. The stove heats the room and holds a basket or chamber of stones. When you splash water on the stones, you get loyly, the burst of humid heat that makes a sauna feel like a sauna.
Choose a stove rated for the size of your hot room. A stove that is too small will struggle on cold days and tempt you to overfire it. A stove that is far too large can make a small room harsh and hard to control. Your stove maker will give a room volume range for each model. Use that range, not a guess from a forum, and allow for cold walls, glass doors, and uninsulated surfaces if your maker says to do so. For help choosing a heat source, see wood-fired vs electric outdoor sauna heater.
Wood Stove Setup: Placement, Flue, and Clearances
Stove placement starts with the manual. Every maker states required clearances to combustible walls, benches, and floors, plus the floor protection and wall shielding their model needs. Follow those instructions exactly. This guide deliberately gives no clearance numbers, because a number that is right for one stove can be wrong and unsafe for another.
Place the stove where the flue can rise as straight as possible through the roof. A straight flue draws better, collects less soot in bends, and is easier to clean. Where a bend is unavoidable, use only the parts your maker allows, and keep the run as short and as simple as you can.
Protect the floor under and around the stove with the non-combustible hearth your manual specifies. Protect nearby walls with the shielding your manual specifies, if shielding is required. Keep benches, buckets, towels, and firewood outside the clearance zone at all times. A towel draped near a stove to dry is a fire risk, not a convenience.
Fit a chimney cap that keeps rain and sparks in check, and make sure the chimney rises clear of the roof as your manual and local guidance require. A short chimney in a sheltered hollow can smoke back into the room on a still or windy day. If smoke regularly spills into the hot room, stop and find the cause. Do not simply open the door and carry on.
Setting Up an Off-Grid Sauna, Step by Step
Use this sequence as a planning checklist. Your stove manual and your local rules come first whenever they differ from general guidance here.
- Confirm the site and approvals. Check drainage, access, wood storage, and cooling space. Ask your local permit office what applies to your build.
- Build a dry, level base. Keep timber off wet ground and slope the ground so water runs away from the building.
- Fit the stove to the manual. Set the hearth, wall protection, and clearances exactly as the maker states. Do not improvise with unlisted materials.
- Fit the flue and chimney. Keep the run straight where possible, use only approved parts, and fit a cap and flashing that keep weather out.
- Load stones as directed. Use only the stone type and size your maker recommends, and stack them so air can move through the pile.
- Cure the stove with first fires. Follow the maker first-fire guidance to dry out the stove and stones gradually before a full session.
- Test water, drainage, and ventilation. Run a short trial session with no guests. Check smoke draw, airflow, floor drainage, and door operation.
- Set up your water station. Place drinking water, loyly water, a ladle, and a bucket where they are easy to reach without crossing the stove.
Stones and the First Fire
Sauna stones store heat and turn splashed water into steam. Use stones made for sauna heaters, in the size your maker recommends. Ordinary garden stones can crack, crumble, or hold moisture in ways that make them unsafe in a hot stove. If a stone looks cracked or soft, take it out and replace it.
Stack stones loosely, not packed tight like bricks. Air needs to move around them so heat spreads through the pile. Leave the maker recommended gaps around heating elements or firebox surfaces, and do not pile stones above the level your manual allows. A tall, unstable pile can shift when you splash water on it.
For the first fire, follow the curing guidance in your manual. In general terms, this means a series of smaller, shorter fires that drive moisture out of the stove, stones, and any new masonry or coatings. Rushing this step with a roaring fire can damage a new stove and fill the room with smoke and odour. Patience here pays off for years.
For more detail on stone choice and care, see sauna stones for heater. Stone care is a small job, but it has a large effect on how pleasant each session feels.
Water Supply: Hauling, Storing, and Gravity Feed
Water is the heart of off-grid sauna planning. You need drinking water, loyly water, and water for washing and cooling. You may also want water for a cold plunge or an outdoor shower, but start with the basics and add extras only when the basics work well.
The simplest system is hauling. Carry clean water in sealed containers to the sauna and store it in a lidded tank or bucket near the changing area. This system is cheap, easy to clean, and easy to drain before a freeze. Its limit is effort. Hauling gets old fast if every session needs several heavy trips.
A gravity feed system can reduce that effort. A raised tank, filled by hand, by pump, or from a collected supply, can feed a tap or hose by gravity alone. Keep the tank clean and covered, keep the outlet above the tap, and use food-safe materials for any part that holds drinking water. Do not use a tank or hose that once held chemicals or fuel.
Rain collection and lake or well water raise extra questions. Collected water may be fine for washing and loyly, but it is not automatically safe to drink. Treat drinking water separately, and follow local guidance on private water supplies. When in doubt, bring drinking water from a known safe source and keep it apart from wash water.
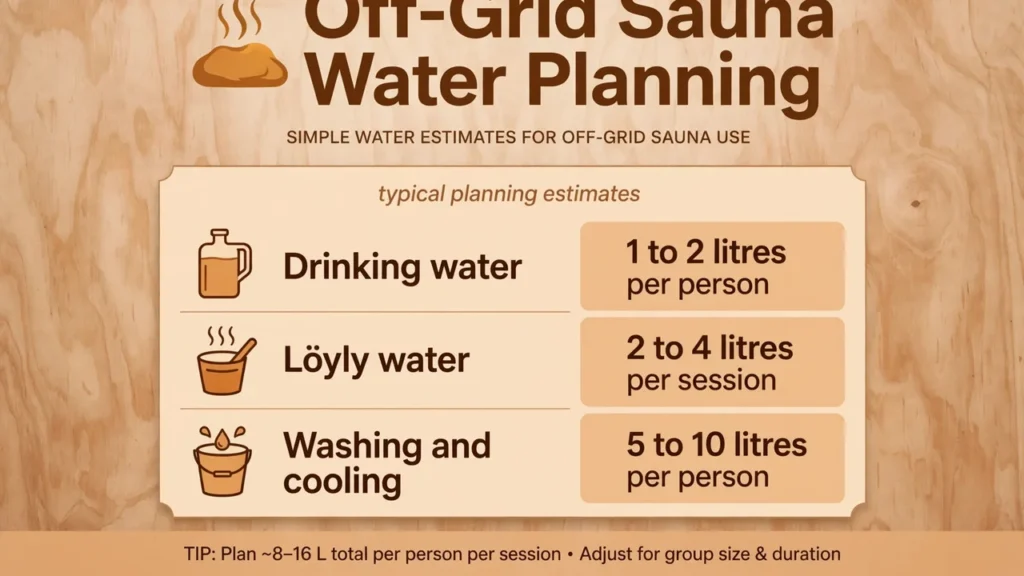
The table below gives typical planning ranges for one person and one session. These are planning estimates to help you size containers, not promises and not medical advice. Hot days, long sessions, and larger groups will need more.
| Water use | Typical planning range | Notes |
|---|---|---|
| Drinking water | 1 to 2 litres per person | Keep separate from wash water. Drink before and after, not only during. |
| Loyly water | 2 to 4 litres per session | Small ladlefuls at a time. More water does not mean better steam. |
| Washing and cooling | 5 to 10 litres per person | Allows a washdown and a cool rinse. A plunge or shower needs more. |
| Total to plan for | About 8 to 16 litres per person | Multiply by group size. Add a spare container for a longer evening. |
Heating Water and Making Good Loyly
Many wood stoves can heat water as a side benefit. Some have a built-in water tank, some take a kettle or pot on top, and some sit near a separate water heater. Use only the method your stove maker allows. A pot balanced on a hot stove top can tip, and a tank fitted to the wrong stove can overheat or leak.
Warm water makes better loyly than ice-cold water, and it is kinder to hot stones. Keep a kettle or pot warming while the room heats, then top up the loyly bucket from it. Do not pour a large jug of cold water onto very hot stones in one go. Small ladlefuls, spaced out, give steady steam and protect the stones.
Keep loyly water clean. Use plain water, without oils, soaps, or additives, unless your stove maker clearly allows a product. Residues can bake onto stones, smell unpleasant, and shorten stone life. If you like scent in the room, use a separate, safe method away from the stove, and never pour scented products directly onto stones unless the maker says it is safe.
Drainage: Where the Water Goes Matters
Every sauna session ends with water on the floor. Splashes, wash water, and condensation all need a safe path out. Without drainage, floors stay damp, timber rots, and the room smells musty. With good drainage, the room dries between sessions and lasts far longer.
A sloped floor to a drain or to an outside outlet is the usual answer. The slope should be gentle but clear, and the outlet should lead away from the foundation, not pool beside it. A floor drain that leads to a soakaway, a gravel bed, or an approved disposal point is better than a drain that simply empties under the building.
Keep the drain clear. Hair, leaves, and grit build up fast in a sauna drain. A removable grate and a quick rinse after each session prevent most blockages. In a freezing climate, make sure trapped water in the drain can empty or be cleared, or the drain itself can freeze and back up.
Keeping Water From Freezing in Cold Weather
Frozen water is the main winter headache for an off-grid sauna. Buckets freeze, tanks split, hoses block, and drains ice over. The fix is not one clever device. It is a routine that assumes a freeze will happen and plans around it.
First, reduce stored water in the coldest spots. Empty buckets, hoses, and small tanks after a session if the building will sit unheated. Store containers upside down or with lids off so any remaining water can expand without splitting them. Bring drinking bottles inside.
Second, protect the drain. A drain that holds a shallow pool will freeze first. Clear it, rinse it, and leave it empty where your design allows. If your drain has a trap that must hold water, ask your installer how that trap is meant to be protected in winter for your climate.
For winter heat-up and snow tips that pair well with this section, read outdoor sauna in winter heating and snow tips. Cold weather rewards the sauna owner who plans the exit as carefully as the entrance.
A Sensible Off-Grid Session Routine
A good session has a calm order. Rushing the heat-up, skipping water, or staying too long all make the experience worse. The routine below works for most wood-fired off-grid saunas, with times adjusted to your stove and room.
- Prepare water and wood before lighting. Fill drinking bottles, the loyly bucket, and a wash bucket. Stack dry wood within easy reach, but outside the stove clearance zone.
- Light a small, steady fire. Use dry kindling and small splits first. Build heat gradually, following your stove manual, rather than forcing a large fire at once.
- Warm water while the room heats. Set a kettle or pot to warm, if your maker allows it, and check ventilation and alarms.
- Shower or wash first if you can. A quick wash before entering keeps the hot room cleaner and helps your skin warm evenly.
- Start short. Sit on a lower bench first, especially if you are new to sauna. Leave after a short round, cool down, drink water, and rest.
- Use small splashes of loyly. One ladleful at a time, with a pause between splashes, gives steadier heat than a flood of water.
- Cool down fully between rounds. Step outside, sit down, breathe cool air, and drink. Do not rush back in while you still feel overheated.
- Finish cool and hydrated. End with a wash, dry clothes, and more water. Eat only when you feel ready, and rest before driving.
Ventilation: The Quiet Safety System
Ventilation does two jobs at once. It brings fresh air into the hot room for breathing, and it helps the stove draw well. A stuffy sauna with a smoking stove is not just unpleasant. It can be unsafe, especially in a small, tightly built room.
Most sauna designs use an inlet low on a wall and an outlet higher up, often on the opposite side or near the stove flue path. Follow your building or stove guidance for vent positions, and do not block vents with benches, towels, or stored items. A vent that is blocked for tidiness is a vent that is not working.
Check airflow during your trial session. You should feel a gentle movement of air, not a cold draught across the benches. Smoke should rise up the flue, not hang in the room. If the room feels heavy, if your eyes sting, or if smoke spills when you open the stove door, stop the session and check the flue, vents, and wind conditions.
Fire and Burn Safety
Wood, fire, and bare skin are a combination that demands respect. Most off-grid sauna accidents are not dramatic. They are a hand on a hot flue, a foot on a hot hearth, or a towel left too close to the stove. Small habits prevent most of them.
Never leave a lit stove unattended. That means no lighting the fire and going back to the house for an hour, and no leaving the building while the stove is still burning strongly. Someone responsible should stay within earshot and within reach of the sauna until the fire is out and the stove is cool enough to leave safely.
Keep a clear zone around the stove and flue at all times. Teach every guest where the hot surfaces are before the first round. Children and pets need close supervision around a wood stove, and young children should not be left alone in a hot room. Elderly guests may need a lower bench, a shorter round, and a hand getting in and out.
Ash and Chimney Care
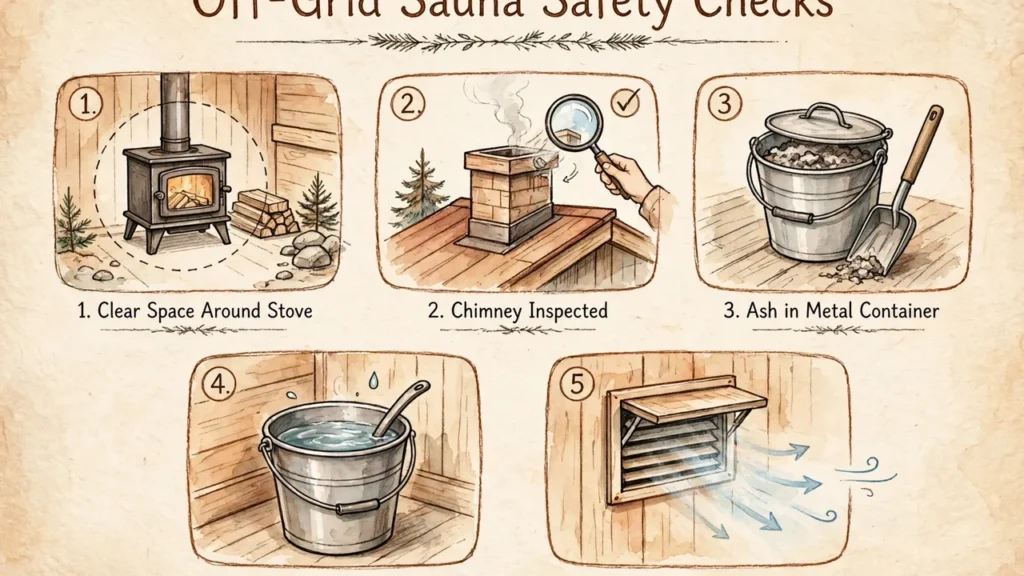
Ash looks harmless long after it is not. Embers can stay hot in ash for many hours, and sometimes for more than a day. Treat all ash as hot until you are certain it is cold, and store it only in a metal container with a tight lid, placed on a non-combustible surface away from the building, wood piles, and dry vegetation.
Empty ash only when the stove is cold, or follow your manual exactly if it allows warm ash handling with proper tools. Use a metal scoop and a metal container, not a plastic bucket or a cardboard box. Do not tip ash onto garden beds, into a ditch, or near a timber wall until you are sure it is fully cold and no embers remain.
Clean the flue on the schedule your stove and flue makers recommend. Creosote builds up faster with wet wood, slow fires, and cool flues. A chimney fire is a serious risk, and regular sweeping is the main defence. If you are unsure how to sweep your flue safely, hire a chimney professional and watch how they do it the first time.
For a year-round care rhythm, see outdoor sauna maintenance calendar. Chimney and ash care are not glamorous, but they are the jobs that keep an off-grid sauna safe for years.
Cold-Climate and Off-Grid Troubleshooting
Off-grid problems tend to arrive together on the coldest night. Use the table below as a first check. If a problem points to the stove, flue, or structure, stop and get qualified help rather than forcing a workaround.
| Problem | Likely cause | Safe first check |
|---|---|---|
| Room will not warm up | Wet wood, poor draught, or a room losing heat fast | Use only dry wood. Check vents and flue draw. Check for draughts around door and vents. |
| Smoke spills into the room | Blocked flue, wind pressure, or a cold flue | Stop the session. Check the cap and flue when cold. Do not keep feeding a smoking fire. |
| Steam feels weak | Stones too cool, packed too tight, or worn out | Let stones heat fully. Restack loosely. Replace cracked or crumbling stones. |
| Water frozen solid | Stored water left in an unheated space | Empty containers after use. Bring drinking water fresh. Warm loyly water during heat-up. |
| Floor stays wet | Blocked drain or a floor that does not slope to the outlet | Clear the grate and drain. Rinse after sessions. Get help if the slope is wrong. |
| Room smells musty | Damp timber and poor drying between sessions | Vent and dry after every session. Clean the drain. Check for leaks around the flue. |
| Fire dies quickly | Wet wood, blocked air inlet, or ash blocking airflow | Use dry wood. Clear ash when cold. Check the air inlet is open and clear. |
Frequently Asked Questions
What is an off-grid sauna?
An off-grid sauna is an outdoor sauna with no mains power and no mains water. Heat usually comes from a wood stove, light comes from daylight or battery lights, and water is carried, stored, or fed by gravity from a tank you fill yourself.
How much water should I bring for an off-grid sauna session?
As a typical planning estimate, allow about 8 to 16 litres per person for one session. That covers 1 to 2 litres of drinking water, 2 to 4 litres of loyly water, and 5 to 10 litres for washing and cooling. Larger groups and longer sessions need more.
Can I use lake or rain water in an off-grid sauna?
Collected water may be suitable for washing and loyly, but it is not automatically safe to drink. Keep drinking water separate, use a known safe source for drinking, and follow local guidance on private water supplies.
How do I stop off-grid sauna water from freezing?
Empty buckets, hoses, and small tanks after a session if the building will sit unheated. Bring drinking water fresh each visit, warm loyly water during heat-up, and clear the drain so it does not hold a pool that can freeze.
Do I need a permit for an off-grid sauna?
It depends on your location, size, and local rules. Check with your local permit office before you build, and do not assume a rule from another area applies to your property.
Is a wood stove safe in a small off-grid sauna?
Yes, when it is fitted and used to the maker instructions, with correct clearances, a sound flue, working alarms, and supervision while lit. Never leave a lit stove unattended, keep the clearance zone clear, and stop the session if smoke spills into the room.
How long does an off-grid sauna take to heat up?
Heat-up time varies with room size, insulation, outside temperature, wood dryness, and stove size. Learn your own stove timing over a few trial sessions and note it down, rather than relying on a generic time from the internet.
Can children use an off-grid sauna?
Children need close supervision, short sessions, lower benches, and plenty of water, and they should never be left alone in a hot room. Ask a doctor first if a child has a health condition that affects heat tolerance, and stop at once if the child feels unwell.
Final Thoughts: Simple Systems, Done Well
An off-grid sauna rewards preparation more than spending. Dry wood, clean water, a sound flue, and a dry floor will do more for your sessions than any extra feature. Build those basics well, learn your stove, and keep a simple routine for water, ash, and drying.
Enjoy the quiet that comes with it. No hum, no pump, no screen. Just fire, water, steam, and cool air. Kept safely, that is a hard combination to beat.