
Choosing where to put an outdoor sauna matters almost as much as choosing the sauna itself. The same cabin can feel calm, private and easy to use in one corner of a garden, and exposed, draughty and damp in another. Sun, wind, drainage and privacy all pull in different directions, so placement is really a balancing act.
Get the balance right and the sauna becomes a place you reach for every week.
This guide walks through the four big placement factors one by one, then shows how to fit them together into a layout that works for your garden. It includes a site-assessment checklist, orientation guidance for both hemispheres, drainage and privacy options, and three worked layout examples. Where a decision touches foundations, permits or roofing in more depth, it points you to the detailed guide on that topic instead of repeating it.


#Paid Links
Please note: This article is general guidance only. It is not a substitute for local building codes, planning rules or a licensed professional. Check with your local permit and code office before you build, and use licensed electricians and plumbers for electrical, plumbing and drainage work. Any cost figures in this guide are planning estimates, not quotes. Always follow your sauna manufacturer’s instructions for clearances, ventilation and heater installation.
Why Placement Deserves a Proper Plan
A sauna is not like a garden chair. Once it is built, moving it is expensive, disruptive and sometimes impossible without dismantling it. The base, the power supply, the water route and any screening around it all become fixed. That is why an hour walking your garden with a notebook before you order anything is time well spent.
Placement also shapes how the sauna performs. A spot that catches the worst of the prevailing wind will lose heat faster and cost more to run. A low corner where rainwater collects will keep the base damp and shorten the life of the timber.
A sauna facing a neighbour’s upstairs window will never feel relaxing, however good the heater is.
Start With a 20-Minute Site Assessment
Before comparing spots, gather the facts about your garden. You do not need specialist tools. A compass app on your phone, a tape measure, a watering can and a rainy day will tell you most of what you need to know. Walk the garden at morning, midday and late afternoon if you can.
Stand in each candidate spot and look in every direction. Note what you can see, what can see you, where the shade falls, and how the ground feels underfoot after rain. Take photos from each spot. They are surprisingly useful later, when you are comparing two locations from memory.


#Paid Links
| Check | What to look for | Why it matters |
|---|---|---|
| Sun path | Which spots get morning sun, afternoon sun, or shade all day | Sets heating load, glare and how hot the cabin gets in summer |
| Prevailing wind | The direction wind usually comes from, and where it funnels between buildings | Wind strips heat, drives rain against walls and carries wood smoke |
| Ground slope | Whether each spot is high, level or the lowest point in the garden | Low spots collect water; a slight fall away from the sauna keeps the base dry |
| Drainage after rain | Puddles, soft ground or water running towards a spot | Standing water speeds up rot and mould around the base |
| Overlooking | Windows, balconies and raised ground that look into each spot | Privacy decides whether you can relax and cool down comfortably |
| Access route | The path from the house door to the sauna, in daylight and in the dark | A short, level, lit path gets used far more than a long muddy one |
| Power and water | How far the spot is from the house supply, and what lies between | Long cable and pipe runs add cost and complexity |
| Boundaries and rules | Distance to fences, neighbours’ buildings and any local setback rules | Setbacks and permits can rule a spot out entirely |
A Quick Test You Can Do This Weekend
On a day when rain is forecast, watch your garden for ten minutes during a shower. Water runs off hard surfaces, gathers in dips, and sheets down any slope. Mark the wettest patches with a garden cane or a photo. Those are the spots to avoid, or to fix with drainage work before the sauna arrives.
Do the same for wind: on a breezy day, stand in each candidate spot and feel where the wind hits. Corners between a house and a fence often funnel the wind.
Sun: Orientation, Overheating and Shade
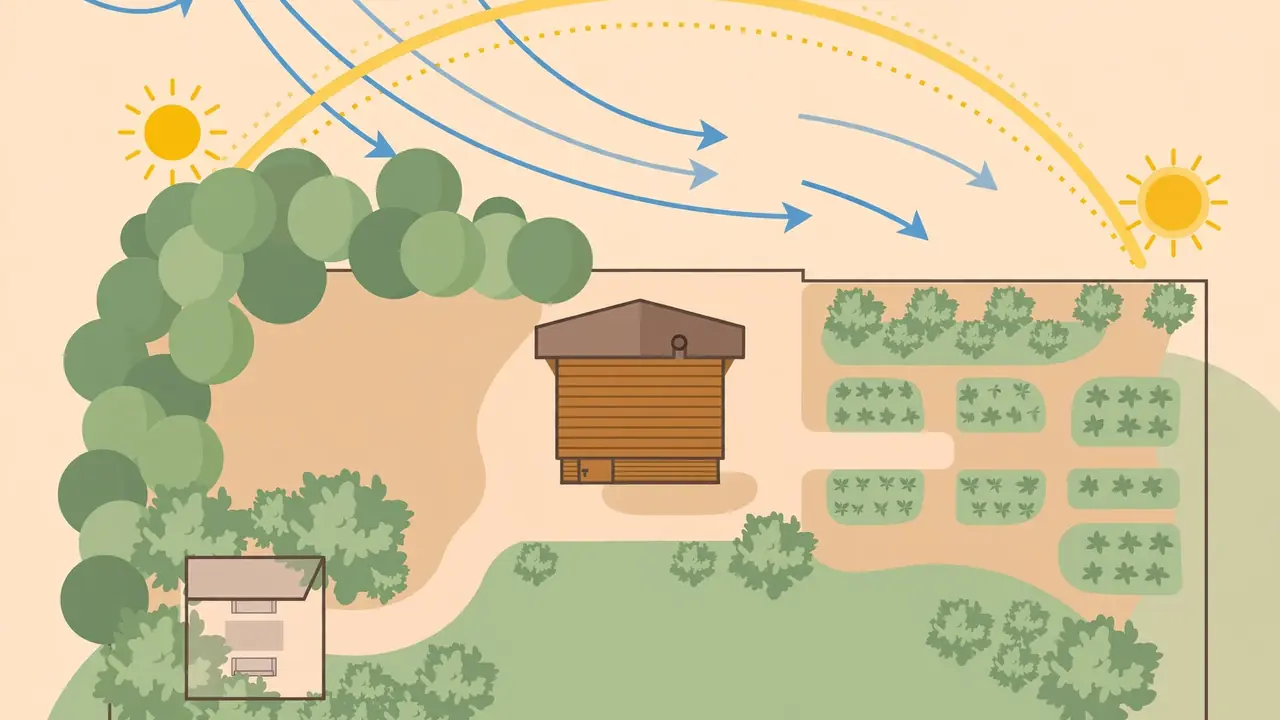
Sunlight affects an outdoor sauna in three ways. It warms the cabin before you switch the heater on, which is welcome in winter. It heats the timber and the roof in summer, which can make the sauna uncomfortably hot before a session even starts. And it controls glare and light inside, which matters most if your sauna has a glass front or large windows.
Morning Sun or Afternoon Sun?
Most people use their sauna in the late afternoon or evening. That makes morning sun the friendlier choice for many gardens. A sauna that catches the morning sun dries out early after a damp night, which helps keep mould at bay. By the time you use it in the evening, the timber has had the hottest part of the day to settle, and the cabin is not already baking from hours of direct afternoon sun.
Afternoon sun suits morning users and cold-winter gardens, taking the edge off heating times. The trade-off is summer overheating: a dark roof in full afternoon sun can make a small cabin very warm inside, so afternoon-facing saunas benefit most from shade, a light-coloured roof finish, or an overhang that blocks high summer sun while letting in lower winter sun.
There is no single right answer. The best orientation depends on when you sauna, how hot your summers get, and whether your cabin has glass that lets the sun straight in. If you are unsure, morning sun with afternoon shade is a safe default in most temperate gardens.
Orientation by Hemisphere and Climate
The sun’s path flips between hemispheres, so advice written for one half of the world can mislead the other half. In the Northern Hemisphere the sun tracks through the south, so a south-facing front catches the most sun through the day. In the Southern Hemisphere it tracks through the north, so a north-facing front does the same job. East gives morning sun and west gives afternoon sun in both hemispheres.
| Situation | Front or glazing faces | What you gain | Watch out for |
|---|---|---|---|
| Northern Hemisphere, cold winters | South or south-east | Most daylight warmth; faster drying after rain and snow | Summer glare through glass; add shade or an overhang |
| Northern Hemisphere, hot summers | East or north-east | Morning sun, cooler afternoons, less overheating | Less winter sun; drying takes longer in damp months |
| Southern Hemisphere, cold winters | North or north-east | Most daylight warmth; faster drying after rain | Summer glare through glass; add shade or an overhang |
| Southern Hemisphere, hot summers | East or south-east | Morning sun, cooler afternoons, less overheating | Less winter sun; drying takes longer in damp months |
| Evening sauna users, any climate | East or morning-sun side | Cabin dries early and is not heat-soaked at session time | Cool-down area may be in shade by evening |
Shade: Helpful, With One Catch
Shade from a tree or a pergola is one of the simplest ways to stop a sauna overheating in summer. Dappled shade is ideal. It cuts the worst of the direct sun while still letting air move around the cabin, which helps the timber dry.
Dense, permanent shade from a large evergreen is less helpful. It can keep walls damp and drop leaves and sap onto the roof.
Watch out for trees directly over the sauna. Falling branches can damage a roof, and leaves blocking a gutter can send water down the walls instead of away from them. If a tree is the only shade available, keep it at a sensible distance and check the roof and gutters regularly. Roofing and mould prevention are covered in more detail in our guide to outdoor sauna rain, humidity, roofing and mould prevention.
Wind: Heat Loss, Draughts and Smoke Drift
Wind is the placement factor people notice last and regret most. A sauna in an exposed spot loses heat through its walls and around its door every time the wind picks up. The heater works harder, sessions take longer to reach temperature, and the cool-down area becomes unpleasant on a breezy evening. A sheltered spot can feel several degrees warmer with no extra energy at all.
Start by finding your prevailing wind direction. In many temperate regions it comes from the west or south-west, but local geography changes everything. Hills, valleys and tall buildings can bend the wind.
Your local weather service lists the prevailing direction, but your own garden is the real test. Tie a light ribbon to a cane in each candidate spot and watch it over a few windy days.
Windbreaks That Actually Work
A solid wall or fence right against the sauna can make wind worse, not better. Wind hitting a solid barrier curls over the top and drops down behind it, creating turbulence. A hedge, a slatted fence or a row of shrubs works better because it slows the wind down instead of stopping it dead. The sheltered zone behind a permeable windbreak stretches much further than the turbulent pocket behind a solid wall.
- Hedges and shrubs: the best all-round windbreak. They slow wind, look natural and double as privacy screening. Evergreens shelter all year round.
- Slatted or trellis fencing: lets some air through, so it calms wind without creating a turbulent pocket. It also works well as a privacy screen with climbing plants.
- Solid fences and walls: useful for privacy and low wind, but expect turbulence just behind them. Keep the sauna a little way back rather than tight against the fence.
- The house itself: placing the sauna on the sheltered side of the house can cut wind dramatically, and it shortens the path, the power run and the water supply.
Watch for wind tunnels. A narrow gap between the house and a boundary fence, or between two outbuildings, can funnel wind and make one corner far windier than the rest. Test any spot in a gap like that on a windy day before you commit.
Wood-Fired Saunas and Smoke Drift
If your sauna has a wood-burning stove, wind direction matters twice over. Smoke from the chimney drifts downwind, so a sauna placed upwind of your own house, your seating area or a neighbour’s windows will send smoke exactly where you do not want it. Place the sauna so the prevailing wind carries smoke away from people, seating and open windows.
Never leave a wood stove unattended, and follow the manufacturer’s instructions for clearances around the stove and the flue. Keep dry leaves and stored firewood clear of the sauna, and store firewood under cover a short distance away.
Good ventilation inside the sauna matters just as much as the wind outside. Fresh air in and stale air out keeps the heat even and the session comfortable. Our guide to outdoor sauna ventilation explains inlet and outlet positions in detail, and it is worth reading before you fix the sauna’s orientation, because vent positions interact with wind direction.
Drainage: Keep Water Moving Away From the Timber
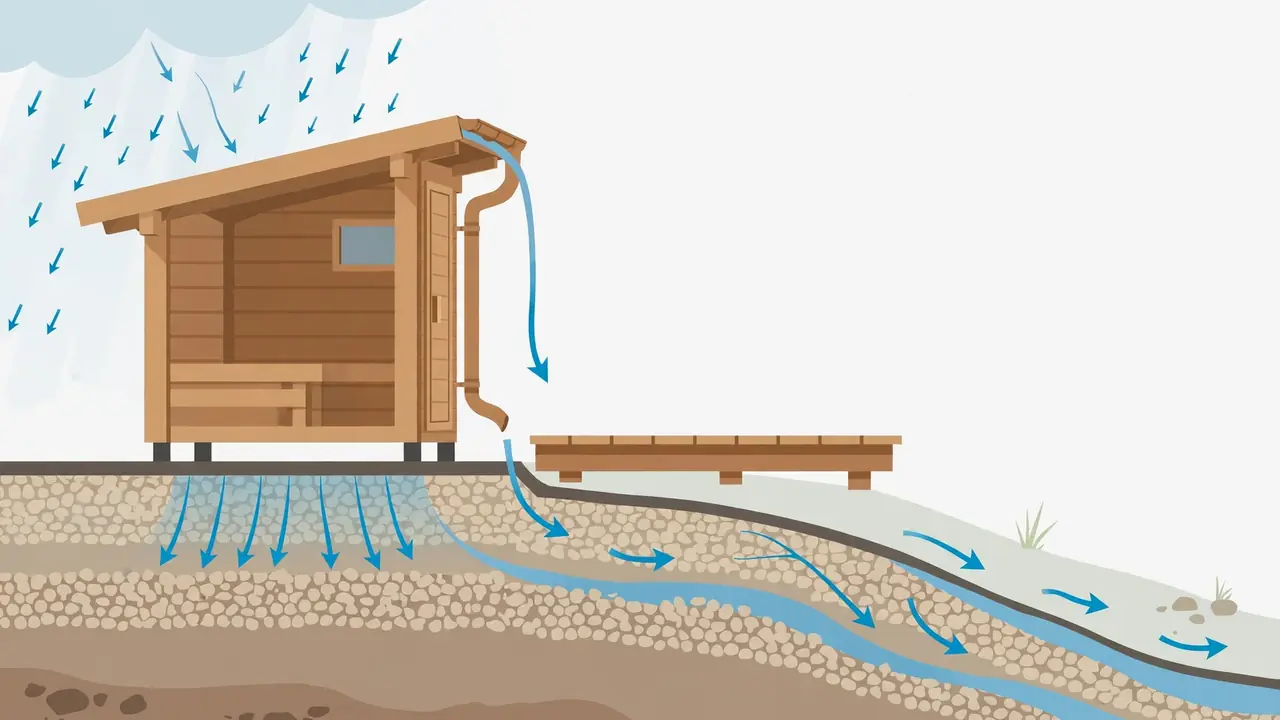
Drainage is the least glamorous part of sauna placement and the one that causes the most expensive problems when it is ignored. Timber that sits in damp ground rots. A base that stays wet grows mould, attracts insects and can shift as the ground softens. The fix is simple in principle: put the sauna on ground that is not the lowest point in the garden, and give water a clear path away from the building.
Read the Slope Before You Build
Every garden has a fall. After heavy rain, watch where the water goes. It will tell you the true slope better than your eyes can.
The ideal sauna spot sits on ground that falls gently away from the building on all sides. A spot at the bottom of a slope, or in a dip where water gathers, is the worst choice even if it looks sheltered and private.
A small amount of fall goes a long way. A gentle, even slope is usually enough to keep water moving, provided nothing blocks its path. What matters most is that water has somewhere to go: a flat pad with a fence, wall or raised bed on the downhill side can trap water just as effectively as a dip.
Drainage Options Compared
Most gardens need one or two of these measures rather than all of them. Start with the simplest: a good spot and a slight fall. Add the rest only where the ground or the climate demands it. A licensed drainage or landscaping professional can advise if your garden has heavy clay, a high water table or a history of flooding.
| Measure | Best for | Effort and cost band | Notes |
|---|---|---|---|
| Gentle fall away from the sauna | Every site | Low; part of ground preparation | The single most important measure; check it with a level before building |
| Gravel border around the base | Splash-back and dripping eaves | Low | Stops soil splashing onto timber and lets water soak away fast |
| Gutters and downpipes | Roofs that shed water onto one side | Low to moderate | Direct water well away from the base; keep gutters clear of leaves |
| French drain or gravel channel | Sloping ground sending water towards the sauna | Moderate; professional help advised | Intercepts water uphill and carries it around the building |
| Raised base or plinth | Low-lying or slow-draining ground | Moderate | Lifts timber clear of standing water; pair with airflow underneath |
| Permeable surrounding surface | Paved cool-down areas | Moderate | Gravel or permeable pavers shed water instead of sending it towards the sauna |
How Drainage Connects to the Foundation
Placement and foundation choices work together. A gravel pad drains freely. A concrete slab is stable and level but does not drain through, so it needs a slight slope and a prepared base.
Pavers sit in between, letting some water through their joints. A deck lifts the sauna off wet ground and lets air circulate underneath, but only if the deck itself is sound and rated for the sauna’s weight.
Do not choose a foundation until you have chosen the spot, and do not choose the spot without thinking about the foundation. A wet, low corner can sometimes be rescued with a raised deck and good drainage, but it is almost always cheaper and simpler to move the sauna to drier ground. Our comparison of the best foundations for an outdoor sauna walks through all four options in detail, including which suits heavy cabin saunas and which suits barrel saunas.
Do not forget water from the sauna itself. Splashing, bucket water and steam that condenses and runs off all end up around the base. A gravel border and a slight fall handle most of it. If your sauna has a drain or a shower nearby, plan that water route with the rainwater route, and get a licensed plumber involved if any pipework connects to a drain.
Privacy: Siting, Screening and Neighbours
A sauna is a place to relax, and relaxation is hard when you feel watched. Privacy is not only about the sauna itself. It is about the whole ritual: walking there, stepping out to cool down, and sitting outside afterwards.
If any part of that feels exposed, you will use the sauna less. Plan privacy for the full journey, not just the cabin.
Start by standing where the sauna door will be and looking outwards. Then stand where other people will be, on the patio, at upstairs windows, on a raised deck next door, and look back. The second view is the one that matters. A spot that feels private from inside the sauna can be completely open from a neighbour’s first-floor window.
Siting First, Screening Second
The cheapest privacy is free. It comes from putting the sauna where existing fences, hedges, the house and the lie of the land already block the view. A corner behind a garage, a spot tucked behind a mature hedge, or a position where the house itself blocks the neighbours’ line of sight can need no extra screening at all. Always look for the naturally private spot before designing screens.
Angle matters too. Turning a sauna by 90 degrees can be the difference between a door that opens onto a neighbour’s patio and a door that opens onto your own garden. The same applies to windows and glass fronts.
Face glazing towards your own garden, a hedge or a view you enjoy, not towards the nearest overlooking window.
Screening Options Compared
- Planting: hedges, bamboo in containers, tall grasses and climbing plants on a trellis. Living screens look natural, soften wind and improve over time, but take a season or two to fill in. Keep them clear of the sauna walls so air can circulate.
- Fencing and trellis: instant privacy, available in many styles, and easy to combine with planting. Slatted designs let air through and feel less enclosing than solid panels. Check local rules on fence height before you build, and talk to neighbours if a taller fence affects them.
- Pergolas and side screens: a pergola over the cool-down area gives shade and enclosure without a full wall. A single side screen can block one specific sightline, such as a neighbour’s upstairs window.
- Outdoor curtains and shade sails: flexible and removable, useful for a seating area, though no substitute for real screening on a windy site.
Whatever screen you choose, leave a gap between it and the sauna. Timber needs air moving around it to dry after rain and steam. A hedge pressed against the wall traps moisture, drops leaves into the gap and makes the wall hard to inspect. A gap of even half a metre makes maintenance easier and keeps the timber drier.
Glass Fronts: Lovely Views, Real Trade-Offs
A glass-fronted sauna with a garden view is one of the most appealing designs available. It is also the design where privacy, heat loss and glare collide most directly. A large glass panel facing the wrong way can turn a relaxing session into a fishbowl, lose heat on a windy evening, and flood the cabin with low sun at exactly the wrong time of day.
The fix is the same as for the sauna as a whole: face the glass towards your own garden and away from overlooking windows. A hedge, fence panel or planted bed in front of a glass wall gives privacy while keeping a green view. Frosted or tinted sections and blinds can help, but they are second best to good orientation. Our guide to outdoor sauna doors, glass fronts, heat loss and privacy covers glass types, safety glass and heat-loss trade-offs in full.
Be a good neighbour about it too. If your sauna looks directly into a neighbour’s garden or windows, that is a problem even if no rule forbids it. A short, friendly conversation before you build can prevent years of awkwardness. In many cases the neighbour will point out a sightline you had not noticed, and the fix is a small shift in position.
Putting the Layout Together: Paths, Power, Water and Rules
Once sun, wind, drainage and privacy point to a spot, the practical details decide whether the layout actually works day to day. A sauna that is beautiful but awkward to reach, cold to walk to in winter, or expensive to connect will slowly fall out of use. Plan the supporting layout with the same care as the spot itself.
The Path From the House
Keep the walk short, level and dry. You will make it barefoot, in a towel, in the dark, in winter. A paved or gravel path with a light at each end is a small cost that transforms how often the sauna gets used.
Avoid steps where you can, and avoid a path that crosses the wettest part of the garden. If the sauna sits far from the house, ask yourself whether you will walk there on a cold February evening. If the answer is no, move it closer.
Changing and Cool-Down Space
Most sauna sessions need somewhere to change, somewhere to sit and cool down, and somewhere to put a towel, a water bottle and a bucket. That space can be a small deck, a paved area beside the sauna, a pergola or a simple bench under a roof overhang. Whatever you choose, it needs the same privacy and drainage thinking as the sauna itself. A cool-down chair facing the neighbours is no better than a sauna door facing them.
Allow enough room. As a planning example, a deck or paved area roughly the same footprint as the sauna gives two people room to sit, stand and move without crowding. Treat that as a starting point, not a rule: your sauna size and how many people use it will shape the real figure.
Power and Water Routes
Electric saunas need a power supply, and the cable route matters. A short, direct run from the house is cheaper, simpler and easier to make safe than a long run across the garden. The same applies to water for a tap, shower or plunge point nearby: long pipe runs cost more, are more likely to freeze in winter, and are harder to drain down.
All electrical work should be done by a licensed electrician, and any outdoor supply should be properly protected and installed to local code. Never run a sauna from an extension lead or a temporary outdoor cable. If your sauna will be used in winter, read our guide to outdoor saunas in winter, including heating and snow tips, before finalising the power and access plan.
Setbacks, Permits and Neighbours
Many areas have rules about how close a garden building can sit to a boundary, how tall it can be, and whether it needs a permit. These rules vary widely, and a sauna that is fine in one town can need permission in the next. Check with your local permit and planning office before you build, and check any homeowners’ association or covenant rules that apply to your property. Our guide to whether you need a permit for an outdoor sauna explains the questions to ask and the documents that are usually involved.
Three Worked Layout Examples
Every garden is different, but most fall into one of three patterns. Use these examples as starting points, then adjust for your own sun, wind and neighbours.
| Garden type | Sun and wind approach | Drainage approach | Privacy approach |
|---|---|---|---|
| Small garden, about 8 by 10 metres | Compact sauna close to the house on the sheltered side; morning-sun orientation; hedge or slatted screen on the windy side | Gravel pad or pavers with a slight fall away from the house; gravel border to catch splash-back | Door and glazing face into the garden, not the neighbours; one trellis screen for the cool-down seat |
| Large garden, about 20 by 30 metres | Sauna in a sunny, sheltered corner with a deciduous tree for summer shade; windbreak hedge on the prevailing-wind side | High ground with a fall away on all sides; gutters draining to a soakaway clear of the base | Distance plus planting does most of the work; a pergola over the cool-down deck for enclosure |
| Sloping garden | Sauna on a levelled terrace part-way up the slope, sheltered by the rise; avoid the exposed ridge and the damp hollow at the bottom | French drain or gravel channel uphill to intercept run-off; raised base so the floor stays clear of ground water | Terrace planting and a side screen block the view from below; check the view from houses higher up the slope |
Small gardens deserve a special mention. When space is tight, every decision counts double, and a sauna that is too big for its spot can dominate the whole garden. If your garden is small, read our guide to outdoor saunas for small gardens before you settle on a size. A compact sauna in the right corner beats a large one squeezed into the wrong one.
Insulation is part of the same picture. A well-insulated sauna holds its heat on a windy evening and recovers faster between sessions, which makes a slightly exposed spot more forgiving. Our guide to outdoor sauna insulation, foil, rockwool and vapour barriers explains how insulation interacts with placement.
Common Placement Mistakes to Avoid
- Choosing the lowest, dampest corner because it is out of sight. It hides the sauna and collects every drop of water in the garden.
- Facing the door or glass at the neighbours. Check the view from their windows, not just from your patio.
- Ignoring the prevailing wind. A sauna on the windy side of the garden loses heat, and wood smoke drifts into seating areas.
- Building tight against a fence or hedge. Timber needs air to dry, and you need room to maintain the walls.
- Forgetting the path. A sauna at the far end of a dark, muddy garden gets used far less than one a few steps from the back door.
- Skipping the permit check. Setback and height rules can force a move after the sauna is built. Check first.
A Short Safety Note Before Your First Session
Placement is about the building, but a quick safety reminder belongs in any sauna guide. Keep sessions short and drink water before and after. Step out if you feel dizzy, unwell or overheated. Do not drink alcohol before or during a sauna session.
If you are pregnant, live with a heart or circulation condition, have low blood pressure, or take medication that affects heat tolerance, check with your doctor before using a sauna.
For wood-fired saunas, never leave the stove unattended, keep combustible material clear of the heater, and follow the manufacturer’s clearance and ventilation instructions exactly. For electric saunas, use only a licensed electrician for installation and repairs.
Frequently Asked Questions
Which direction should an outdoor sauna face?
There is no single best direction. In the Northern Hemisphere a south or south-east facing front catches the most sun, while in the Southern Hemisphere a north or north-east facing front does the same. For most evening users, an east-facing sauna that catches morning sun and avoids the hottest afternoon sun is a good default.
How far should an outdoor sauna be from the house?
Close enough that the walk is short, level and lit, and the power and water runs stay simple. Many owners place the sauna a few steps from the back door. Check local setback and fire-safety rules with your permit office, and always follow the manufacturer’s clearance instructions.
What is the best drainage for an outdoor sauna?
A spot that is not the lowest point in the garden, with a gentle fall away from the sauna, a gravel border around the base, and gutters that carry roof water well clear of the timber. On sloping or slow-draining ground, a French drain uphill or a raised base may also be needed.
How can I make my outdoor sauna more private?
Start by siting the sauna where fences, hedges and the house already block the view, and face the door and any glass away from overlooking windows. Then add screening where it is still needed, such as a hedge, a slatted fence, a trellis with climbers or a pergola over the cool-down area.
Can I put an outdoor sauna under a tree?
Dappled shade from a tree at a sensible distance is helpful in summer, but avoid building directly underneath one. Falling branches can damage the roof, and leaves can block gutters and send water down the walls. Keep the tree far enough back that the roof stays clear and the walls can dry.
Final Checklist: Before You Commit to a Spot
- You have watched the sun, wind and water in the spot at different times of day.
- The ground falls gently away from the sauna and is not the lowest point in the garden.
- The door, windows and cool-down area are private from neighbours’ windows and gardens.
- The path from the house is short, level, dry and lit.
- The power and water routes are short and practical, with licensed professionals booked for the work.
- You have checked setback, height and permit rules with your local office.
- There is room to maintain the walls, clear the gutters and store firewood safely away from the stove.
Work through that list for each candidate spot and the winner will usually stand out. A spot that scores well on sun, wind, drainage and privacy, with a short path and a simple power run, is a spot you will enjoy for years.