
A changing room and a cold shower turn a backyard sauna from a simple hot room into a complete routine. You step out of the heat, cool down under cold water, dry off, and get dressed without tracking water through the house or standing barefoot on a cold lawn. The setup does not need to be large or expensive, but it does need a sensible layout and a plumbing plan that handles water safely.
This guide covers the layout and plumbing basics for an outdoor sauna changing room and cold shower setup. You will find three layout options, the plumbing path from supply to drain, drainage choices, material picks, and a simple build order. Where the work touches water supply, drains, or electrics, the guidance stays general and points you to local rules and licensed trades.
Please note: This article gives general guidance only. It is not a substitute for local building codes or a licensed professional. Check with your local permit and code office before building, and use licensed plumbers and electricians for installation work.


#Paid Links
Why a Changing Room and Cold Shower Belong Together
A sauna session has three parts, and most people plan only the first one. The heat is the part everyone thinks about, yet the cool down and the change back into dry clothes matter just as much. Without a place to do those two things, the routine falls apart. You end up dripping through the garden, hunting for a towel, or rushing back inside while still wet.
A changing room solves the practical half of the problem. It gives you a dry, private spot to hang clothes, store towels, and sit for a few minutes between rounds. A cold shower solves the other half.
It cools you down quickly after the heat, and it keeps the water outside where it belongs. Together, they keep the sauna area tidy and the house dry.
The pairing also protects the sauna itself. When bathers cool down and dry off outside the hot room, less moisture and fewer wet footprints end up inside the sauna. That helps the wood dry between sessions and reduces the damp that leads to mould. If you want a deeper look at how moisture affects an outdoor sauna, read our guide to rain, humidity, roofing and mould prevention.
What to Decide Before You Build
Good changing rooms are planned before the first board is cut. Three decisions shape everything else: how much space you can give the room, where it sits relative to the sauna and the house, and how the water gets in and out. Answering these early saves rework later, because moving a drain or a door after the floor is down is far harder than moving it on paper.
How much space do you actually need?
A changing room does not need to be big. One person can change comfortably in a space roughly the size of a small wardrobe, but two people need room to pass each other without bumping elbows. A bench, a row of hooks, and a small shelf are the essentials. Anything beyond that is comfort, not necessity.


#Paid Links
Think about how you will use the room in real life. Will two people use the sauna together most evenings? Do you need space for robes and a laundry basket?
Will children or older relatives use it too? A room that feels fine when you stand alone in it can feel cramped when two wet people are trying to dry off at the same time.
Where should the room sit?
The best spot is directly beside the sauna hot room, with the cold shower a few steps away. Short walks matter more than they seem. After a hot session, nobody wants a long trek across a cold yard in bare feet, and in winter that walk can be genuinely unpleasant. Keeping the three zones close together also keeps the plumbing runs short, which makes the work simpler and cheaper.
Privacy is the second factor. A changing room needs a door that closes and walls that block the view from neighbours and passers by. A fence, a hedge, or the sauna building itself can provide that screening. For a full look at siting, sunlight, wind, and privacy, see our outdoor sauna placement guide.
How will water get in and out?
Every cold shower needs two things: a supply of cold water and a place for the used water to go. The supply usually comes from the house cold water line, run underground to the shower. The drain can go to a soakaway, a French drain, or the house sewer, depending on local rules and the amount of water involved. This is the part of the project where local code matters most, so settle it before you build.
Ask your local permit office early whether the shower counts as plumbing work that needs approval. In some areas, a simple outdoor shower with a garden hose supply needs nothing at all. In others, any fixed connection to the house water supply needs a permit and a licensed plumber. A short call now is cheaper than a rebuild later.
Changing Room Layout Options
Most outdoor sauna changing rooms fall into one of three layouts. The right choice depends on your budget, the space available, and whether the shower sits inside the building or outside it. None of them is objectively best. Each trades space, cost, and convenience in a different way.
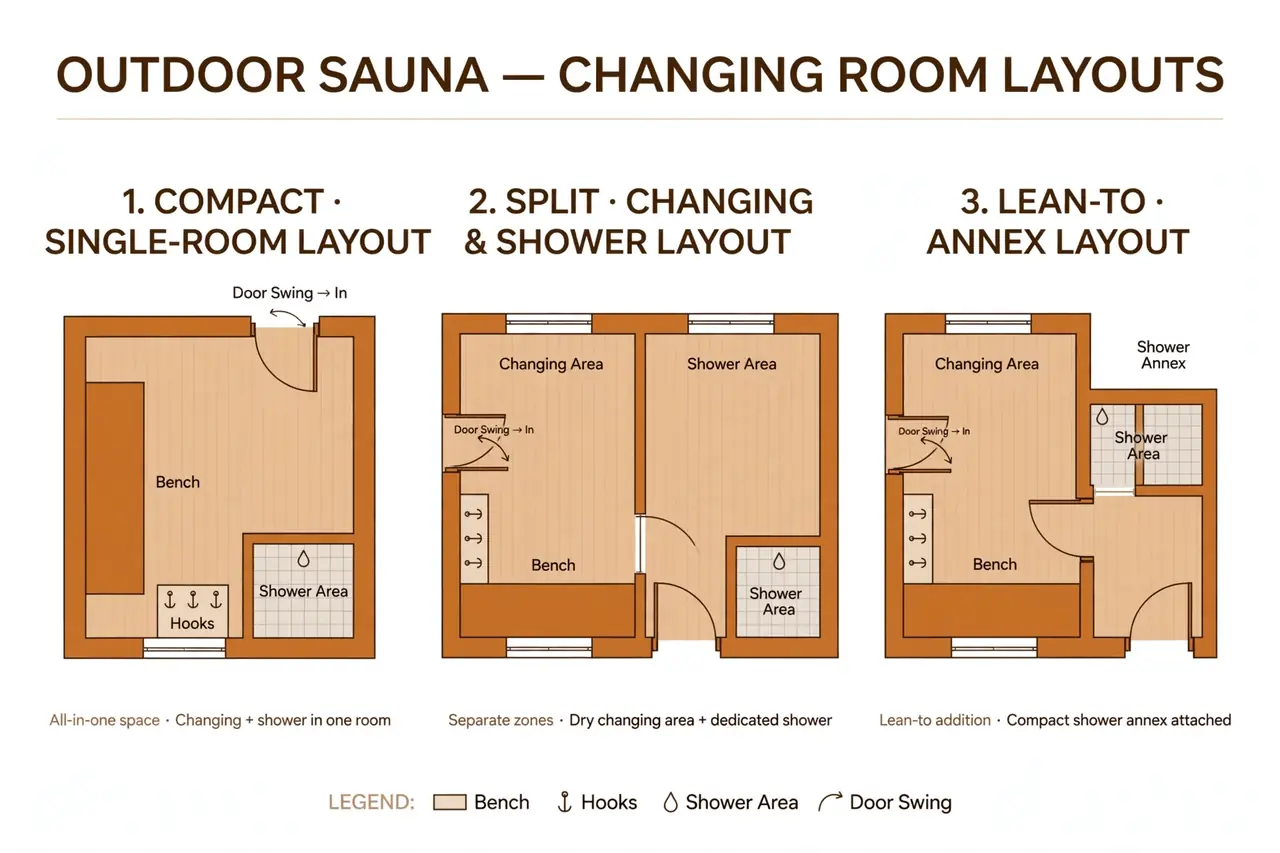
The compact single room
In this layout, the changing room is one small room attached to the hot room, often sharing a wall. A bench runs along one side, hooks line the other, and the cold shower sits just outside the door. It is the simplest and cheapest option, and it suits small yards and smaller budgets. The trade off is that wet and dry activities share one space, so towels and clothes can get damp if the room is used heavily.
The split changing and shower layout
Here the building is divided into two zones. The dry changing area holds the bench, hooks, and storage, while a separate wet area holds the shower and a floor drain. A small step or threshold keeps water out of the dry side.
This layout costs more and needs more floor area, but it stays cleaner and drier. It is the best choice if two or more people will use the sauna regularly.
The lean-to annex
A lean-to annex is a simple roofed addition built against the side of an existing sauna. It works well when the sauna is already standing and you want to add a changing area without rebuilding. The annex can be open on one side for summer use, or fully enclosed with a door for year round use. It is often the cheapest way to add space, because one wall already exists.
Whichever layout you choose, keep the door swing clear. A door that opens onto the bench or blocks the path to the shower will annoy you every single session. Sketch the layout on paper first, mark the door swing, and walk through it in your mind before you commit.
| Layout | Typical floor area | Best for | Watch out for |
|---|---|---|---|
| Compact single room | About 1.5 to 2.5 square metres | One or two users, small yards, tight budgets | Towels and clothes can get damp |
| Split changing and shower | About 3 to 5 square metres | Families, frequent use, keeping the dry side dry | Needs a floor drain and a threshold step |
| Lean-to annex | About 2 to 4 square metres | Adding a changing area to an existing sauna | Roof junction must be sealed against rain |
The floor areas in the table are planning guides, not rules. Your local code, the size of your sauna, and the number of regular users matter more than any single number. If in doubt, build slightly larger than you think you need.
A changing room that is a little too big is a minor waste of space. One that is a little too small is a daily frustration.
Cold Shower Placement: Inside, Outside, or Attached
Where the cold shower goes affects the plumbing, the drainage, and the feel of the routine. There are three common positions, and each suits a different climate and budget. Think about your winters first. A shower that is lovely in July can be unusable in January if it is fully exposed to wind and frost.
- Outdoor open shower. A shower head on a post or wall, standing on a slatted deck. Simple, cheap, and easy to drain. Best in mild climates or for summer only use.
- Covered shower. The same shower under a small roof or pergola. It keeps rain off and gives some shelter from wind. A good middle ground for most yards.
- Indoor shower. A shower inside the changing room building, with a tiled or waterproof floor and a proper drain. The most comfortable in cold weather and the most expensive to build.
For many owners, a covered outdoor shower is the sweet spot. It costs far less than an indoor shower room, yet it stays usable in light rain and cool weather. If you live somewhere with hard winters, plan for the shower to be drained and shut off in the cold months, or build it indoors from the start.
Place the shower where the water can drain away from the sauna foundation. Water pooling against the building is a slow way to damage timber and invite damp. A slight slope in the ground, away from the walls, solves most of this. Our guide to the best foundation for an outdoor sauna explains how ground preparation and drainage protect the structure.
Cold Shower Plumbing Basics
Plumbing a cold shower is straightforward in principle, but the details matter. The water must arrive clean and cold, the pipes must not freeze, and the used water must go somewhere legal and sensible. The diagram below shows the full path, from the house supply to the drain.

The cold water supply
The supply usually branches off the cold water line inside the house and runs underground to the shower. A licensed plumber should make the connection to the house system, because a badly joined pipe can leak inside a wall for months before anyone notices. The outdoor run should be buried below the local frost depth, or insulated and drained for winter if shallow burial is the only option.
Fit an accessible shut-off valve where the supply leaves the house, and a second one near the shower if the run is long. Shut-off valves let you isolate the outdoor shower for repairs or for the winter without turning off the water to the whole house. A drain point at the lowest part of the run lets you empty the pipe before frost arrives.
Choosing the shower hardware
Outdoor shower hardware should be built for the weather. Brass and stainless steel fittings resist corrosion far better than cheap plated parts, and a simple single lever mixer is easier to use with wet hands than a pair of small taps. A rainfall head gives a gentle, even flow that suits a cold plunge style cool down. A handheld head on a hose is more practical if you want to rinse your feet or fill a bucket.
Keep the controls simple. A cold only shower needs one control and no hot water at all, which keeps the plumbing simpler and the cost down. If you think you might want warm water later, say so to your plumber at the start. Adding a hot feed after the walls are finished costs far more than running the extra pipe while the work is open.
Freeze protection
Frozen pipes are the most common plumbing failure in outdoor showers, and they are entirely preventable. The three defences are depth, insulation, and draining. Bury the supply pipe below the frost line where possible, insulate any exposed pipe, and drain the line before the first hard frost. A frost proof tap, designed to shut off inside the warm part of the building, is a worthwhile upgrade in cold climates.
Do not rely on a trickle of running water to stop freezing. It wastes water, it is not reliable in a hard freeze, and it can still leave the pipe damaged. The safe routine is to shut off the supply, open the shower valve, and let the line drain.
If you are unsure about the frost depth or the right fittings for your area, ask a local plumber. They will know what survives your winters.
Backflow and water safety
Any outdoor water connection needs backflow protection so that water from the shower or garden cannot flow back into the house drinking water supply. The exact device depends on local code, and a licensed plumber will know what your area requires. Never connect an outdoor shower to the house supply without this protection in place. It is a small fitting with a big job.
Drainage and Runoff: Getting the Water Away
A cold shower uses a surprising amount of water. Even a short rinse sends several litres onto the ground, and a family using the sauna several times a week can send hundreds of litres into the same small patch of garden. Without a drainage plan, that water pools, turns the ground to mud, and seeps toward the sauna foundation. Plan the drain as carefully as the supply.

| Drainage option | How it works | Cost and effort | Best for |
|---|---|---|---|
| Gravel soakaway | Water drains through gravel into the soil below | Low cost, simple to build | Light use on free draining soil |
| French drain | A gravel filled trench with a perforated pipe carries water away | Moderate cost, a day of digging | Moving water away from the building on flat ground |
| House sewer connection | Wastewater runs through a trapped drain into the house sewer | Highest cost, licensed plumber required | Heavy use, clay soil, or strict local rules |
The slatted shower deck
A slatted deck under the shower is the simplest drainage surface. Water falls through the gaps and into gravel below, while your feet stay on dry wood. Build the deck with small gaps between the boards, and set it on a slight slope so water runs off rather than sitting under the boards. Cedar and other naturally durable timbers suit this job, and the deck should be easy to lift or clean so leaves and dirt do not block the gaps.
When a soakaway is not enough
A soakaway works well on sandy or gravelly soil that drains freely. On heavy clay, the water has nowhere to go, and the soakaway fills up and overflows. If your garden holds puddles after rain, assume the soil drains slowly and plan for a French drain or a sewer connection instead.
A simple test helps: dig a small hole, fill it with water, and see how fast the level drops. Slow drainage means you need a bigger solution.
Check local rules before choosing. Some areas allow shower water to soak into the ground, while others require it to go to the sewer. The rules often depend on whether soap or shampoo is used, so keep the outdoor shower for rinsing only if a soakaway is your plan. Our guide to outdoor sauna flooring, decking, stone and drainage covers floor surfaces and water handling in more detail.
Materials That Handle Water and Steam
A changing room lives in a damp world. Wet feet, wet towels, steam drifting out of the hot room, and cold shower spray all add moisture. Materials that would be fine in a dry shed can rot, swell, or grow mould here. Choose surfaces that dry quickly and tolerate regular wetting.
Flooring
The floor takes the most water, so it deserves the most thought. Slatted wood decking lets water drain through and feels warm underfoot. Stone or tile with a drain is harder wearing and easier to hose down, but it feels cold in winter. Whatever you choose, give the floor a slight fall toward a drain or toward the outside edge, so water never stands in puddles.
Avoid carpet, untreated chipboard, and any flooring that traps moisture underneath. A duckboard, a removable slatted mat, adds comfort and can be lifted out for cleaning. In the dry changing area, a simple wooden floor is usually enough, provided the wet zone is kept separate or the floor can dry between sessions.
Walls and benches
Cedar is the classic choice for sauna changing rooms because it resists moisture and smells pleasant, but it is not the only option. Any timber that is rated for damp conditions will work, provided it is fixed with a small gap behind it so air can circulate. Painted or sealed surfaces in the wet zone are easier to wipe down than bare wood, though they need recoating every year or two.
Keep the bench simple: a flat wooden seat at a comfortable sitting height, with space underneath for shoes or a basket. Wall hooks should be rust proof, and a small shelf near the door keeps glasses, phones, and keys dry. Avoid fabric covered furniture and anything with hidden cavities where damp can sit unnoticed.
What to avoid
- Untreated softwood in the wet zone, which rots quickly when it stays damp.
- Flat floors with no fall, which leave standing water after every shower.
- Sealed wall cavities with no airflow, which hide mould until it is a real problem.
- Ordinary steel hooks and fittings, which rust and stain the timber.
Ventilation and Drying Between Sessions
A changing room that never dries out will smell damp and grow mould, no matter how good the materials are. Ventilation is what keeps it fresh. The simplest setup is a low vent on one wall and a high vent on the opposite wall, so air flows through the room. An opening window does the same job and adds light.
Leave the door open after a session when the weather allows. Air moving through the room dries the bench, the floor, and the towels far faster than still air. In winter, a short burst of ventilation after use is better than leaving the room open all day. For the hot room itself, the principles are the same, and our outdoor sauna ventilation guide explains air inlets, outlets, and drying routines in detail.
Hang towels where air can reach both sides, and never leave a wet towel in a closed pile on the bench. A towel rail or a second row of hooks costs little and makes a real difference. If the room still smells musty after a day of airing, look for a hidden damp spot: under the bench, behind a board, or at the floor edge where water collects.
Electrical and Lighting Basics
A changing room needs light, and many owners also want a small heater, a fan, or a socket for a hair dryer. Electricity and water are a dangerous combination outdoors, so this is not a job for guesswork. Use a licensed electrician for all wiring, and ask for fittings rated for damp or outdoor use.
Keep sockets away from the shower spray zone and fit them with residual current protection, as your local code requires. A simple wall light above the door and a small light inside the room is enough for most changing rooms. Warm white light feels more relaxing than harsh white light after a sauna session. Our outdoor sauna electrical hookup guide covers supply, safety devices, and when to call a professional.
A Simple Build Order
Building in the right order saves time and avoids rework. The sequence below works for most changing room and cold shower projects, whether you are adding to an existing sauna or building the whole structure at once. Check each step with your local code office and your trades before you start.
- Confirm the rules. Check permits, drainage rules, and water connection requirements with your local office.
- Mark out the layout. Peg the footprint, check the door swing, and confirm the path from sauna to shower to changing room.
- Prepare the ground. Level the base, set the foundation, and create the fall for drainage away from the building.
- Run the underground services. Lay the water supply pipe and the drain or soakaway before the floor goes down.
- Build the structure. Frame the walls and roof, fit the door, and seal the roof junction against rain.
- Fit the plumbing and electrics. Use licensed trades for the house water connection, backflow protection, and all wiring.
- Finish the wet zone. Lay the slatted deck or tiled floor, fit the shower head and controls, and test the drain with a bucket of water.
- Fit out the dry zone. Add the bench, hooks, shelf, and lighting, then test the whole routine end to end.
Test the drain before you finish the floor. Pour several buckets of water through the shower and watch where it goes. If it pools or runs toward the sauna, fix the fall now. A drain test takes ten minutes at this stage and a full rebuild later.
Using the Cold Shower Safely
Cold showers after a sauna are a wellness habit, not a treatment. Many people enjoy the feeling of cooling down quickly, and contrast between hot and cold is a traditional part of sauna culture. It is not a cure for any condition, and it is not a way to detox the body. Keep expectations modest and listen to your body.
Not medical advice: Cold showers are not for everyone. Check with a doctor first if you are pregnant, live with a heart or circulation condition, have low blood pressure, or take medication that affects heat tolerance. Start with short cool rinses, breathe normally, and get out straight away if you feel dizzy, unwell, or short of breath.
A sensible routine is simple. Leave the hot room, sit or stand for a minute to let your breathing settle, then step under the cold shower for a short rinse. Start with your arms and legs before letting the water hit your chest and head. Keep the first cold showers brief, and build up slowly over weeks rather than forcing a long cold soak on day one.
Hydrate before and after the session, and never use the sauna or the cold shower after drinking alcohol. Children and older users should use shorter sessions and cooler water only with care, and they should never be left unsupervised around water. If you want to combine sauna and cold water more fully, our guide to backyard contrast therapy with an outdoor sauna and cold plunge covers the routine in more depth.
Common Mistakes to Avoid
Most changing room problems are predictable, and most come from rushing the planning stage. The list below covers the mistakes we see most often. Avoiding even half of them will make the finished room far more pleasant to use.
- Building the room too small, then having nowhere to put a second towel or a dry robe.
- Putting the shower where its runoff flows toward the sauna foundation.
- Skipping the shut-off valve and drain point, then facing frozen pipes in the first winter.
- Using indoor grade fittings outdoors, which rust and leak within a year.
- Forgetting ventilation, so the room stays damp and smells musty between sessions.
- Placing the light switch or socket within reach of shower spray.
- Building without checking local drainage rules, then having to redo the soakaway.
Keeping the Setup in Good Shape
A changing room and cold shower need only a little routine care. After each session, hang towels to dry and leave the door open briefly to air the room. Once a week, sweep the deck, check the drain gaps for leaves, and wipe down the bench. Once a season, check the shower fittings for leaks and look at the roof junction and wall bases for damp.
Before winter, shut off the outdoor supply, open the shower valve, and drain the line completely. Store the handheld shower head indoors if it detaches, and check that the frost proof tap is working. In spring, turn the supply back on slowly and check every joint for drips before the first full session. A seasonal routine like this keeps the whole setup reliable for years, and our outdoor sauna maintenance calendar gives a month by month checklist for the sauna itself.
Frequently Asked Questions
How big should an outdoor sauna changing room be?
A compact changing room of about 1.5 to 2.5 square metres suits one or two people, with a bench, hooks, and a shelf. A split layout with a separate shower area needs about 3 to 5 square metres. Build slightly larger than you think you need if the space allows, because a cramped changing room is a daily frustration.
Do I need a plumber for an outdoor cold shower?
Yes, in most cases. Any fixed connection to the house water supply should be made by a licensed plumber, including the backflow protection your local code requires. A plumber can also confirm the right frost protection and drainage for your area. A simple garden hose shower needs no plumber, but it is a temporary solution rather than a proper setup.
Where should cold shower water drain?
It depends on your soil and local rules. A gravel soakaway works on free draining soil with light use, a French drain moves water further from the building, and a connection to the house sewer handles heavy use and clay soil. Check with your local code office before choosing, and keep the shower for rinsing only if the water soaks into the ground.
Can I use the cold shower in winter?
It depends on your climate and your plumbing. In mild winters, a well insulated supply and a frost proof tap can keep an outdoor shower usable. In hard winters, most owners drain the line and shut the shower off for the season. An indoor shower inside the changing room building is the only reliable option for year round cold showers in freezing climates.
How long should a cold shower after a sauna last?
Keep it short, especially at first. A brief rinse of well under a minute is enough to cool down, and you can build up slowly over weeks. Start with your arms and legs before the water hits your chest. Get out straight away if you feel dizzy, unwell, or short of breath, and check with a doctor first if you are pregnant or live with a heart or circulation condition.