
Last updated: November 12, 2026. A home gym and an infrared sauna sound like a perfect pair. You train, you step into the heat, and you cool down without leaving the room.
The pairing works well, but only when the room is planned for both jobs at once. A gym is already a warm, busy space full of metal, rubber, and electronics. Add a heater that runs for 30 minutes at a time and every weak point in the room shows up fast.
This guide walks through the three decisions that matter most: where the sauna sits, how air moves through the room, and what goes under the cabin. Get those three right and the sauna becomes a natural part of your training routine instead of a source of damp smells, tripped breakers, and scratched floors.
You will learn how to measure for a cabin that actually fits, which flooring survives sweat and heat, how to keep fresh air moving in a room that already runs warm, and how to protect your weights, benches, and electronics from the extra heat and moisture. You will also find a step by step setup checklist and a short list of the mistakes gym owners make most often.


#Paid Links
Please read first, this is general guidance only. This article gives general guidance for planning a home gym sauna, not a substitute for local code or a licensed professional. Building rules, permit needs, and electrical rules vary by area, so check your local code and permit office, and use a licensed electrician for any new circuit, outlet change, or panel work. Always follow your own sauna model’s manual first, because it overrides anything general written here. This article is not medical advice. Saunas are wellness tools, not treatments. If you are pregnant, live with a heart or circulation condition or low blood pressure, or take medication that affects heat tolerance, check with a doctor before using a sauna.
Key takeaways
- Measure the room, the door, and the delivery path before you order, and leave clear space around the cabin for the door to swing open and for air to move.
- Put the sauna where it stays out of the main training walkway, away from the rack and the bench, and close enough to an outlet that no extension cord is needed.
- Concrete, tile, and vinyl plank handle sweat and heat well under a sauna, while carpet is the weakest choice and hardwood needs a protective layer.
- A gym needs fresh air in and stale air out, so plan for a vent, a fan, or an openable window, and air the room out after every session.
- Give the sauna its own dedicated circuit and plug it straight into the wall, never through an extension cord or a power strip.
- Keep electronics, screens, and bare metal away from the warmest air near the cabin, and wipe down mats and benches after sweaty sessions.
- Hydrate before and after each session, start with short sessions, and leave the sauna at once if you feel dizzy or unwell.
- Check your local code and permit office before any building or electrical work, and use a licensed electrician for circuits, outlets, and panel work.
Why a home gym is a different room for a sauna
A spare bedroom or a basement corner asks very little of a sauna. A home gym asks much more. The room already runs warm when you train, the air already carries sweat, and the floor already takes dropped weights and dragged equipment.


#Paid Links
An infrared sauna adds steady heat for the length of a session, plus warm, damp air that escapes every time the door opens. In a room full of steel plates, rubber mats, and electronic screens, that extra heat and moisture has more to damage than it would in an empty room.
The good news is that none of this is hard to manage. It just has to be planned before the cabin arrives, not discovered afterwards. A sauna that is placed well, ventilated properly, and set on the right floor will serve you for years with very little fuss.
What makes gym air different
Training raises the temperature of a room. Your body gives off heat, your breathing adds moisture to the air, and a closed door traps both. A sauna session adds another layer of warm air on top of that.
That is why gym saunas need more thought about air movement than a sauna in a quiet spare room. The room needs a way to bring fresh air in and a way to let warm, stale air out. Without it, the room stays stuffy long after the session ends, and damp air settles on equipment.


#Paid Links
The same logic applies to flooring. Gym floors take sweat, dropped bottles, and chalk dust every week. A sauna adds more sweat and more moisture in one small area, so the floor under and around the cabin has to cope with that without warping, staining, or holding a smell.
Start with the room, not the sauna
The most common setup mistake is choosing the sauna first and the room second. A cabin that looks compact online can feel huge once it is inside a gym full of equipment. Measure first, then shop.
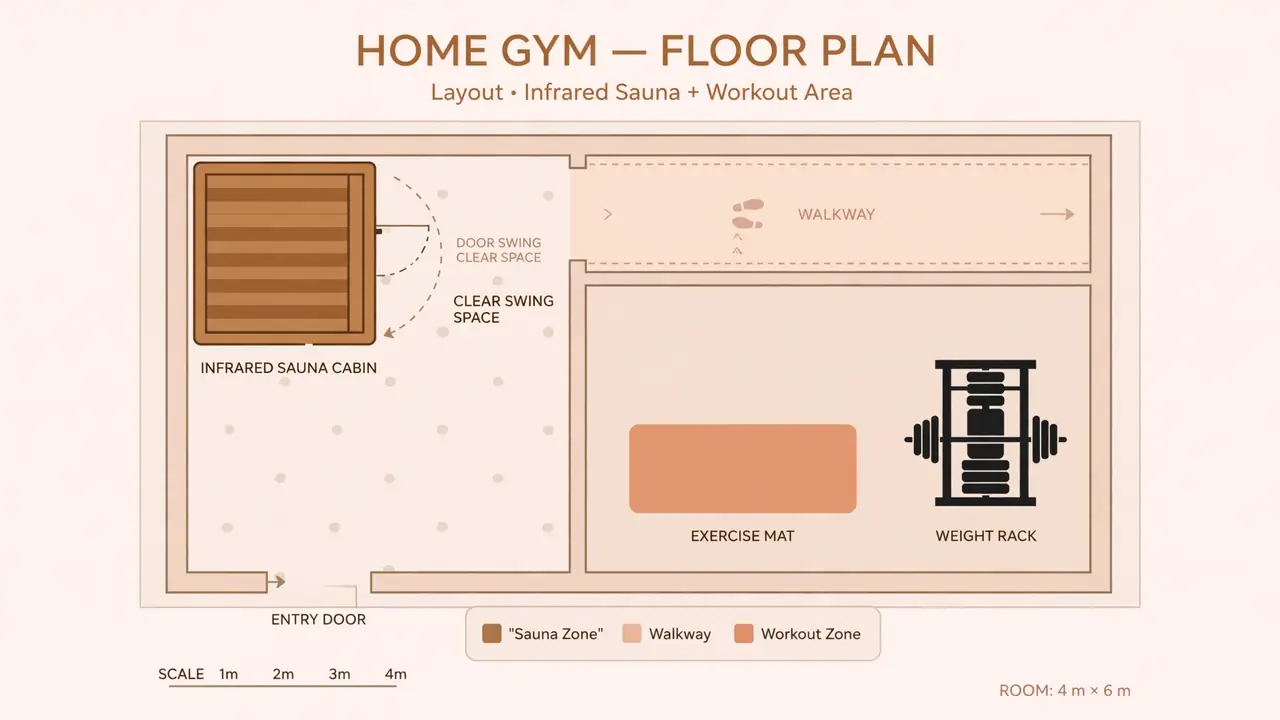
Start by drawing a simple floor plan of the room. Mark the rack, the bench, the cardio machine, and the open floor you need for lifting and stretching. Then look for the space that is left. That leftover space is your real sauna footprint, not the empty corner you imagined.
Measure the cabin, the door, and the delivery path
Measure the width, depth, and height of the cabin you plan to buy, then add the clearance your model’s manual asks for around it. Clearances vary by model, so use the manual for your exact cabin, not a number from a general guide.
Then measure the path the cabin will travel to reach the room. Doorways, hallways, stair turns, and the gym door itself all need to pass the largest flat-packed panel. Many cabins arrive in flat panels rather than one solid box, which helps, but a wide side panel can still jam in a narrow hallway.
Finally, measure the ceiling height. Infrared cabins are tall, and a low ceiling can make assembly awkward or leave no room for the heat to rise and spread. If your gym is in a basement with a low ceiling, read our guide to an infrared sauna in a basement before you buy, because headroom and moisture need extra attention there.
Leave room for the door to open
A sauna door swings out, not in. That means the space in front of the cabin must stay clear, not just on the day you build it, but every day you use it. A bench, a dumbbell rack, or a stack of plates parked in front of the door turns every session into a shuffle.
Mark the door swing on the floor with tape before the cabin arrives. Walk the route you will take from the gym floor into the sauna and back out again. If you have to step over equipment or squeeze past the rack, move the plan, not the equipment after the fact.
Keep the training walkway clear
Every gym has a natural walkway between the door, the rack, and the open floor. The sauna should sit outside that path. A cabin that blocks the walkway will be bumped, leaned on, and used as a shelf within a week.
A corner is usually the best spot, with the door facing the open floor. That keeps the cabin out of the way while leaving a clear step in and out. If the only free corner is far from an outlet, weigh the cost of a new outlet against the daily annoyance of a bad layout. A licensed electrician can advise on what is possible in your room.
Placement: where the sauna should go in your gym
Placement is a balance of four things: the door swing, the outlet, the airflow, and the training space. A spot that wins on three and fails on one will annoy you every day. Walk through all four before you commit.
Corner spots work best in most gyms
A corner gives the cabin two walls of support and keeps it out of the middle of the room. It also leaves the long wall free for the rack and the mirror. Most home gyms have one corner that is underused, often the one furthest from the door.
Check the walls in that corner before you settle on it. The cabin needs a flat, level surface and a wall that is dry and sound. A wall with a damp patch, peeling paint, or a musty smell is telling you something. Fix the damp first, or pick another corner.
Mind the clearances in your model’s manual
Every infrared sauna model has its own clearance requirements, and they are printed in the manual for a reason. The heater panels need air around them, the cabin needs room for heat to spread, and the control panel needs to be reachable.
Never push a cabin hard against a wall to save a few centimetres. Tight gaps trap warm air, make cleaning impossible, and can hide damp. Leave the space the manual asks for on every side, and keep the back of the cabin reachable for the occasional check.
Stay close to power, far from water
The best spot is near a suitable outlet, so the sauna plugs straight into the wall with its own cord. That simple fact rules out many corners in garage gyms and basement gyms, where outlets are scarce. Our guide to infrared sauna power requirements explains how to check watts, volts, and breaker size for your model.
Keep the cabin away from sinks, showers, and anywhere water pools on the floor. Sweat inside the cabin is expected and wiped down after each session. Standing water under or beside the cabin is not. If your gym shares space with a laundry area or a wet room, keep a clear dry gap between them.
A quick placement checklist
Use this table as a final check before you order. If any row fails, change the spot or fix the issue first.
| What to check | What good looks like | Why it matters |
|---|---|---|
| Door swing | Full swing clear, no equipment in the arc | You step in and out safely every session |
| Walkway | Clear path from gym door to sauna door | No tripping over plates or benches in the dark |
| Outlet | Suitable outlet within the cord length | No extension cord, no power strip |
| Clearances | Manual clearances kept on all sides | Air moves, heat spreads, cleaning is possible |
| Floor | Level, dry, and firm under the cabin | Door seals, panels sit true, no rocking |
| Walls | Dry, sound, no damp or mould smell | Warm air will not feed hidden damp |
| Delivery path | Panels fit through every doorway | The cabin actually reaches the room |
Flooring under an infrared sauna in a gym
Flooring is where a gym sauna differs most from a sauna in a spare room. The floor under the cabin takes heat, sweat, and the weight of the cabin itself, plus the daily traffic of training shoes, dropped plates, and dragged benches around it.
The right floor makes cleaning easy and hides nothing. The wrong floor traps moisture, holds smells, or warps under the heat. Choose the floor for the sauna zone first, then match the rest of the gym around it if you can.
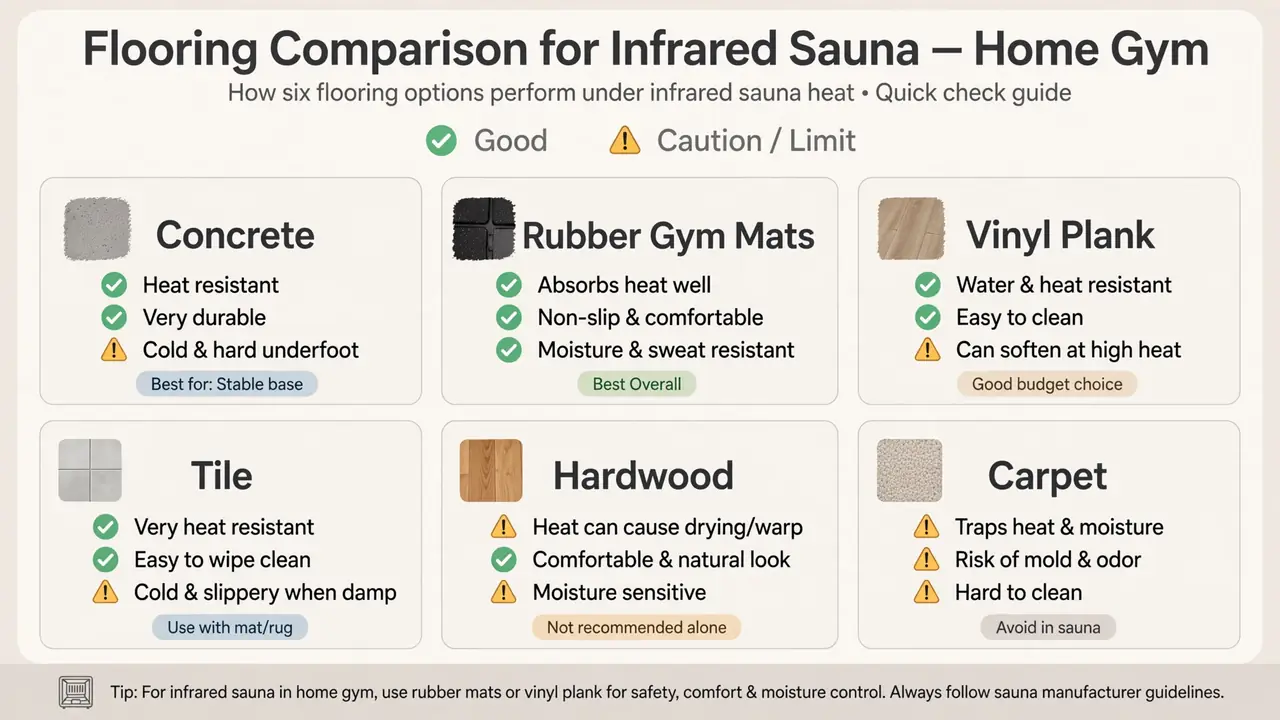
| Flooring | Sweat and moisture | Heat | Grip when damp | Verdict for a gym sauna |
|---|---|---|---|---|
| Sealed concrete | Excellent, wipes clean | Handles heat well | Can be slippery when wet | Best all round, add a mat at the door |
| Tile | Excellent, grout needs sealing | Handles heat well | Slippery when wet | Great, use a non-slip mat outside the door |
| Vinyl plank | Good, water resistant | Good for sauna heat | Good | Strong choice, check the maker heat guidance |
| Rubber gym mats | Good, easy to lift and clean | Good, made for gyms | Excellent | Great around the sauna, check fit under the cabin |
| Hardwood | Weak, moisture can stain and warp | Fair, can dry out and gap | Fair | Usable only with a protective layer under the cabin |
| Carpet | Poor, holds sweat and smell | Poor, traps warm damp air | Fair | Avoid under and around the sauna |
Concrete and tile: the easy winners
Sealed concrete is the simplest floor for a gym sauna. It is level, firm, easy to mop, and it does not mind heat or sweat. A thin rubber mat at the sauna door catches drips and gives you grip as you step out.
Tile is just as practical, with one extra job: keep the grout sealed. Sealed grout wipes clean and resists smells. Unsealed grout soaks up sweat and turns dark over time. If your gym floor is already tiled, check the grout before the cabin arrives.
Rubber mats: great around the cabin, think twice under it
Rubber gym mats are made for this room. They grip well when damp, they cushion dropped weights, and they lift up for cleaning. Around the sauna they are an excellent choice.
Under the cabin, think carefully. A thick soft mat can compress unevenly under the weight of the cabin, which can tilt the frame and stop the door sealing well. If you want mats under the cabin, use thin, firm, interlocking tiles and check your model’s manual for what the maker allows underneath. Many owners put the cabin straight on the hard floor and use mats only in front of the door.
Vinyl plank: a strong middle option
Vinyl plank is water resistant, easy to clean, and kind to bare feet. It suits a gym sauna well, provided the maker of the flooring allows the temperatures the cabin produces. Check the flooring maker’s heat guidance before you commit, and keep the cabin on the planks only if the manual for your sauna model allows it.
Hardwood and carpet: the two to avoid
Hardwood looks warm and inviting, but it is a poor partner for a sauna. Sweat and moisture can stain it and make boards warp or gap over time, and the dry heat can shrink boards. If your gym already has hardwood, put a waterproof, heat-safe protective layer under and around the cabin, and wipe up sweat at once.
Carpet is the weakest choice of all. It holds sweat, holds smells, and hides damp that you cannot see. A cabin on carpet is hard to level and hard to clean under.
It is also hard to keep fresh. If your gym is carpeted, cut the carpet out of the sauna zone and replace it with a hard floor or firm mats before the cabin arrives. Our guide to a garage or closet infrared sauna conversion covers the same floor-first thinking for tight spaces.
Level the floor before the cabin arrives
A cabin on an uneven floor rocks, gaps, and lets heat escape. Check the spot with a spirit level and fix dips or ridges before delivery day. A thin self-levelling layer or a firm shim under the frame, done to the maker’s guidance, beats a wobbling cabin every time.
While you are at it, check the floor is dry. A damp patch under a warm cabin will stay damp, and damp plus warmth is how smells start. Fix leaks and damp first. A sauna never fixes a damp floor.
Ventilation and airflow in a gym that already runs hot
Ventilation is the part of a gym sauna setup that gets skipped most often, and it is the part you notice most when it is missing. A stuffy gym after a session tells you the air had nowhere to go.
An infrared sauna does not fill the room with steam the way a steam room does, but it still warms the air and adds moisture from sweat. Every time the door opens, a puff of warm, damp air escapes into the gym. That air needs a way out, and fresh air needs a way in.
Fresh air in low, stale air out high
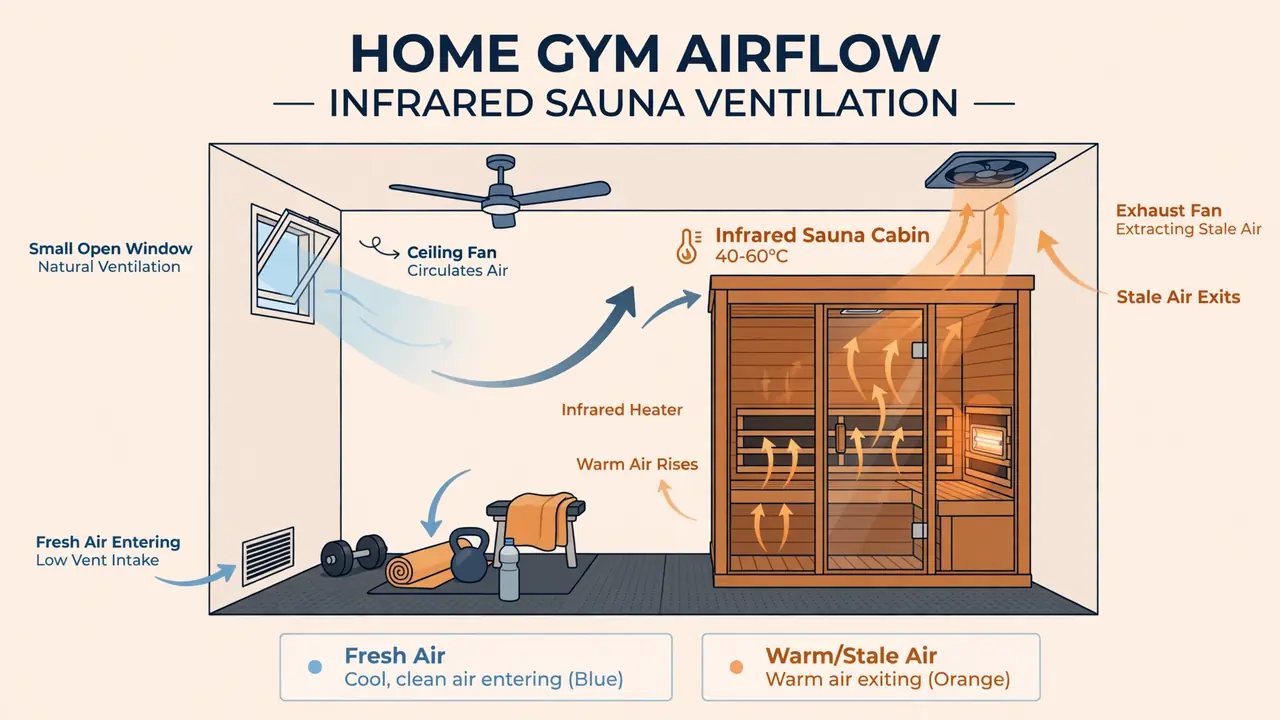
Warm air rises, so the natural path is fresh air entering low and stale air leaving high. A low vent or a gap under the gym door brings fresh air in. A high vent, an extractor fan, or an openable window near the ceiling lets warm air out.
You do not need a complex system for a small home gym. A window you can open, a ceiling fan, or a small extractor fan often does the job. What matters is that air actually moves. A room with no vent, no fan, and a door that seals tight will stay warm and stuffy long after the session ends.
Use the sauna door and the room door together
After a session, open the sauna door and the gym door or window for a while. This flushes the warm, damp air out of the cabin and out of the room in one move. It is the simplest ventilation habit you can build, and it costs nothing.
Leave the cabin door open until the inside is dry to the touch. Wipe the bench and the floor of the cabin with a clean towel first, then let the air finish the job. A cabin that is closed up while still damp will smell stale at your next session.
Watch humidity and smell, not just temperature
Temperature is easy to feel. Humidity is quieter, and it is the number that causes trouble. A room that stays damp grows smells, and damp settles on metal and fabric first.
If the room smells musty, or if mirrors and metal stay damp long after a session, the air is not moving enough. Open a window, run the fan longer, or check whether the vent is blocked by stored equipment. A small dehumidifier can help in a basement gym, but it is a helper, not a replacement for fresh air.
If your gym is in a small flat, the same rules apply in a tighter space. Read our guide to an infrared sauna in an apartment for advice on neighbours, shared walls, and keeping a small room fresh.
Do not block the vents with gym gear
Gyms collect gear, and gear ends up leaning against walls. Check that no rack, mat stack, or storage box covers the room vent, the fan, or the gap under the door. A blocked vent is the same as no vent at all.
Keep the area around the cabin clear for the same reason. Air needs to move around the cabin, not just through it. A stack of yoga mats pressed against the back panel traps warm air and hides damp.
Power in a room full of equipment
A home gym already asks a lot of its wiring. Treadmills, fans, lights, and chargers share the same circuits, and a sauna is a steady, heavy load on top of that. Power is the one part of this setup where guessing is not an option.
Give the sauna its own dedicated circuit, with nothing else sharing the breaker. That is the single most important power decision you will make. A shared circuit is how breakers trip halfway through a session, and repeated tripping is a warning worth listening to.
Plug the sauna straight into the wall outlet. Never use an extension cord or a power strip, and never plug the sauna into the same outlet as a treadmill or a heater. If the outlet is too far away, ask a licensed electrician about adding one near the cabin. The full detail, including the amps formula and the 120 volt versus 240 volt choice, is in our infrared sauna power requirements guide, and our guide to how much electricity an infrared sauna uses will help you estimate running costs.
If a breaker trips, unplug the sauna and find the cause before you reset it. If it trips again, or if you smell burning, see scorch marks, or feel heat at the outlet, stop and call a licensed electrician. Never fit a bigger breaker without matching wire, and never bypass a safety device.
Protecting your gym equipment from heat and sweat
The sauna warms the room, and warm damp air is hard on gym equipment. A little care keeps your plates, benches, and electronics in good shape for years.
Bare metal and moisture do not mix
Steel plates, barbells, and rack uprights can rust when damp air sits on them day after day. Wipe down bare metal after sweaty sessions, and keep plates off the floor near the sauna door where drips land.
Rubber-coated plates and stainless bars cope better, but they still deserve a wipe. A quick towel pass after training is faster than scrubbing rust later. Store small metal items, like clips and chains, in a dry box rather than on the floor by the cabin.
Keep screens and electronics clear of the warmest air
Keep phones, tablets, speakers, and TV screens away from the cabin and out of the path of the warm air that escapes when the door opens. Heat and moisture shorten the life of electronics, and a screen fogged with condensation is a screen you cannot use.
If you like music or a timer in the sauna, check your model’s manual first. Many makers advise against taking electronics inside the cabin at all, and a phone left on a hot bench can overheat. A small speaker outside the cabin, pointed at the door, is the safer choice.
Mats, benches, and fabric need a drying routine
Mats and bench pads soak up sweat, and a warm room slows drying. Hang mats to air after training, wipe bench pads down, and wash fabric items regularly. A mat left rolled up wet in a warm gym will smell within days.
Keep towels in the routine too. Sit on a towel inside the sauna, not on the bare bench, and use a second towel for the floor outside the door. Towels catch most of the sweat before it reaches the floor, the bench, or the wood of the cabin.
Step by step: setting up your infrared sauna home gym
Follow these steps in order. Each one depends on the one before it, and skipping ahead is how cabins end up in the wrong corner or on the wrong floor.
- Draw the room on paper, marking the rack, the bench, the cardio machine, and the open floor you need for training.
- Measure the free space, the ceiling height, and the delivery path from the front door to the gym, including every doorway and turn.
- Pick a corner spot that keeps the door swing clear, the walkway open, and the outlet within reach of the cord.
- Check the floor under the spot for level and damp, and sort the flooring before the cabin arrives.
- Check the ventilation: a vent, a fan, or a window you can open, plus a clear path for air to move around the cabin.
- Check the power: a suitable outlet on a dedicated circuit, or a licensed electrician booked to add one.
- Choose the cabin size that fits the measured space with the manual clearances kept, not the biggest cabin you can afford.
- Clear the delivery path, lay a mat at the sauna door, and set towels and a wipe-down cloth within reach.
- Assemble the cabin to the manual, level it, plug it straight into the wall, and run a short test session with the door closed to check the heat and the seal.
- Move the gym gear back in, keeping the door swing and the vents clear, then do a full training plus sauna day to test the routine in real use.
If you ever need to move the cabin later, for a room change or a house move, read our guide on how to move an infrared sauna before you take it apart. Cabins come apart panel by panel, but the heater connections and the glass door need care.
Using the sauna around your workouts
A sauna in the gym is most useful when it fits your training, not when it fights it. Timing matters. So does how you feel on the day.
Many people use the sauna after training, once the hard work is done. Others prefer a short, gentle session on rest days. Our guide to an infrared sauna before or after a workout covers the timing question in detail, including why most people find after training works best.
Session safety basics
Drink water before and after each session, and keep water within reach. Start with short sessions and build up slowly over days and weeks. Sit or lie down in the cabin, and stand up slowly when the session ends, because the heat can make you feel light-headed.
Leave the sauna at once if you feel dizzy, unwell, or too hot. Do not drink alcohol before or during a session. This is not medical advice. Saunas are wellness tools, not treatments.
If you are pregnant, live with a heart or circulation condition or low blood pressure, or take medication that affects heat tolerance, check with a doctor before using a sauna.
Listen to your body on hard training days
On a hard training day, you are already warm, tired, and low on fluids. A long sauna session on top of that can leave you drained. Keep the session short, drink more water than usual, and skip the sauna entirely if you feel unwell, feverish, or unusually exhausted.
Children and older family members need extra care around a home gym sauna. Keep the cabin locked or switched off when not in use, and never let a child use the sauna without an adult present. Pets should stay out of the gym during sessions too, because the heat and the closed cabin are not safe for them.
Mistakes that cost gym owners time and money
Most gym sauna problems come from the same short list of mistakes. All of them are easy to avoid if you know about them before delivery day.
- Buying the cabin before measuring the room, the door, and the delivery path.
- Putting the cabin on carpet, or on thick soft mats that compress and tilt the frame.
- Blocking the door swing with a bench, a rack, or a stack of plates.
- Sharing a circuit with a treadmill or a heater, then wondering why the breaker trips.
- Using an extension cord or a power strip because the outlet is too far away.
- Closing the cabin up while it is still damp, then finding a stale smell at the next session.
- Covering the room vent with stored mats, boxes, or a rack.
- Ignoring a damp wall or a musty smell in the chosen corner.
- Putting a phone or a speaker inside the cabin, where heat and moisture can damage it.
- Skipping the manual clearances to squeeze a bigger cabin into a small room.
Before you buy: a final checklist
Run through this list once more before you place the order. Every item you can tick off now is a problem you will not meet on delivery day.
- The cabin fits the measured space with the manual clearances kept on all sides.
- The door swings fully open with no equipment in the way.
- The walkway from the gym door to the sauna door is clear.
- The floor is level, dry, and suited to a sauna: concrete, tile, vinyl plank, or firm mats.
- Fresh air can enter low and stale air can leave high, through a vent, a fan, or a window.
- A suitable outlet is within reach on a dedicated circuit, or a licensed electrician is booked.
- The delivery path fits the largest panel through every doorway.
- Towels, a wipe-down cloth, and a mat for the sauna door are ready.
- You have read the manual for your exact model, including its clearances and power needs.
- You have checked your local code and permit office where any building or electrical work is needed.
A well planned infrared sauna home gym is a quiet upgrade to your training. The cabin sits in its corner, the air stays fresh, the floor stays clean, and the sauna is ready whenever you are. Plan the room first, and the sauna will take care of the rest.
If something goes wrong after setup, a heater that will not warm up, a control panel that will not respond, or a strange smell from the cabin, start with our infrared sauna troubleshooting guide. Most common faults have a simple cause, and the guide walks through them in order.
Frequently asked questions
Can I put an infrared sauna in my home gym?
Yes, an infrared sauna works well in a home gym when the room is planned for it. Measure the space first, keep the door swing and the training walkway clear, give the sauna its own dedicated circuit, and make sure fresh air can move through the room.
What is the best flooring under an infrared sauna in a gym?
Sealed concrete and tile are the best choices, because they handle heat and sweat and wipe clean easily. Vinyl plank is a strong option too, if the flooring maker allows the heat. Carpet is the worst choice, because it holds sweat and smell.
Does a home gym sauna need extra ventilation?
Yes. A gym already runs warm and damp from training, and the sauna adds more warm air. Plan for fresh air in low and stale air out high, using a vent, a fan, or an openable window, and air the room out after every session.
Can I put a sauna on rubber gym mats?
Rubber mats are excellent around the sauna, in front of the door, and across the training floor. Under the cabin, use thin, firm mats only, and check your model’s manual first, because thick soft mats can compress unevenly and tilt the frame.
Does an infrared sauna need its own circuit in a home gym?
Yes, give the sauna its own dedicated circuit with nothing else sharing the breaker. A gym already runs treadmills, fans, and lights, and a shared circuit is the most common cause of tripped breakers. Ask a licensed electrician if you need a new circuit or outlet.
Should I use the sauna before or after a workout?
Most people find after training works best, once the hard work is done. Keep sessions short, drink water before and after, and skip the sauna if you feel unwell. Check with a doctor first if you are pregnant, live with a heart or circulation condition or low blood pressure, or take medication that affects heat tolerance.