
A sauna beside the sea sounds like the perfect place to unwind. You step out of the heat, hear the waves, and feel the cool salt breeze on your skin. Yet that same breeze is quietly working against your cabin, day after day, in ways an inland sauna never faces.
Salt air carries tiny droplets of seawater onto every surface it touches. Those droplets dry, leave salt behind, and then draw moisture back in from the air. The result is timber that stays damp longer, metal that rusts faster, and coatings that wear out sooner than the maker expected.
This guide explains how salt air attacks an outdoor sauna, which woods and fixings hold up best near the coast, and how to protect the cabin, heater, and electrics with a routine you can actually keep. Everything here is general guidance, and where figures are given they are typical ranges that vary by product, region, and how close the sauna sits to the water.


#Paid Links
Please note: this article gives general guidance only. It is not a substitute for local building codes, permit rules, or a licensed professional. Check with your local permit or code office before building or changing a sauna, and use licensed electricians and builders for installation work. Saunas are wellness tools, not treatments: hydrate before and after sessions, keep sessions short to start, leave immediately if you feel dizzy or unwell, avoid alcohol before or during a session, and check with a doctor first if you are pregnant, live with a heart or circulation condition, or take medication that affects heat tolerance.
Why coastal air is harder on a sauna than inland air
Three things combine near the coast: salt, moisture, and wind. Salt on its own is not the whole story, and damp on its own is not either. Together they keep surfaces wet for longer, and wind drives that wet, salty air into joints, vents, and end grain that rain alone would never reach.
Distance from the water matters a great deal. A sauna on a cliff edge or a beachfront plot faces far more salt spray than one a few streets inland, even if both are in the same town. Height matters too: a cabin on an exposed rise catches more wind than one tucked behind a hedge or a house wall.
Season plays a part as well. Stormy autumn and winter months bring the most spray and the longest damp spells, while a hot, dry summer can bake salt into the timber surface. That is why coastal owners need a routine that changes with the seasons, not a single annual check.
Salt, moisture, and wind: the three-way attack
Salt is hygroscopic, which means it pulls water out of the air. A speck of salt left on a screw head or a bench end will stay damp long after the rain has stopped. That constant damp film is what speeds up rust on metal and softening in wood.
Moisture on its own swells timber, opens joints, and feeds mould. Salt makes the cycle worse, because each drying leaves more salt behind, and each damp spell starts from a saltier surface. Over time the timber surface can feel rough, grey, and tired even when the structure underneath is still sound.


#Paid Links
Wind is the delivery system. It pushes spray sideways under eaves, through vents, and into the gap behind cladding. A cabin that looks sheltered from above can still take a battering from the side, which is why the windward wall usually shows wear first.
How close is too close to the sea?
There is no single safe distance, because exposure depends on wind direction, height, and what stands between the sauna and the water. A cabin facing the sea across open ground will face more spray than one shielded by a dune, a fence, or another building.
As a rough guide, owners within sight of breaking waves should plan on the most protective routine in this article: the best fixings, the most frequent oiling, and the closest inspections. Owners a few hundred metres back, with shelter in between, can usually follow a lighter version of the same routine.
If you are still choosing a spot, read our guide to outdoor sauna placement: sun, wind, drainage and privacy before you commit. Siting is the cheapest protection you will ever buy, and it is far harder to fix after the cabin is built.
How salt air attacks wood, metal, heaters, and electrics
Salt air does not damage everything in the same way. Timber weathers and softens, metal rusts and weakens, and electrical parts corrode in places you cannot see. Knowing which part fails first helps you spend your maintenance time where it counts.
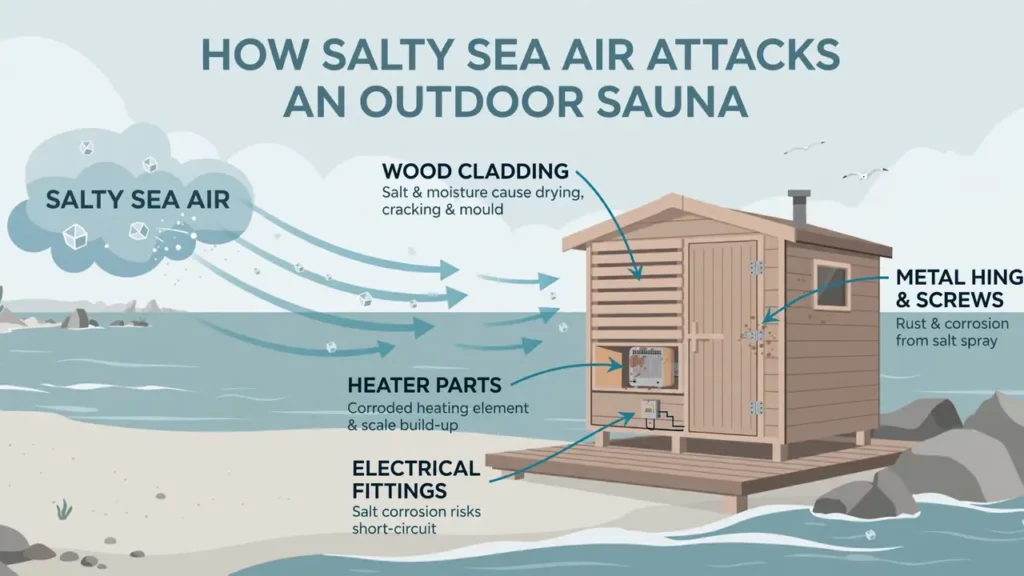
What salt does to sauna timber
Outdoor cladding takes the first hit. Salt and sun bleach the surface grey, raise the grain, and open small cracks that let water deeper into the boards. The inside of the hot room is protected by heat and by regular drying, so it usually weathers far more slowly than the outside.
End grain is the weak point. The cut ends of boards, bench ends, and door bottoms soak up water like a wick, and salt concentrates there as the water dries. Those spots are the first to feel soft or rough, and they deserve extra oil and extra attention at inspection time.
Joints suffer next. As boards swell and shrink through damp and dry cycles, gaps open around fixings and the timber moves against the screws. A joint that was tight in summer can be loose by winter, and loose joints let in more spray the following season.
Rust on hinges, screws, and brackets
Ordinary steel fixings are the fastest casualty in a coastal sauna. A screw head can show orange rust within a single winter, and rust does not just look bad: it stains the timber, weakens the fixing, and can make a hinge seize or a door drop.
Rust also spreads by contact. A rusting bracket can stain the wood beneath it and start corrosion on a neighbouring fitting. That is why a single cheap screw in an otherwise well-built cabin can cause a surprising amount of damage.
Check the door hardware first, because it moves every day and shows wear early. Hinges, handles, latches, and the screws holding them are the parts you touch most, and they are the parts most likely to fail at an awkward moment.
Heaters and electrical parts in salty air
Heaters cope better than most parts, because they dry themselves out every time they run. Even so, salt can settle on exposed metal, terminals, and control panels, especially in a cabin that sits unused for weeks. A heater that is used regularly and dried after each session lasts longer than one left cold and damp.
Electrical fittings are the part to take most seriously. Salt and damp can corrode terminals and cable glands, and corrosion in a junction box is not something to fix with a quick wipe. If you see green or white crust on terminals, or a fitting that feels warm or smells odd, switch the power off at the breaker and call a licensed electrician.
For the basics of a safe supply, see our guide to outdoor sauna electrical hookup. All electrical work should be done or checked by a licensed electrician, and local code rules always come first.
Which woods hold up best near the sea
No wood is immune to salt air, but some species cope far better than others. The right choice depends on whether the timber is outside cladding, interior panelling, or benches, because each part faces different heat, moisture, and wear.
For the full comparison, including heat behaviour and cost, read our guide to thermowood vs cedar vs spruce for outdoor saunas. The table below is a short coastal summary of the same choices, focused on salt-air durability rather than price or looks.
| Wood | Coastal strength | Main weakness near the sea | Best use |
|---|---|---|---|
| Western red cedar | Good natural resistance to decay and insects | Soft surface, greys quickly if left untreated | Cladding and interior panelling |
| Thermowood (heat-treated pine or ash) | Very stable, absorbs less moisture than untreated pine | Needs oiling to keep its colour; can feel brittle at fixings | Cladding, benches, and decking |
| Alder | Stable in heat, pleasant to sit on | Less durable outside without protection | Interior benches and panelling |
| Aspen | Light, pale, stays cool to touch | Soft and easily marked; not for exposed exterior | Interior benches and backrests |
| Spruce or pine (untreated) | Cheap and widely available | Absorbs moisture readily, prone to mould and rot | Interior only, with good ventilation |
| Thermally modified ash | Hard, dense, and dimensionally stable | Heavier and costlier; check supplier grading | Benches and high-wear surfaces |
Two cautions belong here. First, the table describes typical behaviour, not a guarantee: grading, treatment quality, and local conditions all change the result. Second, never use pressure-treated timber inside the hot room, and never use any timber treated with chemicals that are not rated for sauna heat. Ask the supplier for the treatment specification in writing.
Cedar near the coast: the classic choice
Cedar has earned its reputation honestly. Its natural oils resist decay, it moves less than pine in damp weather, and it smells good when warm. Left untreated outside, it will turn silver-grey, which many owners like, but the surface will still need cleaning and occasional oiling if you want it to stay smooth.
Cedar is soft, so it dents easily where boots, buckets, and firewood knock against it. Near the coast, that matters, because a dented surface holds salt and water. Fit a boot scraper and a small shelf by the door, and keep firewood off the cladding.
Thermowood: the stable modern option
Thermowood is timber that has been heated to change its structure, which makes it absorb less water and move less with the seasons. That stability is exactly what a coastal cabin needs, because the swell-and-shrink cycle is what opens joints to spray.
It is not maintenance-free, though. Thermowood still greys in the sun, and its surface can feel dry and rough if it is never oiled. Treat it like cedar: clean it, oil it on schedule, and check the fixings, because its lower moisture movement does not protect the screws.
What to avoid on the windward side
Untreated spruce and pine are a poor choice for exposed exterior cladding near the sea. They soak up spray, dry slowly, and are more likely to develop mould and soft spots. If your cabin already has them, the answer is not panic: it is a stricter oiling routine and faster repairs when damage appears.
Also avoid mixing very different timbers on the same wall without a plan. They move at different rates, and the joints between them open first. If you are replacing boards, match the species and the profile of the boards around them.
Hardware and fasteners: the cheapest protection you can buy
If there is one place to spend extra money on a coastal sauna, it is the fixings. A handful of stainless screws costs little next to a cabin, yet it is the difference between a door that still hangs straight after five winters and one that sags on rusted hinges.
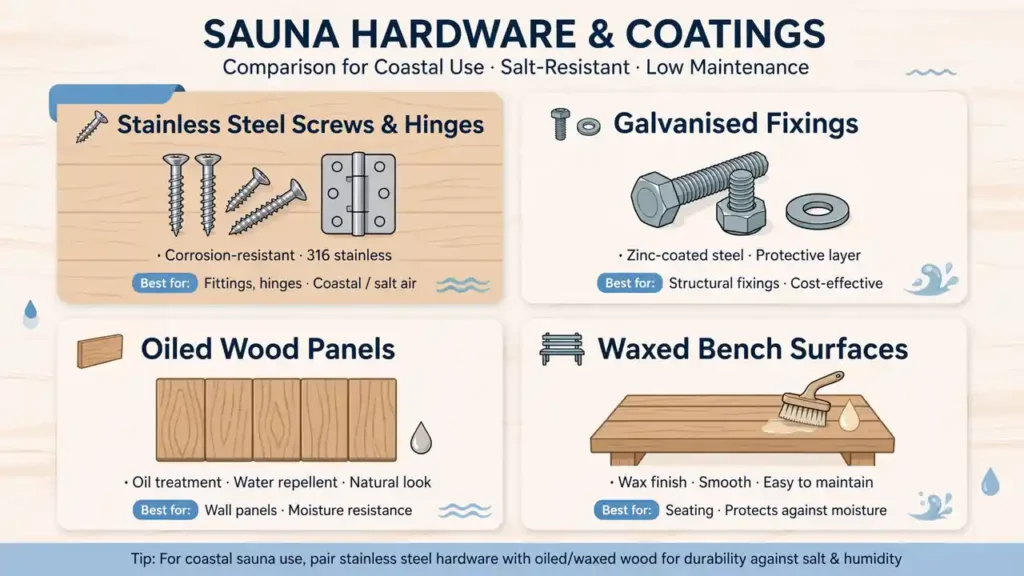
| Fixing type | Coastal suitability | What to know |
|---|---|---|
| Stainless steel screws and nails (marine grade) | Best choice for exposed coastal use | Costs more, but resists rust far longer than plain steel |
| Standard stainless steel screws | Good for sheltered spots and interiors | Fine inland, but check them more often right by the sea |
| Hot-dip galvanised fixings | Reasonable budget option | Coating wears over time, especially on the windward side |
| Plain steel or zinc-plated screws | Poor for coastal exteriors | Rust quickly and stain the timber; avoid outside |
| Brass fittings | Mixed | Can tarnish and stain; check suitability with the supplier |
| Aluminium brackets and trims | Good where specified for exterior use | Keep them away from direct contact with dissimilar metals |
Grades matter, but the honest truth is that suppliers label stainless steel in different ways, and the grade alone does not guarantee performance in your exact spot. Buy marine-grade fixings from a reputable supplier, keep the receipt and the grade details, and inspect them every season rather than trusting a label for years.
Stainless grades, honestly explained
Stainless steel is a family, not a single metal. The grades most often sold for outdoor and marine use contain more of the elements that resist corrosion, and they cost more for that reason. Cheaper stainless grades still rust in heavy salt spray, just more slowly than plain steel.
For a coastal sauna, ask for marine-grade stainless for every exposed fixing: screws, nails, hinges, handles, brackets, and chimney straps. Use the same grade throughout a single fitting, because mixing grades can set up a small electrical reaction between different metals that speeds up corrosion where they touch.
Inside the hot room, the same rule applies to anything metal you can see or touch. Heater guards, thermometer fixings, and bucket hooks all sit in hot, humid air, and a rusted hook over a bench is a burn and a stain waiting to happen.
Galvanised vs stainless: which one, and where
Galvanised fixings are steel coated in zinc, and they are a fair budget choice for sheltered spots and for parts hidden inside the structure. The zinc layer protects the steel until it wears through, and near the sea it wears through faster than inland.
Stainless is the better choice for anything exposed: door hardware, roof edge trims, vent covers, and any fixing on the windward wall. If the budget is tight, spend the stainless money on the outside and the moving parts first, and use galvanised fixings only where they stay dry and hidden.
Never mix plain steel screws with stainless ones in the same board. The plain screw will rust first and stain the timber around the stainless one, and you will end up replacing both. When you replace a fixing, replace it with the same or a better grade.
Hinges, handles, and latches that survive the sea
Choose hinges and handles sold for exterior or marine use, and fit them with screws of the same metal. A stainless hinge held by plain screws is only as good as its weakest screw, and the hinge will loosen as the screws rust.
Oil the moving parts lightly once or twice a year with a product the maker approves for sauna use. Wipe off the excess, because oil that drips onto hot timber can stain, and never use a lubricant that gives off fumes when heated inside the hot room.
Keep the door alignment in mind as well. A door that drags will wear its hinges faster, and coastal swelling makes dragging more likely. Adjust the hinges early, while the fix is a small turn of a screw, rather than waiting until the door sticks.
Protective oils, waxes, and coatings for coastal timber
Oil does not make timber waterproof, and no coating makes it salt-proof. What a good oil or wax does is slow the water down, keep the surface supple, and make cleaning easier. That is enough to add years to a coastal cabin if it is reapplied on time.
Always use products made for sauna timber, and follow the maker’s instructions exactly. Products meant for garden furniture or decking may contain chemicals that are not safe when heated, and they can smell strongly in a hot room. When in doubt, ask the sauna maker or the oil supplier before you apply anything inside.
Oils for exterior cladding
Exterior sauna oils are usually based on natural oils with pigments that slow greying. A pigmented oil lasts longer than a clear one in strong sun, and it keeps the timber looking even. Apply it to clean, dry timber, and work it into the end grain with extra care.
Two thin coats beat one thick coat. A thick coat sits on the surface, peels, and traps moisture underneath, while thin coats soak in and wear evenly. Let the first coat dry fully before the second, and do not oil in rain, high wind, or direct midday sun.
For interior surfaces, see our guides to the best sauna wood oil and sauna wood wax. Interior benches and backrests need products that are safe at high temperatures and will not leave a sticky or slippery surface.
Wax for benches and high-touch surfaces
Wax is useful where hands and skin touch the wood. A thin layer of sauna-safe wax on benches and backrests makes sweat and water bead instead of soaking in, and it keeps the surface smooth. It wears off with use, so it needs reapplying more often than exterior oil.
Apply wax only to cool, clean, dry timber, and buff off the excess. A waxy, slippery bench is a safety problem, so use less than you think you need and test the surface before the next session.
How often to re-coat near the coast
Re-coating frequency depends on exposure, and the table below gives typical ranges for a coastal cabin. Treat them as a starting point, and re-coat sooner if the timber looks dry, grey, or rough, or if water stops beading on the surface.
| Surface | Exposed to sea wind | Sheltered coastal spot | Sign it needs re-coating |
|---|---|---|---|
| Exterior cladding | Every 6 to 12 months | Every 12 to 18 months | Grey, rough, or dry to the touch |
| Door and window frames | Every 6 to 12 months | Every 12 months | Stiff movement, visible cracks |
| Deck and steps | Every 6 to 12 months | Every 12 months | Splinters, water soaking in fast |
| Interior benches (wax) | Every 2 to 4 months of regular use | Every 3 to 6 months of regular use | Dull, rough, or stained surface |
| Interior panelling (oil) | Every 12 to 24 months | Every 18 to 24 months | Dry patches, darkened marks |
Write the date of each oiling on a card inside the changing room. It takes ten seconds, and it stops the common problem of guessing whether the last coat was six months or two years ago. Our outdoor sauna maintenance calendar has a fuller year-round version of this routine.
Siting, windbreaks, and drainage: stop the spray before it arrives
The best protection is distance and shelter. A sauna placed behind a windbreak, with its back to the prevailing wind, takes far less spray than the same cabin standing alone on an open headland. You cannot change the weather, but you can choose which wall faces it.
Turn the door and the vents away from the prevailing wind where you can. The windward wall should be the plainest one, with as few openings as possible, while the door, windows, and vents sit on the sheltered side. That single choice cuts the salt load on the parts that fail first.
Windbreaks that actually work
A good windbreak slows the wind rather than stopping it dead. A solid wall can create turbulence that drives spray over the top and down behind it, while a hedge, a slatted fence, or a trellis with climbing plants breaks the wind into slower, gentler air.
Keep the windbreak a sensible distance from the cabin. Too close, and it traps damp air against the walls; too far, and it does little good. A gap of a few metres usually works, but check local rules before planting or building anything near a boundary.
Do not let plants touch the cabin. Branches rubbing on cladding wear the oil off and hold damp against the timber, and roots can lift paving and block drains. Trim back anything that touches the walls at least twice a year.
Drainage and the base: keep the bottom dry
Salt water that pools around the base is worse than spray on the walls, because the bottom boards sit in it for hours. The ground should slope gently away from the cabin on all sides, and the base should sit clear of the soil on a proper foundation.
Gravel around the cabin helps, because it drains fast and does not splash muddy water onto the walls the way bare soil does. Keep gutters and downpipes clear, and make sure roof water runs away from the cabin rather than down the walls.
If you are still planning the build, read our guide to the best foundation for an outdoor sauna. A raised, well-drained base is the single most useful thing you can do for a coastal cabin, and it is far cheaper than replacing rotted bottom boards later.
Ventilation and drying after every session
Coastal cabins stay damp longer than inland ones, so drying matters more. A sauna that is closed up wet after a session will grow mould on the benches, smell musty, and corrode its fixings from the inside. A few minutes of ventilation after each use prevents most of that.
After a session, leave the door open for a short while and let the heater run briefly to dry the interior, following the heater maker’s instructions. Open the vents, prop the door ajar if the weather allows, and wipe down the benches so they dry faster.
Our guide to outdoor sauna ventilation explains vent positions and airflow in detail. The key point for coastal owners is simple: a cabin that dries out between sessions lasts far longer than one that stays damp all week.
The post-session drying routine
- Open the vents and leave the door ajar for 20 to 30 minutes after the last session, weather permitting.
- Wipe the benches, floor, and any pooled water with a clean towel.
- Leave the heater on low briefly if the maker allows it, so the interior dries fully.
- Remove damp towels, buckets, and wet wood from the cabin.
- Close the vents and door once the interior feels dry to the touch.
If the sauna will sit unused for a week or more, do a longer drying session first and leave the vents open on a dry day. A cabin that is closed up damp for a month is the one that greets you with mould and a musty smell.
Mould, damp, and the smell test
Trust your nose. A healthy sauna smells of warm wood, not of damp or mildew. If the smell changes, look for dark spots under the benches, behind the heater, and around the door frame, and clean them early with a product the sauna maker approves.
For the wider picture on rain, humidity, and mould, see our guide to outdoor sauna rain, humidity, roofing and mould prevention. Coastal owners face the same problems as inland ones, just more often and with salt added.
Heater and electrical protection in salty air
The heater is the most expensive part of most saunas, and it is also one of the best protected, because heat drives moisture away. Even so, salt can settle on the outer casing, the control panel, and any exposed terminals during long idle periods, especially in a cabin near breaking waves.
Use the sauna regularly if you can. A heater that runs weekly stays drier than one that sits cold for a month, and regular use also means you notice small problems early. If the cabin will be idle for a long stretch, ask the heater maker how to prepare it for storage.
Electric heaters: what to check
Check the control panel and any external switches for white or green crust, sticking buttons, or a display that flickers. These are signs of corrosion, and they should be checked by a licensed electrician rather than cleaned with water or spray.
Keep the heater area clear of salt-covered items, and never hose down the heater or the control panel. Wipe the outer casing with a dry or slightly damp cloth when the heater is cold and switched off, and let it dry fully before the next session.
Wood-fired stoves by the sea
A wood-fired stove faces the same salt problem, plus soot and ash that hold moisture against the metal. Brush off ash after the stove cools, keep the door seals clean, and check the chimney straps and flashing for rust each season.
Follow the stove maker’s clearances exactly, never leave a lit stove unattended, and keep firewood dry and away from the cabin walls. For the wider safety picture, see our guide to how to build an outdoor sauna, and always check local rules before installing or changing a stove.
Lights, sensors, and outdoor fittings
Choose light fittings and sensors rated for outdoor or damp locations, and fit them where they are sheltered from direct spray. A fitting that is rated for a bathroom may still fail quickly on an exposed coastal wall, so check the rating with the supplier.
In summer, heat is the extra problem: a coastal sauna in full sun can overheat between sessions, which dries the timber too fast and stresses the seals. Our guide to outdoor sauna summer overheating, shade and ventilation tips covers shading and vent settings for hot months.
Covers: when they help and when they harm
A cover can be the best friend of a coastal sauna, or its worst enemy. A well-fitted cover keeps spray off the walls and the roof, but a loose or airtight cover traps damp underneath and creates the exact conditions that rot timber and rust metal.
The rule is simple: a cover must keep water out and still let air move. If you can smell damp when you lift the cover, the cover is doing more harm than good, and the cabin needs drying and a better-fitting cover.
Choosing a cover for a coastal cabin
- Measure the cabin, including the chimney and any roof overhang, and buy a cover made for that size.
- Choose a breathable, water-resistant fabric rather than solid plastic sheeting.
- Look for straps and buckles that hold the cover tight in high wind.
- Check that air can move at the base, so damp does not collect underneath.
- Pick a colour and material that will not stain the timber if it rubs.
For the full cover and storm-prep routine, see our guide to outdoor sauna security, weatherproofing, locks, covers and storm prep. The storm checklist there pairs well with the coastal routine in this article.
Cover mistakes to avoid
Do not cover a wet cabin and leave it for weeks. Dry the cabin first, then fit the cover, and lift it on dry days to let the timber breathe. Do not use a cover that flaps in the wind, because the flapping edge rubs the oil off the timber and wears a pale stripe into the cladding.
Do not cover the chimney in a way that blocks it, and never cover a stove that is still warm. Check the cover after every storm, and replace it when the fabric tears or the straps fail, because a torn cover channels water into one spot rather than shedding it evenly.
Seasonal maintenance checklist for coastal owners
Coastal maintenance is not a single annual job. It is a short routine repeated through the year, with the heaviest work in spring and autumn and lighter checks in between. The table below is a typical plan; adjust it to your exposure, and do more, not less, if the cabin faces open sea.
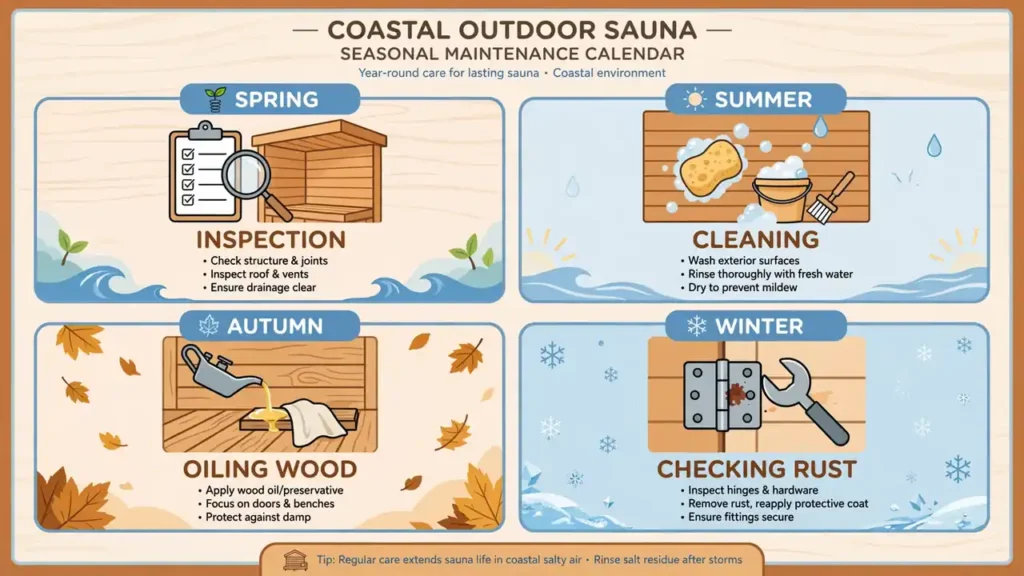
| Season | Wood and coatings | Metal and fixings | Heater and electrics |
|---|---|---|---|
| Spring | Wash off winter salt, inspect cladding, oil exterior timber | Check hinges, screws, and brackets for rust; replace as needed | Test controls, check terminals, book an electrician if anything looks corroded |
| Summer | Check for sun damage, oil door and window frames, trim plants | Oil moving parts lightly, check the chimney straps | Watch for overheating, keep vents open between sessions |
| Autumn | Clean and re-oil before the storms, clear gutters and drains | Tighten loose fixings, fit the cover, check the door seals | Check the heater before the busy season, test the lights |
| Winter | Inspect monthly for damp and soft spots, clear roof snow | Check for rust streaks after storms, wipe salt off fittings | Use the sauna regularly to keep it dry, report faults early |
Keep a one-page log of each check: the date, what you found, and what you fixed. It takes a minute, and it shows you patterns, such as a hinge that rusts every winter or a wall that always needs oil in spring. That pattern is the clue that tells you where to spend money next.
The monthly five-minute check
- Walk around the cabin and look for rust streaks, soft timber, and loose boards.
- Open and close the door, and check the hinges and handle for stiffness.
- Look under the benches and behind the heater for damp or dark spots.
- Check the base and drains for standing water.
- Sniff the air inside: warm wood is fine, damp or musty is not.
Five minutes a month catches most problems while they are still cheap. The expensive repairs almost always start as a small stain or a loose screw that nobody noticed for a year.
Warning signs: rust streaks, soft wood, and swollen joints
Learn the early signs, and you will rarely face a big repair. Rust streaks running down from a screw, a board that feels soft when you press it, and a door that swells shut are all messages from the cabin. They are easy to ignore and expensive to fix later.
Rust streaks and stains
A thin orange or brown streak below a fixing usually means the fixing is rusting, not the timber. Replace the fixing with a marine-grade stainless one, clean the stain gently, and check the timber underneath for softness.
If the streak returns quickly after a replacement, the problem may be a different metal nearby, such as a bracket or a nail, corroding and staining the same spot. Check the whole area, not just the single screw.
Soft, spongy, or swollen timber
Press the timber with your thumb. Healthy sauna wood feels firm, even when it is damp on the surface. If your thumb sinks in, or the wood crumbles, the timber has started to decay and needs attention now.
Swollen joints are a related sign. A door that sticks, a vent that will not close, or boards that have pushed apart all point to timber that is taking in too much water. Find the water source first, whether it is a blocked gutter, a failed seal, or spray through a gap, and fix that before replacing any boards.
When to call a professional
- Any corrosion on electrical terminals, cables, or the heater control panel.
- Soft or crumbling timber in the structure, the base, or the roof.
- A door or roof that has moved, sagged, or no longer closes safely.
- Mould that keeps returning after cleaning, or a strong damp smell that will not clear.
- Any damage to a wood-fired stove, chimney, or flue.
For electrical faults, call a licensed electrician. For structural timber, call the sauna maker or a builder who knows timber cabins. For stove and chimney problems, call a stove specialist. A short professional visit is far cheaper than a rebuild, and it is the safe choice whenever you are unsure.
Living with a coastal sauna: the long view
A coastal sauna asks for more care than an inland one, but it gives more back. The sea air, the view, and the cold plunge of a breeze after the heat are hard to match, and owners who keep up the routine usually find the cabin ages gracefully rather than falling apart.
The routine itself is simple once it becomes a habit: choose the right wood and fixings, oil on schedule, dry the cabin after every session, and check it briefly each month. Do those four things, and salt air becomes a maintenance task rather than a threat.
Start this week with the five-minute check. Walk around the cabin, look at the windward wall, and press the bottom boards. Whatever you find will tell you exactly where to begin.
Frequently asked questions
Does salt air really damage an outdoor sauna?
Yes, it speeds up the wear that damp and sun cause on their own. Salt draws moisture onto timber and metal, so surfaces stay wet longer, rust appears faster, and coatings wear out sooner. The damage is gradual, and a regular routine keeps it under control.
What is the best wood for an outdoor sauna near the sea?
Cedar and thermowood are usually the best choices for exterior cladding, because cedar resists decay naturally and thermowood absorbs less moisture than untreated pine. Benches do well in alder, aspen, or thermally modified ash. Avoid untreated spruce or pine on exposed exterior walls.
Which screws should I use in a coastal sauna?
Marine-grade stainless steel is the best choice for every exposed fixing, including screws, hinges, handles, and brackets. Hot-dip galvanised fixings are a reasonable budget option only where they stay dry and hidden. Avoid plain steel or zinc-plated screws outside.
How often should I oil a coastal sauna?
Exposed exterior cladding usually needs oiling every 6 to 12 months, and sheltered coastal cabins every 12 to 18 months. Interior benches need waxing every 2 to 6 months of regular use. Re-coat sooner if the timber looks dry or grey, or if water stops beading on the surface.
Should I cover my outdoor sauna by the sea?
A well-fitted, breathable cover helps, because it keeps spray off the walls and roof. A loose or airtight cover harms the cabin, because it traps damp underneath. Dry the cabin first, fit the cover tightly, and lift it on dry days so the timber can breathe.
What are the first warning signs of salt damage?
Rust streaks below fixings, soft or spongy timber, swollen joints, a door that sticks, and a damp or musty smell are the earliest signs. Check the windward wall and the bottom boards first. Call a licensed electrician for any electrical corrosion, and a builder or the sauna maker for soft structural timber.