
An outdoor sauna sits outside your house, often out of sight, through every season. That is part of its charm, and it is also why it needs more protection than an indoor sauna. A good lock, a cover that fits, and a simple storm plan keep the cabin, the heater, and your peace of mind safe.
This guide covers outdoor sauna security and weatherproofing in one place. You will learn which locks suit a wooden sauna door, how to protect hinges, glass, and heaters, how to choose and fit a cover, and what to do before, during, and after a storm. The focus is on practical steps you can check in an afternoon, not on expensive gadgets.
Please note: this article gives general guidance only. It is not a substitute for local building codes, permit rules, or a licensed professional. Check with your local permit or code office before changing a structure, wiring, or a wood-fired stove, and use a licensed electrician or installer for electrical work. If a sauna has been damaged by fire, flood, or a storm, have it checked by a professional before you use it again.


#Paid Links
Why outdoor sauna security is different
A sauna in the garden is a small building with valuable parts inside. The heater alone can cost a large share of the whole cabin, and copper, stone, glass, and timber are all easy to carry away. A door that is left unlocked, or a window left open for ventilation, can invite an opportunistic thief.
Weather is the other intruder. Rain driven by wind finds gaps around doors and vents. Snow can sit on a flat roof and melt into joints. A loose cover in a gale can flap, tear, and then let water in for weeks. Security and weatherproofing are really one job, because a cabin that is sealed well is also harder to break into.
The good news is that most of the fixes are simple. A solid hasp, a weatherproof lock, tight door seals, and a cover that is strapped down will deal with most of the risk. The rest comes down to a routine: checking the cabin after storms, oiling timber, and replacing worn seals before they fail.
Start with the weak points: a quick security walk-around
Before you buy anything, walk around your sauna slowly and look at it the way a stranger would. Check the door, the windows, the vents, the roof edge, and the base. Note anything that moves, rattles, or lets in light, because light coming through a joint usually means water and cold air can get through too.
Try the door from outside. Does it flex when you push it? Does the handle wobble? Can you slip a finger between the door and the frame? A door that flexes is a door that can be forced, and a gap is a sign that the seal has shrunk or the hinges have dropped.
- Push and pull every door and window to test for play in the hinges and frames.
- Look for daylight around the door seal, vents, and where the roof meets the walls.
- Check that vent covers close fully and cannot be lifted off from outside.
- Note any loose boards, raised screws, or cracked sealant around the base.
- List everything valuable inside, from the heater to buckets, ladles, and thermometers.
- Check the path to the sauna at night. Dark corners and blind spots make a break-in easier.
Write down what you find and fix the cheap items first. Tightening screws, replacing a seal, and adding a hasp often cost far less than replacing a stolen heater. If you want a fuller picture of where your sauna sits in the garden, read our guide to outdoor sauna placement, sun, wind, drainage, and privacy, because a cabin that is visible from the house and well drained is easier to protect.


#Paid Links
Locks that work on a wooden sauna door
A sauna door is usually made of timber and glass, and it expands and shrinks with heat and moisture. That movement rules out some locks that work well on a house door. The best lock for a sauna is one that tolerates a little movement, resists rain, and can be fitted without weakening the door.
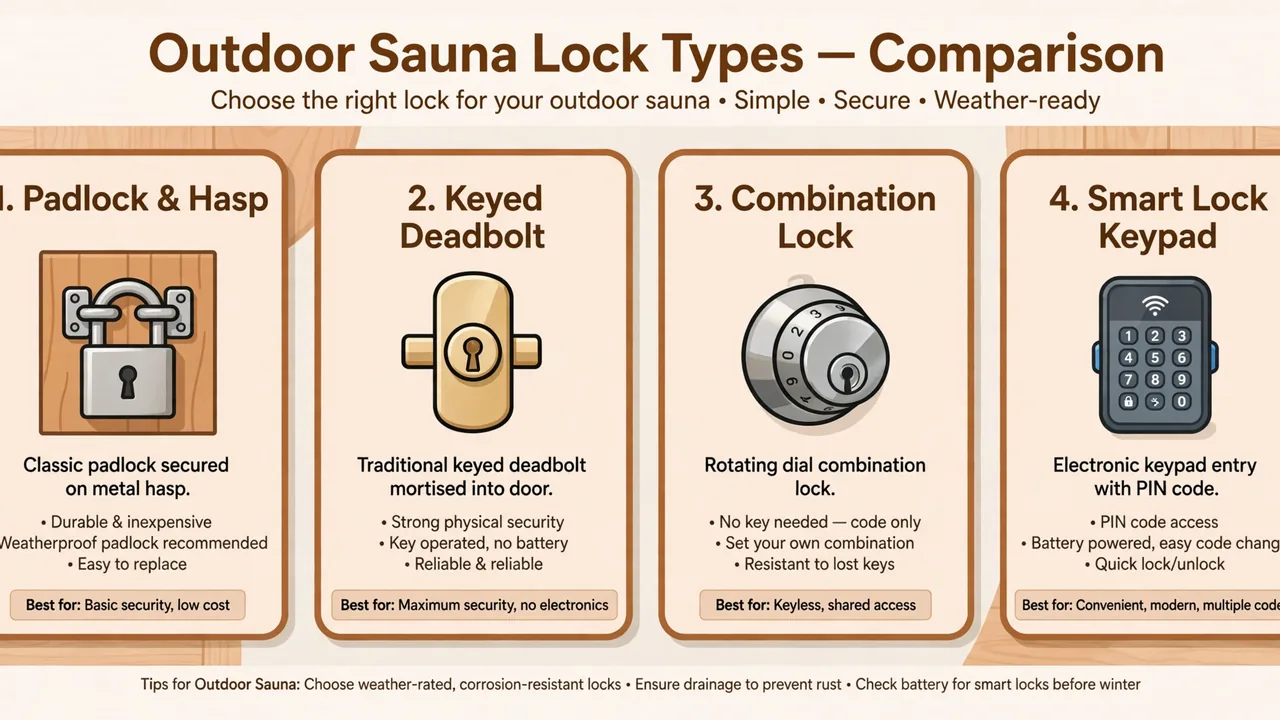
Padlock and hasp: simple, strong, and easy to replace
A padlock with a sturdy hasp is the most common choice for an outdoor sauna, and for good reason. It is cheap, it is easy to fit, and you can replace the padlock in minutes if a key is lost. Choose a weatherproof padlock with a shrouded shackle, which makes it harder to cut, and a hasp made from stainless steel or brass so it does not rust.
Fit the hasp with long screws that reach into solid timber, not just into the door skin. Use coach screws or bolts through the door where the design allows it. A hasp held by short screws is only as strong as those screws, however good the padlock is.
Keyed deadbolt: neat, but check the door first
A deadbolt looks tidy and gives a firm lock, but it needs a door thick enough to hold the mechanism and a frame that stays aligned. On a thin sauna door, a deadbolt can weaken the timber around the cutout. On a door that swells in damp weather, it can jam.
If your door is thick and stable, a deadbolt can work well, especially on a changing room door rather than the hot room door. Never fit a lock that could trap someone inside the hot room. Anyone using the sauna must always be able to leave quickly without a key.
Combination lock: handy when several people use the sauna
A combination lock removes the need for keys, which suits families, rental cabins, and households where several people use the sauna. You can change the code when a guest leaves or a code is shared too widely. Choose a model rated for outdoor use, because a cheap indoor combination lock can seize up after a wet winter.
Keep the code short enough to remember and long enough to be useful, and change it at least once a year. Do not use a birthday, a house number, or a code that is written on a note near the door.
Smart lock: convenient, but keep a manual backup
A smart lock lets you open the sauna with a code, a phone, or a fob, and some models log who opened the door and when. That can help for a rental property or a shared garden cabin. But a smart lock needs power, a signal, or batteries, and cold and damp can shorten battery life.
If you choose a smart lock, pick one rated for outdoor use and keep a manual key or code as a backup. Test it in cold weather before you rely on it, and never fit a smart lock that could lock someone inside the hot room. A lock that fails closed is a safety risk, not a security feature.
| Lock type | Best for | Main strength | Main drawback |
|---|---|---|---|
| Padlock and hasp | Most outdoor saunas | Cheap, strong, easy to replace | Needs a solid hasp and long screws |
| Keyed deadbolt | Thick, stable doors | Neat and firm when fitted well | Can jam if the door swells |
| Combination lock | Shared or family use | No keys to lose | Code must be changed regularly |
| Smart lock | Rental or shared cabins | Codes, logs, and remote control | Needs power and a manual backup |
Whatever lock you choose, fit it to the changing room or outer door, not the hot room door. The hot room should always open freely from inside. If you are unsure whether your door can take a mortice lock, ask the sauna maker or a locksmith before cutting into the timber.
Hinges, handles, and glass: the parts thieves test first
A lock is only as strong as the door around it. Many break-ins do not attack the lock at all. They lift a door off its hinges, unscrew a handle, or break a small window to reach inside. Check these parts as carefully as the lock itself.
Hinges should be fixed with long screws into solid timber, and hinges on an outward-opening door should have security pins or non-removable pins so the door cannot be lifted off when it is locked. If your hinges are on the outside, consider moving them inside or fitting hinge bolts, which are small pins that hold the door in the frame even if the hinge pins are removed.
Handles and latches should sit firmly, with no wobble. A loose handle is a sign that the screws have worked free, and it is also a weak point that can be pulled off. Replace short screws with longer ones, and use stainless steel fixings so they do not rust and seize.
Glass needs care too. A large glass front looks beautiful, but it is also a way in. Tempered safety glass is harder to break and breaks into small, blunt pieces rather than sharp shards, which is safer for everyone. Keep the glass clean so you can spot chips and cracks early, and consider a simple wooden shutter or an internal blind for times when the sauna is not in use. For more detail on glass, heat loss, and privacy, see our guide to outdoor sauna doors, glass fronts, heat loss, and safety glass.
Securing the heater, stove, and loose kit
The heater is the most valuable single item in most outdoor saunas. An electric heater can be unbolted and carried away in minutes if it is only held by a few screws. A wood-fired stove is heavier, but its door, flue parts, and tools are easy to take.
Bolt the heater to the wall or floor bracket supplied by the maker, using the fixings they recommend. Do not improvise a bracket from thin timber. If the heater has a removable control panel, take it indoors when the sauna will be unused for a long time, and store it somewhere dry.
- Bolt heaters and stoves to their brackets and check the fixings each season.
- Store buckets, ladles, thermometers, and sand timers indoors when the sauna is closed for weeks.
- Keep spare sauna stones, tools, and cleaning kit in a locked shed or the house, not in the sauna.
- Photograph the heater, stove, and any serial numbers, and keep the photos with your purchase records.
- Do not leave a key, a spare code, or a ladder near the sauna.
Wood-fired stoves need extra care. Never leave a stove unattended while it is lit, and follow the maker instructions for clearances around the stove and flue. Clear ash only when it is fully cold, and store ash in a metal container with a lid, away from timber and dry leaves. If the stove or chimney has been hit by a falling branch or a storm, have it checked before you light it again.
Electric heaters need a different kind of care. Keep the supply switched off at the isolator when the sauna is not in use, and have any wiring work done by a licensed electrician. Never run an extension lead to a sauna heater, and never cover a heater or store items on top of it.
Deterrents that work without turning your garden into a fortress
You do not need a high fence or a loud alarm to make a sauna less attractive to a thief. Most thieves look for the easiest target, so small changes that add time, light, or attention can be enough. A motion light over the door, a clear view from the house, and a locked gate all help.
A motion sensor light is one of the best value deterrents. It lights the door and the path when someone approaches, and it also helps you find your way safely on a dark winter evening. Choose a light rated for outdoor use, and angle it so it lights the door without shining into a neighbour window.
A simple camera can help too, but it is not a substitute for a lock. If you fit one, place it where it can see the door and the path, and tell household members and guests that it is there. Check local rules about cameras that record a shared path or a neighbour garden, because the rules vary by area.
Keep the area around the sauna tidy. Trim back shrubs that hide the door, and do not stack firewood against the cabin where it can hide a person or give a step up to the roof. A clear view from the house is a quiet form of security that costs nothing.
Weatherproofing that actually keeps water out
Weatherproofing an outdoor sauna means keeping water out of the places where it can do slow damage. Timber that stays wet will swell, stain, and in time rot. Insulation that gets wet loses its value. A damp cabin also takes longer to heat and can develop a musty smell that is hard to remove.
Start at the base. The sauna should sit on a raised, drained foundation so rain does not pool under the floor. Check that water runs away from the cabin, not towards it, and that gutters and downpipes, if fitted, are clear. A blocked gutter can pour water straight down a wall for a whole winter.
Next, check the seals. Door and window seals shrink with heat and age, and a seal that looked fine last year may now let in wind and rain. Close the door on a thin piece of paper and try to pull it out. If it slides out easily, the seal is not gripping and should be replaced. Use seals made for high heat on the hot room door, and follow the maker guidance on the right type.
Vents need the same attention. A vent that is stuck open in a storm lets rain straight into the wall, while a vent that is stuck shut traps damp inside. Open and close every vent, clean out dust and insects, and make sure the covers sit flush when closed. Our guide to outdoor sauna rain, humidity, roofing, and mould prevention covers roofing and mould in depth, so this article stays focused on covers, seals, and storm prep rather than repeating that ground.
Choosing a cover that fits
A cover is the simplest way to protect a sauna that will sit unused for weeks, but only if it fits. A cover that is too loose will flap in the wind, rub the timber, and let rain in underneath. A cover that is too tight can trap damp against the wood and tear at the seams when you pull it on.
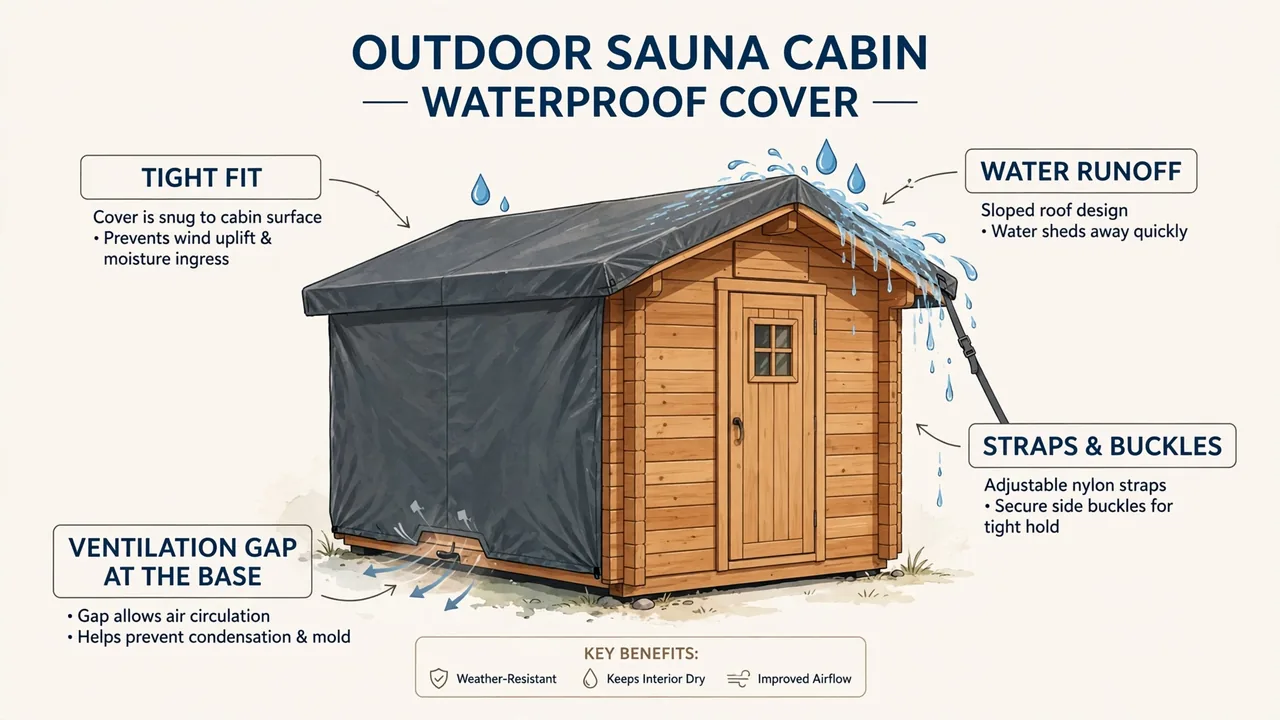
Measure before you buy
Measure the length, width, and height of your sauna, including the roof overhang and any chimney or vent that sticks out. A cover made for your exact model will fit best, but a good universal cover can work if the measurements are close. Allow a little slack for the cover to sit over the roof edge, but not so much that it billows.
What a good cover is made of
Look for a cover made from a waterproof, breathable fabric with taped or welded seams. Breathable matters, because a fully sealed plastic sheet can trap condensation against the timber. The cover should have straps or buckles that hold it tight, reinforced corners where it meets the roof edge, and a way for air to move at the base.
| Cover type | Best for | Watch out for |
|---|---|---|
| Full fitted cover | Long breaks and winter storage | Must fit well and allow air at the base |
| Roof-only cover | Extra rain protection over the roof | Does not protect walls or the door |
| Tarpaulin with straps | Short-term storm cover | Can flap, rub timber, and trap damp |
| Custom-made cover | Unusual shapes and chimneys | Costs more and takes time to order |
How to fit and check a cover
Fit the cover on a dry, calm day, not in the middle of a storm. Pull it down evenly, fasten every strap, and check that the base is not sealed tight to the ground. A small gap at the base lets air move and stops condensation from building up inside.
- Check the cover after the first windy day, and tighten any strap that has stretched.
- Look for water pooling on top, and lift the cover to let it drain if needed.
- Check the timber under the cover once a month for damp or musty smells.
- Clean and dry the cover before you fold it away, so it does not grow mould in storage.
- Replace a cover with torn seams or broken buckles, because a damaged cover can do more harm than no cover.
Do not cover a sauna that is still wet inside. Open the door and vents, let the cabin dry fully, and only then fit the cover. Covering a damp sauna is one of the fastest ways to grow mould on benches and walls.
Storm prep: before, during, and after
Storms test every weak point at once: wind, rain, falling branches, and sometimes flooding. A short preparation routine, done when a storm is forecast, can prevent most of the damage. The key is to do it early, while it is still safe and dry outside.
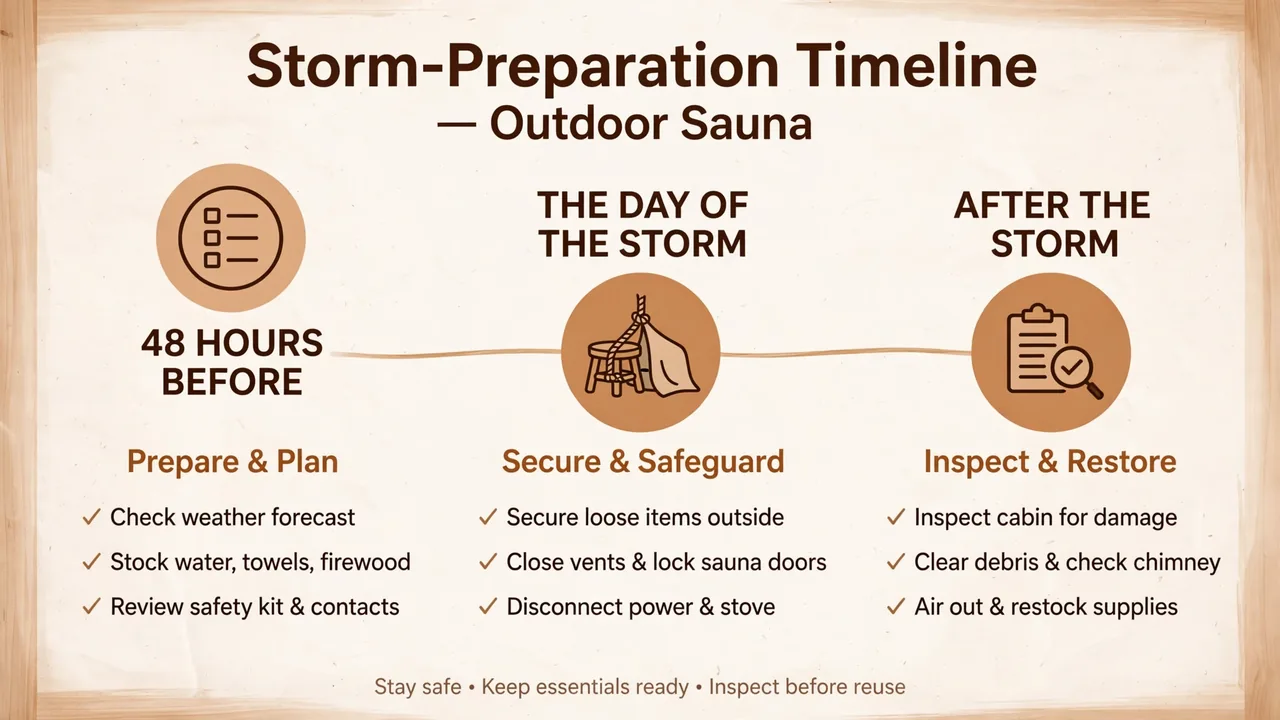
48 hours before the storm
- Check the weather forecast and note when the strongest wind and heaviest rain are expected.
- Walk around the sauna and tighten loose boards, screws, and roof fixings.
- Clear gutters and drains so water can run away from the cabin.
- Fit the cover if you use one, and fasten every strap.
- Move loose items indoors, including buckets, firewood stacks near the cabin, garden furniture, and tools.
- Lock the door and windows, close the vents, and switch off the heater at the isolator.
On the day of the storm
Stay indoors during the storm and do not go out to check the sauna while the wind is strong. A loose board or a falling branch can cause a serious injury, and a wet path to the sauna can be slippery. If you can see the sauna from a window, note any cover that has come loose or any water pooling, but leave the repair until the wind has dropped.
Do not use the sauna during a storm, especially in a lightning storm or when the power is flickering. If you feel unwell at any time, leave the sauna at once and get fresh air. That rule applies in calm weather too, but it matters even more when help may be slower to reach you.
After the storm
- Wait until the wind has dropped, then walk around the cabin and look for missing boards, lifted roofing, and fallen branches.
- Check the roof, the chimney, and the flue for damage before you light a wood-fired stove.
- Look inside for water, damp patches, and a musty smell, and open the door and vents to dry the cabin.
- Check the cover for tears and pooling water, and refit or replace it as needed.
- Test the heater only after the cabin and the electrics are dry, and have a licensed electrician check anything that has been flooded.
Take photos of any damage before you clear it up, because they help with an insurance claim and with a repair quote. If a tree has fallen on the cabin, do not climb on the roof yourself. Call a professional to make it safe first.
Wind, falling branches, and flooding: placement lessons
Where a sauna sits makes a big difference in a storm. A cabin in an open, windy spot takes the full force of the weather, while a cabin tucked behind a hedge or a fence is more sheltered. But shelter can bring its own risk if it comes from a large tree that could drop a branch on the roof.
Keep large overhanging branches cut back, and do not site a sauna directly under a dead or damaged tree. A falling branch can crack a roof, break a chimney, and let in water for months before the damage is found. If you are planning a new sauna, read our placement guide before you choose the spot, because sun, wind, drainage, and privacy all shape how well a cabin weathers a storm.
Flooding is the other placement risk. A sauna in a low dip will collect water in heavy rain, and water that sits under the floor can rot the base from below. Make sure the ground falls away from the cabin, and keep drains and ditches clear. If your garden floods regularly, raise the sauna on a higher base and talk to a local builder about drainage before the next storm season.
Winter security and storm overlap
Winter brings a second set of risks. Snow can load a roof, ice can jam a door, and a long cold spell can leave a sauna unused for weeks, which is when a break-in or a slow leak is least likely to be noticed. Check the cabin more often in winter, even when you are not using it.
Clear snow from the roof before it builds up, using a soft brush from the ground where you can. Do not climb on an icy roof. Keep the path to the sauna clear and lit, because a fall on ice near a hot stove is a serious risk. For heating, snow, and cold weather use, see our guide to outdoor sauna use in winter, heating, and snow tips.
If you close the sauna for the winter, drain any water supply, remove loose items, and fit the cover. Lock the door, close the vents, and note the date so you remember to check the cabin at least once a month. A monthly check takes ten minutes and can catch a leak, a pest, or a broken lock before it becomes a costly repair.
A seasonal security and weatherproofing routine
A routine is what turns a one-off fix into lasting protection. The table below gives a simple seasonal plan. Pair it with your normal cleaning and maintenance, and you will rarely be caught out by a storm or a worn seal.
| Season | Security checks | Weatherproofing checks |
|---|---|---|
| Spring | Test locks and hinges after winter, change a shared code | Check seals, vents, and roof after frost and snow |
| Summer | Trim shrubs that hide the door, test the motion light | Oil or treat timber as the maker advises, check the cover in storage |
| Autumn | Fit the cover, lock loose kit away, check the gate | Clear gutters and drains, replace worn seals before the rains |
| Winter | Check the cabin monthly, keep the path lit and clear | Clear roof snow, check for ice damage and damp inside |
Keep a simple log of what you checked and what you fixed, with dates. It helps you remember when a seal was last changed, and it is useful if you ever need to show an insurer that the cabin was looked after. Our outdoor sauna maintenance calendar gives a fuller year-round plan that pairs well with this routine.
Seven mistakes to avoid
- Locking the hot room door from outside, so someone inside cannot leave quickly.
- Fitting a cheap indoor lock on an outdoor door, where rain and cold will seize it up.
- Using short screws on a hasp or hinge, so the fitting pulls out of soft timber.
- Covering a damp sauna, which traps moisture and grows mould under the cover.
- Buying a cover by guesswork, then finding it flaps in the wind and rubs the timber.
- Ignoring a small leak or a worn seal until it has rotted a board or soaked the insulation.
- Going out in a storm to fix a loose cover, when waiting a few hours would be safer.
What to do if your sauna is broken into or storm-damaged
If you find the sauna broken into, do not touch anything more than you need to. Note what is missing, take photos, and report the break-in to the police if items have been stolen. Tell your insurer promptly, and keep purchase records, photos, and serial numbers ready, because they speed up a claim.
If the sauna has been damaged by a storm, make it safe first and worry about repairs second. Do not use a heater, stove, or electrical supply that has been flooded or hit by a branch until a professional has checked it. A licensed electrician should check any flooded wiring, and a stove installer should check a damaged chimney or flue.
For larger repairs, check whether you need a permit. Rules vary by area and by the size of the work, so ask your local permit or code office before you rebuild a roof, move a stove, or change the structure. Our guide to whether you need a permit for an outdoor sauna explains the questions to ask and the documents to have ready.
After a break-in or a storm, use the repair as a chance to improve. A stronger hasp, a better cover, a motion light, and a trimmed hedge are all cheap upgrades that make the next attempt harder. Security and weatherproofing work best as a habit, not as a single purchase.
Frequently asked questions
What is the best lock for an outdoor sauna?
A weatherproof padlock with a sturdy stainless steel hasp suits most outdoor saunas. It is strong, cheap, and easy to replace, and it tolerates the small movement of a timber door. Fit it with long screws into solid timber, and keep a spare key somewhere safe indoors.
Should I lock the hot room door?
No. Lock the outer or changing room door, and leave the hot room door free to open from inside at all times. Anyone using the sauna must be able to leave quickly without a key, especially if they feel dizzy or unwell.
Do I need a cover for my outdoor sauna?
A cover helps if your sauna will sit unused for weeks, or if it faces driving rain and wind. Choose a waterproof, breathable cover that fits well, fasten every strap, and leave a small gap at the base for air. Do not cover a damp sauna, and check under the cover once a month.
How do I prepare my outdoor sauna for a storm?
Check the forecast, tighten loose boards and fixings, clear gutters and drains, fit the cover, and move loose items indoors. Lock the doors, close the vents, and switch the heater off at the isolator. Stay indoors during the storm, and check the roof, chimney, and cabin for damage only after the wind has dropped.
Can a smart lock work on an outdoor sauna?
Yes, if it is rated for outdoor use and you keep a manual key or code as a backup. Cold and damp can shorten battery life, so test it in winter before you rely on it. Never fit a smart lock that could lock someone inside the hot room.
How often should I check my outdoor sauna in winter?
Check it at least once a month, even if you are not using it. Look for damp, ice damage, a loose cover, and a lock that has seized in the cold. Clear snow from the roof before it builds up, and keep the path lit and clear.