
Rain is the quiet test of every outdoor sauna. A sauna that looks solid on a dry summer day can start to show its weak points after a wet autumn, when rain finds its way under a shallow roof edge, into an unsealed joint, or onto wood that never fully dries between sessions.
This guide explains how to keep an outdoor sauna dry in a rainy or humid climate. It covers roofing choices, overhangs, gutters and drainage, ventilation and drying, wood protection, and mould prevention. The advice is general guidance for planning and maintenance, not a substitute for your kit manufacturer’s instructions or local building rules.
Please note: This article is general guidance only. Check your local code and permit office before building or changing a roof, and use licensed professionals for roofing and electrical work. If your sauna has a wood-fired stove, follow the manufacturer’s clearances, never leave the stove unattended, and keep the chimney and ash area clean.


#Paid Links
Why Rain and Humidity Are Hard on an Outdoor Sauna
An outdoor sauna faces water from two directions. Rain falls on it from outside, and every session adds moisture from inside, as water is thrown on the stones and bathers sweat. The building has to shed the rain and dry out the session moisture, again and again, for years.
Wood is the material most at risk. When timber stays damp for long stretches, it can swell, warp, and grey. Joints can open up as boards move, and those small gaps then let in more water. Over time, damp wood is also the surface where mould is most likely to appear.
Humidity makes the job harder because drying slows down. In a dry climate, a wet wall may dry in a day. In a humid one, the same wall can stay damp for much longer, especially on the shaded side of the building or where plants crowd against it. That is why rain protection and drying habits matter more, not less, in humid places.
The good news is that most rain damage is preventable. It is rarely one big leak that causes trouble. It is usually a series of small, fixable weaknesses: a roof edge that is too short, a gutter that overflows, a vent that stays shut, or a bench that is never left to dry. This guide works through each one in turn.
Start With the Roof: Shape, Pitch and Coverage
The roof does more work than any other part of an outdoor sauna in wet weather. A good roof sheds rain quickly, keeps the walls dry, and protects the joints where the walls meet the roof. A poor roof lets water sit, creep under edges, and drip down the walls.
Roof shape matters. A sloped roof sheds water by gravity, while a flat or nearly flat roof relies on perfect sealing and drainage to stay dry. That is one reason most outdoor sauna kits use a sloped roof, and why a very shallow slope needs more care with its covering and joints.


#Paid Links
Single-Slope, Gable and Barrel Roofs
A single-slope roof, sometimes called a shed roof, has one high side and one low side. Rain runs in one direction, which makes gutters simple: one gutter along the low edge usually catches most of the water. This shape suits small cabins and lean-to saunas.
A gable roof has two slopes meeting at a ridge, like a small house. Rain runs off both sides, so it needs gutters on both edges. It sheds water well and gives more headroom inside, but it has a ridge and two eaves to keep sealed and clear.
A barrel sauna has a curved roof formed by the staves themselves, with no separate flat roof surface. Rain runs off the curve in all directions, which works well as long as the bands are tight and the wood is in good condition. Barrel saunas still need a dry base and clear ground around them, because water that pools underneath will keep the lowest staves damp.
What Roof Pitch Does in the Rain
Pitch is the steepness of the roof. A steeper pitch moves water off the roof faster, which helps in heavy rain and in places where leaves and debris collect. A shallow pitch holds water for longer, so its covering, overlaps and seals have to work harder.
There is no single pitch that suits every sauna. The right pitch depends on the kit design, the roofing material, and the local climate. Follow the manufacturer’s guidance for your kit or the roofing supplier’s guidance for your material, and check local rules before changing a roof’s shape.
One practical check applies to every roof: stand back in the rain and watch where the water goes. If it sheets evenly off the edges, the roof is doing its job. If it drips in one spot, runs down a wall, or pools anywhere, that spot deserves a closer look once the rain stops.
Choosing a Roof Covering for a Wet Climate
The covering is the skin of the roof. It has to shed water, cope with sun and frost, and stay in place in wind. In a rainy climate, the way a covering handles standing water and debris matters more than how it looks on a dry day.
Metal roofing is a common choice for outdoor saunas in wet areas. It sheds water quickly, and rain tends to wash leaves and dirt off its smooth surface. It needs proper flashing where it meets the walls and chimney, and fixings that suit the material, so water cannot creep in around screws.
Asphalt shingles are familiar and widely available. They work well on a properly pitched roof, but they rely on their overlaps, so they need the pitch and the underlay the manufacturer specifies. Debris can collect on their rougher surface, so they benefit from a regular clear-down.
Cedar shingles suit the look of a timber sauna and shed water well when they are laid with the right exposure. They are a natural material, so they weather and change colour over time. They need airflow underneath and a pitch that suits them, and they should be fitted by someone who knows the material.
EPDM rubber membrane is a single-piece covering that suits low-slope roofs. Because it has few seams, there are fewer places for water to enter. It needs a clean, smooth base and careful detailing at the edges and around any chimney or vent, and it should be fitted to the supplier’s instructions.
Whatever covering you choose, the details matter as much as the material. Flashing at the ridge, eaves and chimney, sealed overlaps, and fixings that do not work loose are what keep a roof watertight over time. If you are unsure about any of these, ask a roofing professional to inspect the roof before the wet season.

| Roof covering | Rain shedding | Upkeep in wet weather | Best suited to |
|---|---|---|---|
| Metal roofing | Strong, fast run-off | Check fixings and flashing | Sloped roofs in heavy rain |
| Asphalt shingles | Good on a proper pitch | Clear debris from overlaps | Sloped roofs, easy to source |
| Cedar shingles | Good when laid correctly | Needs airflow, weathers over time | Timber saunas, traditional look |
| EPDM membrane | Strong, few seams | Check edges and details | Low-slope roofs |
If you are choosing between two coverings, ask three questions. Does it suit the pitch of your roof? Does it cope with the amount of rain and debris in your area?
And can it be fitted and maintained properly where you live? The covering that scores well on all three is usually the right one.
Overhangs: The Cheapest Rain Protection You Can Buy
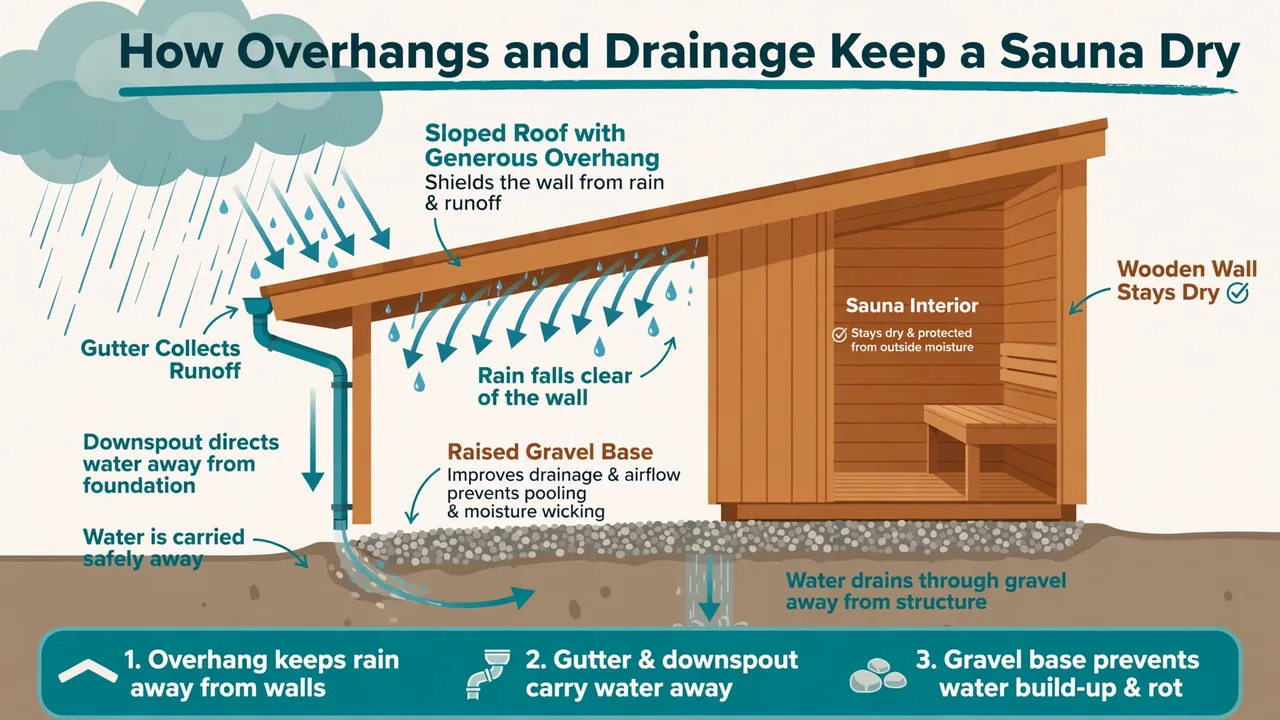
An overhang is the part of the roof that extends past the wall. It is a simple idea, and it is one of the most effective rain defences a sauna can have. A generous overhang throws rain clear of the walls, the door, and the joints at the top of the wall.
Without an overhang, rain runs down the wall from the eave. The wall stays wet for longer, the top joint is soaked in every storm, and wind-driven rain can reach the door seal. With an overhang, much of that water lands on the ground instead, well away from the timber.
Deeper overhangs give more protection, especially on the side that faces the prevailing wind and rain. That side deserves the most attention. If your sauna sits in an exposed spot, a deeper overhang on the windward side is worth more than the same depth on the sheltered side.
There is no universal overhang depth that fits every sauna. The right depth depends on the wall height, the roof pitch, the local wind and rain, and the kit design. Follow your kit manufacturer’s guidance, and ask a builder or roofing professional if you are extending an overhang or adding one to an existing sauna.
Overhangs also protect the entrance. A small porch roof or a deeper eave over the door keeps rain off the threshold and the door seal, and it gives you a dry step when you come out of a session in the rain. It also keeps the area by the door from turning into a muddy patch.
Gutters, Downspouts and Where the Water Goes
A roof without gutters drops all its water in a line at the eaves. Over time, that line of falling water can erode the ground, splash mud onto the lower walls, and keep the base damp. Gutters collect the water and move it somewhere it can do no harm.
A gutter needs to be the right size for the roof and the local rainfall, and it needs a fall towards the downspout so water does not sit in it. A level gutter holds water, and standing water breeds mosquitoes and adds weight that can pull the gutter away from its fixings.
Downspouts should carry water away from the sauna, not down beside it. A short extension, a splash block, or a length of pipe that leads to a drain or a planted area can make a real difference. The goal is simple: water that leaves the roof should not come back to the walls or the base.
- Clear gutters and downspouts at least twice a year, and more often if trees overhang the roof.
- Check that gutters still fall towards the downspout after a storm or a frost.
- Look for green staining or mud splashes on the lower walls, which suggest water is bouncing back from the ground.
- Make sure downspout water runs away from the sauna and does not pool near the base.
- Keep plants and stored items away from the downspout outlet so water can flow freely.
Ground drainage deserves the same attention. If the ground around the sauna slopes towards the building, rain will run straight to the walls. A gentle slope away from the sauna, a gravel apron, and a raised base all help water move away. Our guide to the best foundation for an outdoor sauna explains how the base and the ground beneath it should work together.
Ventilation and Drying After Every Session
Rain protection is only half the story. The other half is drying. After a session, the inside of a sauna is warm and damp. If that moisture has nowhere to go, it will settle into the wood and stay there, especially in humid weather.
Ventilation gives the moisture an exit. Most outdoor saunas have an inlet vent low down and an outlet vent high up, so warm damp air can rise and leave. Both vents need to be open after a session, and nothing should block them. A vent hidden behind a bench or a stored item is not doing its job.
A simple drying routine makes a big difference. Leave the door ajar for a while after a session so the room can air out, and leave the vents open. Wipe standing water from the floor and benches if any has pooled. Then let the room dry fully before you close it up again.
In a humid climate, drying takes longer, so be patient with it. Closing a damp sauna for days is one of the quickest ways to invite mould. If the sauna will not be used for a while, give it a full airing first, and check on it after a wet spell rather than leaving it shut through the season.
Heating the sauna briefly can help drying, but it is not a substitute for ventilation. Warm air holds more moisture, and if that air cannot escape, the moisture simply moves around the room. Always dry with the vents open. For the full picture, see our guide to outdoor sauna ventilation.
Protecting the Wood: Species, Finishes and End Grain
Not all wood copes with rain in the same way. Some species resist moisture better than others, and heat-treated timber can be more stable outdoors. The choice of wood for the outside of the sauna matters more than the choice for the inside, where the timber is protected by the roof and walls.
Exterior cladding should be a species or treatment that suits outdoor use in your climate. Your kit supplier can advise on what holds up locally, because a timber that thrives in a dry region may struggle in a wet one. Our comparison of thermowood, cedar and spruce for outdoor saunas explains how the common options differ.
End grain is the part of a board most people forget. The cut ends of boards absorb water far faster than the flat faces, so they are the first places to swell, split and grey. Sealing or treating the end grain, and keeping it clear of the ground, protects the boards where they are weakest.
Finishes such as exterior oils and stains can slow down water uptake and UV greying, but they are not a one-time fix. They wear away, especially on the weather side, and need to be renewed on the schedule the product maker recommends. A finish that has worn off offers little protection, so treat recoating as routine maintenance rather than a repair.
Inside the sauna, use only finishes made for sauna interiors, and only where the manufacturer allows them. Many sauna makers recommend leaving interior benches and wall panels untreated so the wood can breathe and dry. Never use a standard exterior paint or varnish inside a hot room unless the product is made for that use.
Mould Prevention: The Daily Habits That Matter Most
Mould is not caused by one rainy day. It grows where moisture, warmth and a food source, such as wood or dust, meet for long enough. An outdoor sauna in a humid climate provides all three at times, which is why prevention is a matter of routine, not luck.
What Mould Needs to Grow
Mould needs dampness that lasts. A surface that gets wet and dries quickly is a poor home for it. A surface that stays damp for days, in a still corner with little airflow, is a good one. That is why the shaded side of a sauna, the floor under a bench, and the corners behind the door are the places to watch.
Dirt and organic matter feed mould, so a clean sauna resists it better than a dirty one. Leaves blown in through a vent, dust on a ledge, and spilled drinks all add to the problem. A quick brush and wipe after a session removes the food source as well as the water.
The Habits That Keep Mould Away
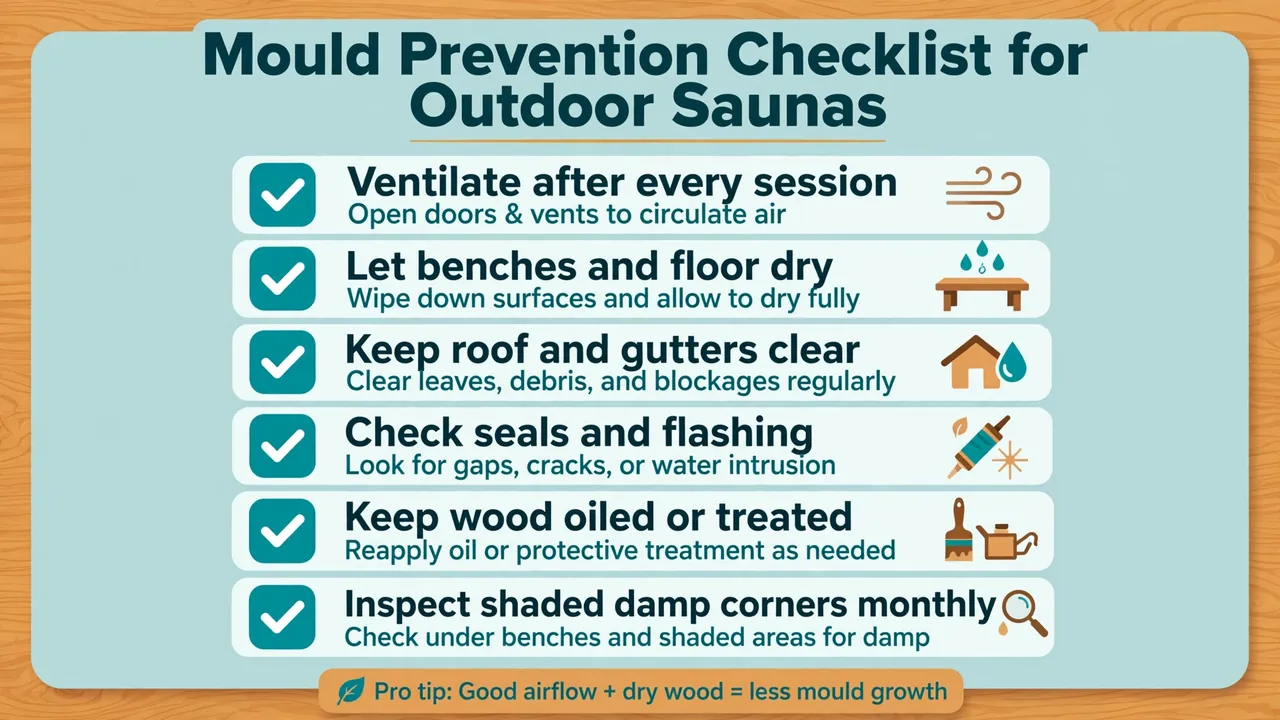
- Ventilate after every session, with the door ajar and the vents open until the room is dry.
- Keep the floor and benches clear so air can reach every surface.
- Remove leaves, dust and spills promptly instead of leaving them to sit.
- Trim plants back from the walls so air can move around the building.
- Check shaded corners and the floor under benches every month in the wet season.
- Fix any leak, drip or blocked gutter as soon as you spot it, before the timber soaks.
If Mould Appears: What to Do
If you find a small patch of mould, act promptly and calmly. Stop using the sauna until you have dealt with it, and ventilate the room well. Find the source of the moisture first, because cleaning the patch without fixing a leak or a blocked vent means it will return.
Clean the affected area following your sauna manufacturer’s guidance and the instructions on any cleaning product you use. Wear gloves and a mask, and keep the room ventilated while you work. Do not use harsh chemicals or bleach inside a sauna unless the manufacturer says it is safe, because residues can release fumes when the room is heated.
If mould covers a large area, keeps returning after cleaning, or you are unsure whether the timber beneath it is sound, get professional advice before using the sauna again. A specialist can judge whether the wood needs treatment or replacement, and whether the ventilation or roof needs work.
People with asthma, allergies or other breathing conditions should take mould seriously and avoid spending time in a room where mould is present. If you are in any doubt about your health, speak to a doctor before using the sauna again.
Seasonal Checks: A Rain-Ready Routine
A sauna that is checked before the wet season is far easier to look after than one that is inspected after the damage appears. A short routine, done twice a year, catches most problems while they are still small.
| When | What to check | What to do |
|---|---|---|
| Before the wet season | Roof, flashing, gutters | Clear debris, fix loose fixings, check seals |
| Before the wet season | Walls and door seal | Look for gaps, re-oil exterior timber if due |
| During the wet season | Gutters and downspouts | Clear blockages, check water runs away |
| During the wet season | Shaded corners and floor | Look for damp patches or early mould |
| After the wet season | Roof and base | Check for slipped coverings and pooling water |
| After the wet season | Vents and heater | Clear vents, check the heater and wiring safely |
Winter adds its own challenges, because snow can sit on a roof and melt slowly into joints, and frozen gutters cannot drain at all. If your area gets snow as well as rain, read our guide to the outdoor sauna in winter, with heating and snow tips before the cold arrives.
Keep a simple log of what you check and when. A note that says the gutters were cleared in early autumn, or that the west wall was re-oiled in spring, makes the next check faster and stops jobs from being forgotten. Our outdoor sauna maintenance calendar gives a year-round plan you can adapt to your climate.
Common Mistakes That Invite Water In
Most rain problems come from a short list of avoidable mistakes. Knowing them in advance is cheaper than fixing the rot they cause.
- Building too close to the ground. Walls that touch wet soil or sit in a puddle soak up water from below. A raised base and a gravel apron keep the lowest boards dry.
- Skipping the overhang. A roof that ends flush with the wall leaves the wall fully exposed to every storm.
- Letting plants hug the walls. Shrubs and climbing plants trap damp air against the timber and hide leaks until they are serious.
- Closing a damp sauna. Shutting the door and vents on a wet room locks the moisture in and gives mould a still, damp space to grow.
- Ignoring the chimney flashing. The joint where a chimney passes through the roof is a classic leak point, and it is easy to miss from the ground.
- Forgetting the door seal. A worn door seal lets wind-driven rain into the room and lets warm air out. Check it each season.
If you are still planning your sauna, these mistakes are easier to avoid than to fix. Our guide on how to build an outdoor sauna covers the planning stage, including siting and drainage, before the first board goes up.
When to Call a Professional
Some rain problems are jobs for an owner with a ladder and a brush. Others are jobs for a professional. Knowing the difference keeps you safe and stops a small job from becoming a costly one.
- Call a roofer if the roof covering is slipping, the flashing has failed, or water is coming in through the roof itself.
- Call a builder if walls are soft, warped or out of line, or if the base has sunk or shifted.
- Call a licensed electrician for any damp wiring, tripping breaker, or heater fault. Never work on sauna electrics yourself.
- Call a chimney or stove specialist if a wood-fired stove leaks, smokes into the room, or shows damage around the flue.
- Call a mould specialist if mould is widespread, keeps returning, or you have a breathing condition and need the room assessed.
A professional inspection before the wet season is money well spent on an older sauna. A roofer or builder can spot a failing flashing or a soft board in minutes, and the repair is usually small if it is caught early.
Key Takeaways
- Rain damage is usually a series of small weaknesses, not one big leak, and most of them are preventable.
- A sloped roof, a generous overhang, and clear gutters keep most rain off the walls.
- Water must be carried away from the sauna, not dropped beside the base.
- Ventilate and dry the room after every session, and be patient with drying in humid weather.
- Protect end grain, renew exterior finishes on schedule, and use only sauna-safe products inside.
- Check shaded corners monthly in the wet season, and fix leaks and blocked gutters as soon as you find them.
- Use licensed professionals for roofing, electrical and chimney work, and follow your kit manufacturer’s guidance.
Frequently Asked Questions
Can I use my outdoor sauna in the rain?
Yes, a well-built outdoor sauna can be used in the rain. Keep the door closed during the session, dry off before stepping back inside the house, and ventilate the sauna afterwards so it dries fully. Avoid using it in a storm, and never use a sauna with a damaged roof or wet electrics.
Does rain damage an outdoor sauna?
Rain on its own does not ruin a sauna, but repeated wetting without drying can damage wood over time. Boards can swell and warp, joints can open, and damp timber can grow mould. A good roof, overhangs, gutters and a drying routine keep that damage from happening.
What is the best roof for an outdoor sauna in a rainy climate?
There is no single best roof for every sauna. Metal roofing sheds water quickly, asphalt shingles suit a properly pitched roof, cedar shingles suit timber saunas, and EPDM membrane suits low-slope roofs. The right choice depends on your roof pitch, your kit, and your local rainfall, so follow the manufacturer’s guidance for your roof.
How big should the roof overhang be on an outdoor sauna?
There is no universal overhang depth that fits every sauna. A deeper overhang gives more protection, especially on the side facing wind and rain. Follow your kit manufacturer’s guidance for the right depth, and ask a builder or roofing professional if you are changing an existing roof.
How do I stop mould growing in my outdoor sauna?
Ventilate after every session with the door ajar and the vents open until the room is dry. Keep the floor and benches clear, remove leaves and spills promptly, trim plants back from the walls, and check shaded corners every month in the wet season. Fix any leak or blocked gutter as soon as you spot it.
What should I do if I find mould in my sauna?
Stop using the sauna, ventilate the room, and find the source of the moisture before you clean. Clean the area following your sauna manufacturer’s guidance, wearing gloves and a mask, and do not use harsh chemicals inside unless the manufacturer says it is safe. If mould covers a large area or keeps returning, get professional advice before using the sauna again.
Do I need gutters on an outdoor sauna?
Gutters are not always required, but they help a lot in a rainy climate. They stop roof water from falling in a line at the eaves, splashing mud onto the walls, and pooling near the base. If you fit gutters, keep them clear and make sure the downspouts carry water away from the sauna.
Final Word
Keeping an outdoor sauna dry in rain and humidity is not about one clever product. It is about a roof that sheds water, overhangs that keep it off the walls, gutters that carry it away, and the habit of letting the room dry after every session.
Start with the roof and the ground, because those two decide how much water ever reaches the timber. Then build the small habits into your routine: clear the gutters, open the vents, and check the shaded corners. Done regularly, those habits are the difference between a sauna that ages gracefully and one that fights damp every winter.
Last updated: 10 November 2026. This article is general guidance only. Check your local code and permit office, and use licensed professionals for roofing and electrical work.