
An outdoor sauna in a cold climate lives a harder life than an indoor one. On a freezing night the wall of your sauna can face a temperature difference of 60°C or more between the hot room inside and the air outside, and every gap in the insulation is a leak that costs heat, money and comfort.
Good insulation does three jobs at once. It keeps the heat where you want it, so the heater works less and the room reaches temperature faster. It keeps moisture out of the wall structure, so the timber stays dry and the sauna lasts for decades instead of a few winters. And it keeps the bench level warm and even, so the sauna feels right instead of draughty at your feet and scorching at the ceiling.
This guide explains how outdoor sauna insulation actually works in cold climates: the wall build-up layer by layer, what foil vapour barriers do, why rockwool (mineral wool) is the default choice, how the alternatives compare, and the mistakes that ruin an otherwise well-built sauna. It is a construction guide, not a winter-use guide. If you want help running a sauna through snow season, see our guide to outdoor saunas in winter.


Paid Links - As an Amazon Associate, I earn from qualifying purchases.
Please read before you build: This article is general guidance only. It is not a substitute for your local building code, permit rules or a licensed professional. Always check with your local permit and code office before building, and use a licensed electrician for any heater or wiring work. Cost figures in this article are planning estimates, not quotes. Prices vary by region, brand and installer, so get local quotes before you buy.
Why insulation matters more outdoors than indoors
An indoor sauna sits inside a heated house. Its walls lose heat into rooms that are already warm, so even thin insulation is often enough. An outdoor sauna has no such luck. Its walls face wind, rain, snow and sub-zero air, and the bigger the temperature gap, the faster heat escapes.
That heat loss shows up in three ways you can feel. First, the heater runs longer and harder to reach temperature, which raises running costs. Second, the lower benches and the floor stay cold while the ceiling overheats, because heat escapes fastest where the wall is weakest. Third, warm moist air from inside the sauna meets cold surfaces inside the wall, condenses into water, and quietly soaks the timber and insulation.
The third problem is the expensive one. Wet insulation loses much of its insulating power, and wet timber rots and grows mould. A sauna that looks fine from the outside can be rotting from the inside out within a few winters. Proper insulation, paired with a vapour barrier, is what stops that from happening.
How a sauna wall actually works
A well-built outdoor sauna wall is not one thick layer. It is a system of layers, each doing a different job. The insulation sits between the studs, the vapour barrier sits on the warm side of the insulation, and a ventilation gap sits behind the interior panelling so any moisture can dry out.
Think of it as a sandwich, built from the outside in. Each layer matters, and skipping one creates a weak point that the others cannot fix.


Paid Links - As an Amazon Associate, I earn from qualifying purchases.
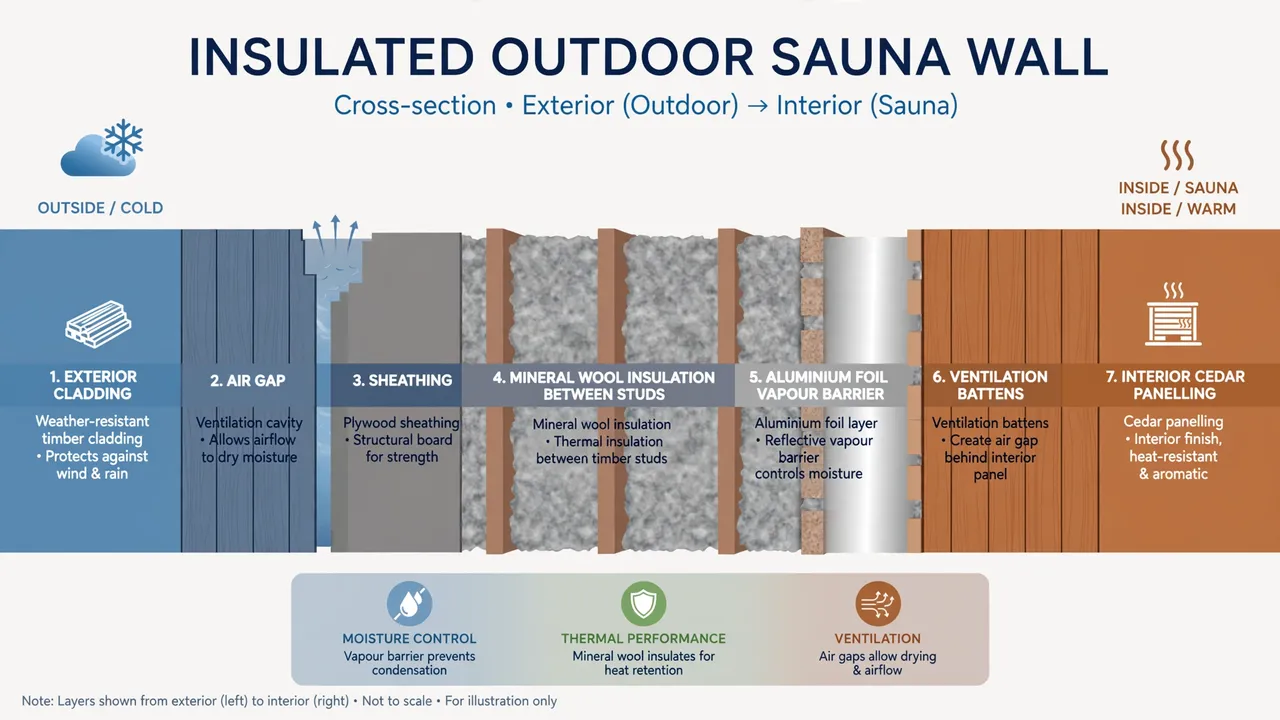
The layers, outside to inside
| Layer | What it does | Typical material |
|---|---|---|
| Exterior cladding | Sheds rain and snow, protects the wall | Thermowood, cedar or spruce boards |
| Ventilated air gap | Lets the cladding dry after rain | 20–25 mm gap on vertical battens |
| Wind barrier / sheathing | Stops wind washing through the insulation | Breathable membrane or board sheathing |
| Studs with insulation | Slows heat loss through the wall | Rockwool or mineral wool batts |
| Foil vapour barrier | Stops warm moist air reaching the cold wall | Aluminium foil, taped at every seam |
| Ventilation battens | Air gap so the panelling can dry | 20–22 mm battens |
| Interior panelling | The surface you see and touch | Alder, aspen or cedar tongue-and-groove |
The order matters. The vapour barrier must sit on the warm (interior) side of the insulation, never on the cold side. Put it in the wrong place and it traps moisture inside the wall instead of keeping it out. The ventilation gap behind the interior panelling matters too. Without it, any moisture that does reach the panelling has nowhere to go.
Wall thickness is part of the system as well. In cold climates, builders commonly use 100 mm studs so there is room for a full 100 mm of insulation. Thinner 50 mm walls are common on budget kits, but they leave little room for insulation and perform poorly in a real winter. If you are choosing between kits, check the wall thickness before you check the price. Our guide to sizing an outdoor sauna covers how size and heater choice interact with the building shell.
Foil vapour barriers: the most important layer you cannot see
A vapour barrier is a sheet of material that stops water vapour from passing through the wall. In a sauna it is usually aluminium foil, sometimes foil laminated to paper or plastic. It sits directly behind the interior panelling, on the warm side of the insulation, and it does two jobs.
First, it blocks moisture. A sauna session fills the air with steam, and warm air holds far more moisture than cold air. Without a barrier, that moisture drifts into the insulation, hits the cold outer layers, and condenses into liquid water inside the wall. The foil stops the vapour before it gets there.
Second, the shiny foil surface reflects radiant heat back into the room. This is a real but modest effect. It helps a little with comfort and heat retention, but it is not a substitute for proper insulation. A foil layer with no insulation behind it will not keep a sauna warm.
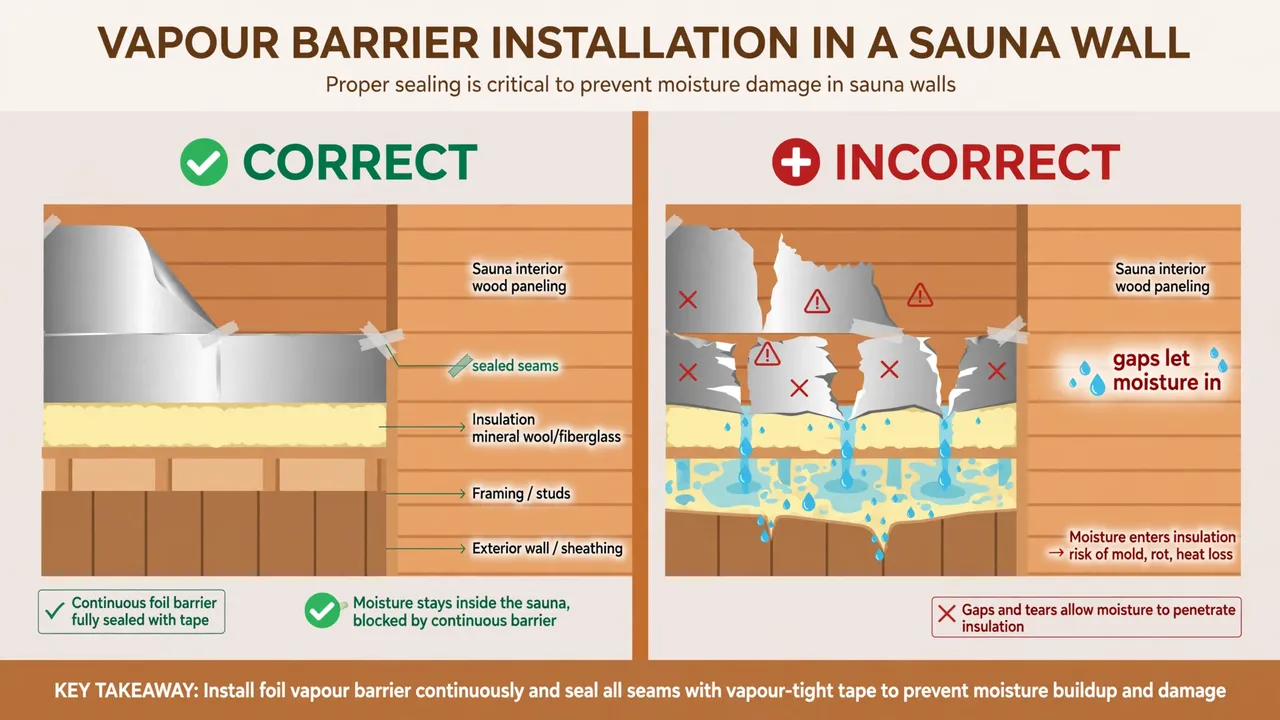
Installing a foil barrier properly
A vapour barrier is only as good as its weakest point. A single untaped seam or a tear around a light fitting lets moist air through, and the moisture will find that gap. Installation quality matters more than the brand of foil you buy.
- Overlap every seam by at least 100 mm and tape it with aluminium tape, not ordinary tape. Ordinary tape dries out and peels in sauna heat.
- Run the foil continuously across walls and ceiling with no breaks. Treat the ceiling as part of the same sealed envelope, since hot moist air rises.
- Seal every penetration. Light fittings, thermometer cables, heater wiring and vent openings all need taping or a proper gasket where they pass through the foil.
- Staple sparingly and tape over staples. Every staple is a tiny hole. Keep staples to the edges and cover them with tape.
- Do not puncture the foil when fixing battens. Fix the ventilation battens through the foil into the studs, then tape over the fixing points if the foil is torn.
One common question is whether the foil should go behind the insulation instead. The answer is no. The barrier belongs on the warm side, directly behind the interior panelling. If it sits on the cold side, moisture condenses on its inner face and soaks the insulation from the inside.
Ventilation works with the barrier, not against it. The sauna still needs fresh air coming in and stale air going out, but that air should move through purpose-built vents, not through gaps in the wall. See our guide to outdoor sauna ventilation for vent placement that works with a sealed wall.
Rockwool (mineral wool): the workhorse of sauna insulation
Rockwool, also called mineral wool or stone wool, is the most widely used insulation in outdoor saunas, and for good reason. It is made from melted rock spun into fibres, so it handles heat well, does not burn, and keeps its shape when it gets damp and dries out again.
Its heat resistance is solid rather than spectacular. Typical published values put mineral wool at roughly R-3.0 to R-3.7 per inch of thickness, so a 100 mm (about 4 inch) layer gives roughly R-12 to R-15. That is enough for a cold-climate sauna when combined with a foil barrier and a sealed wall, and it is the standard that most sauna kit makers design around.
Rockwool has three practical advantages that matter in a sauna. It is non-combustible, which is reassuring next to a wood-fired stove or a powerful electric heater. It is vapour-open, meaning it lets moisture pass through and dry out rather than trapping it, so a small leak dries instead of festering. And it is easy to cut and friction-fit between studs, which makes a tight, gap-free install achievable for a careful DIY builder.
Choosing and fitting rockwool batts
- Match the batt to your stud depth. A 100 mm stud bay takes a 100 mm batt. Do not compress a thick batt into a shallow bay, because compressed insulation loses performance.
- Cut slightly oversize. A batt cut a few millimetres wider than the bay stays in place by friction and leaves no gaps at the edges.
- Fill every gap. Gaps around windows, doors, pipes and corners are where heat escapes fastest. Cut small pieces to fill them rather than leaving voids.
- Wear gloves, a mask and long sleeves. Mineral wool fibres irritate skin and lungs during handling, even though the finished wall is safe once sealed behind foil and panelling.
- Use unfaced batts. The foil vapour barrier is a separate layer. Faced batts with a paper or foil facing can create a second, misplaced vapour layer inside the wall.
One thing rockwool does not do is block air. It slows heat moving through the material, but wind can still blow through it if the wall is not sealed. That is why the wind barrier on the outside and the foil barrier on the inside are both essential. Insulation without air sealing is like a warm coat left unzipped.
How the alternatives compare
Rockwool is the default, but it is not the only option. Rigid foam boards and foil-faced products each have a place, and understanding their trade-offs helps you choose for your climate and budget. The table below uses typical published R-values per inch. Always check the datasheet for the exact product you buy, because values vary by brand and density.
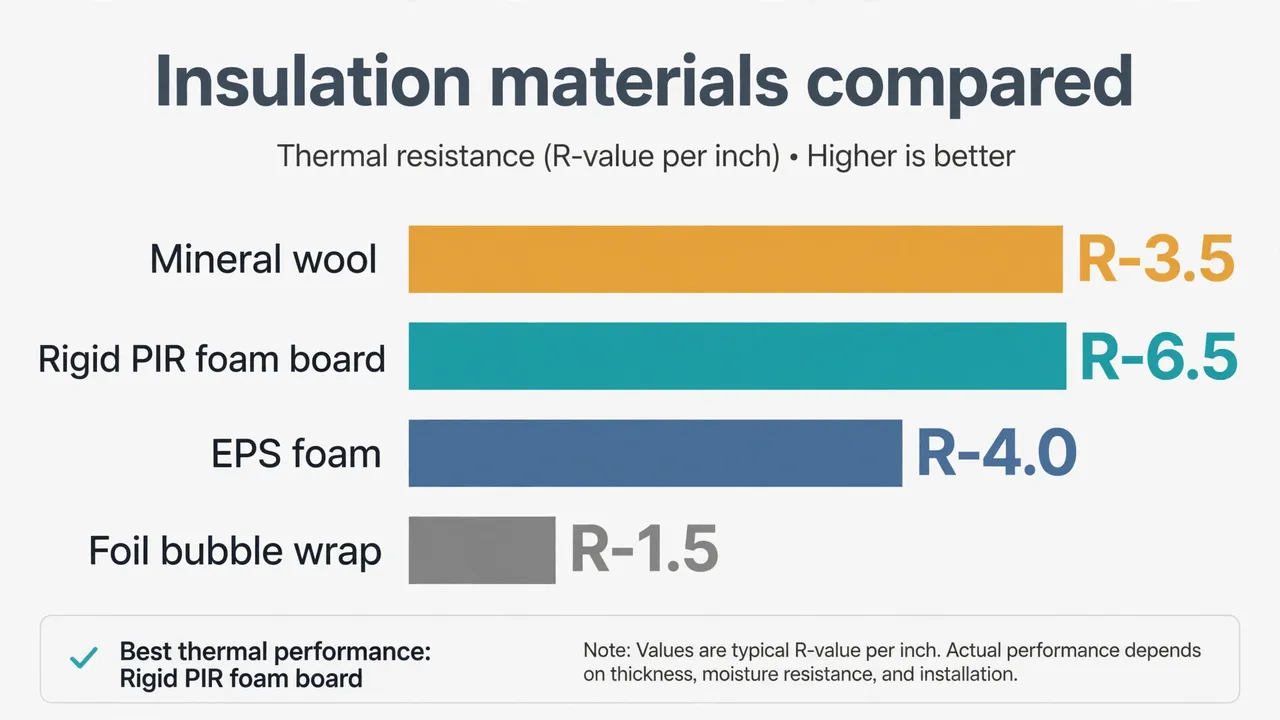
| Material | Typical R-value per inch* | Fire behaviour | Moisture behaviour | Best for |
|---|---|---|---|---|
| Mineral wool (rockwool) | R-3.0 to R-3.7 | Non-combustible | Vapour-open, dries out | Standard cold-climate walls |
| Rigid PIR foam board | R-6.0 to R-6.5 | Combustible, needs covering | Low absorption, foil-faced | Thin walls needing high R-value |
| EPS foam board | R-3.6 to R-4.2 | Combustible, needs covering | Low absorption | Budget builds, floors |
| XPS foam board | R-5.0 | Combustible, needs covering | Very low absorption | Below-grade and floor use |
| Foil bubble wrap | R-1.0 to R-1.5 | Varies by product | Vapour barrier itself | Reflective layer only, not insulation |
Rigid PIR foam boards
PIR (polyisocyanurate) boards offer roughly double the insulating power of mineral wool per inch, which makes them attractive when wall thickness is limited. A 50 mm PIR board can match the thermal performance of about 100 mm of rockwool. They are usually foil-faced, which adds a reflective surface.
The catch is fire safety. PIR foam is combustible and must never be left exposed inside a sauna. It has to be fully covered by the foil barrier and interior panelling, with no gaps, and it should never sit close to a heater or flue. Check the manufacturer’s temperature limits before using any foam product in a hot room, and follow the heater maker’s clearance instructions exactly.
EPS and XPS foam boards
EPS (expanded polystyrene) and XPS (extruded polystyrene) are cheaper foam options with moderate insulating power. XPS absorbs very little water, which makes it a good choice under floors and around foundations. EPS is lighter and cheaper but absorbs more moisture over time.
Both are combustible and, like PIR, must be fully covered inside the hot room. They are better suited to the floor, the roof, and the outer shell than to the walls of the sauna room itself. Never use any foam board as the only insulation directly behind the panelling near a stove.
Foil bubble wrap: a reflective layer, not insulation
Foil bubble wrap is sometimes sold as sauna insulation, but on its own it is not. Its R-value is low, around R-1.0 to R-1.5, because the thin layer of trapped air does very little. Its real job is reflecting radiant heat, and it works best as a vapour barrier or as an extra reflective layer over proper insulation.
If a kit or seller claims that foil bubble wrap alone is enough insulation for a cold climate, be sceptical. A sauna built that way will heat slowly, cost more to run, and struggle on the coldest nights. Use foil bubble as a barrier layer, not as the insulation.
Building the wall, step by step
The order of work matters as much as the materials. Each layer goes in at the right time, and the vapour barrier goes in last before the interior panelling. Rushing the sequence is how gaps and tears happen.
- Frame the walls with studs deep enough for your insulation, typically 100 mm in cold climates. Keep stud spacing even so batts fit snugly.
- Fit the exterior sheathing and wind barrier on the outside of the frame, sealing joints so wind cannot reach the insulation.
- Install the exterior cladding over a ventilated air gap on battens, so rain can drain and the cladding can dry.
- Fit the insulation batts between the studs from the inside, cutting them slightly oversize and filling every gap around windows, doors and corners.
- Run the foil vapour barrier across the whole interior face, walls and ceiling, overlapping and taping every seam and sealing every penetration.
- Fix the ventilation battens over the foil, creating the air gap behind the panelling. Tape over any foil damage from fixings.
- Fit the interior panelling, leaving small gaps at the floor and ceiling so air can move behind it. Choose a sauna-suitable wood such as alder, aspen or cedar. Our comparison of thermowood vs cedar vs spruce for outdoor saunas covers the trade-offs.
Before you start, check whether your project needs a permit. Rules vary widely by location, and some areas treat an outdoor sauna as an outbuilding with setback and size rules. Our guide to whether you need a permit for an outdoor sauna explains what to check and who to ask. A solid foundation for your outdoor sauna matters just as much as the walls, since a damp or shifting base undermines everything above it.
Do not forget the roof and the floor
Walls get most of the attention, but heat rises, and the ceiling is where the hottest air sits. In a cold climate the roof deserves at least as much insulation as the walls, and many builders use more. A poorly insulated ceiling is the single biggest heat leak in most outdoor saunas.
Insulate the ceiling with the same care as the walls: full-depth insulation between the joists, a continuous foil barrier on the warm side, and a ventilation gap above the insulation so the roof structure can dry. The foil barrier must run continuously from wall to ceiling with no break at the joint, because that corner is where moist air collects.
The floor is different. It sits close to the cold ground and gets splashed with water, so moisture resistance matters more than maximum R-value. Rigid XPS boards under a concrete slab or beneath the floor deck work well, because they absorb almost no water. A raised wooden floor over a ventilated crawl space also performs well, provided air can move underneath and the ground stays dry. Whatever you choose, keep the floor structure ventilated and never let timber sit in standing water.
What insulation does to heat-up time and running costs
Insulation does not change how hot your sauna gets. The heater decides that. What insulation changes is how fast the room gets there and how much energy it takes to stay there. A well-insulated sauna reaches temperature sooner, holds it with less heater cycling, and keeps the lower benches warm.
The effect is easiest to see as a worked example. Take a typical two-person outdoor sauna with roughly 8 square metres of wall and ceiling area, heated by a 6 kW electric heater. The numbers below are planning estimates, not measurements, and your sauna will differ. They show the direction and rough size of the effect, not a guarantee.
| Wall build-up | Approximate heat loss* | What you notice |
|---|---|---|
| 50 mm rockwool, no foil barrier | Highest | Slow heat-up, cold feet, heater runs almost constantly |
| 100 mm rockwool, no foil barrier | Medium | Reasonable heat-up, but moisture risk in the wall |
| 100 mm rockwool + taped foil barrier | Lowest | Fastest heat-up, even bench temperatures, dry walls |
| 50 mm PIR + foil barrier | Low | Similar to 100 mm rockwool, in a thinner wall |
In practice, the difference between a poorly insulated sauna and a well-insulated one can be tens of minutes of heat-up time on a cold night, and a heater that cycles on and off instead of running flat out. Over a winter of regular sessions, that adds up to real savings on electricity or firewood. Our guide to outdoor sauna running costs per session breaks down the energy side in more detail.
Heater sizing and insulation go together. An undersized heater in a well-insulated sauna will still reach temperature, just slowly. An oversized heater in a poorly insulated sauna will reach temperature quickly and then struggle to hold it evenly. If you are choosing a heater, read our comparison of wood-fired vs electric outdoor sauna heaters alongside this guide.
Fire safety and heater clearances
Insulation and fire safety are linked. Mineral wool is non-combustible, which is one reason it is the standard choice near heaters and stoves. Foam boards are not, and they must be fully covered and kept well away from heat sources. Whatever insulation you use, follow the heater manufacturer’s clearance instructions exactly, and never improvise clearances.
For wood-fired saunas, the basics are simple and non-negotiable. Never leave a lit stove unattended. Keep the flue and chimney clean and inspect them regularly, since soot build-up is a fire risk. Store ash in a metal container with a lid, away from the building, and only once it is fully cold. Keep firewood and kindling away from the stove, not stacked against the sauna wall.
Electric heaters need a licensed electrician for installation, full stop. The wiring, the breaker and the heater’s position all have safety implications, and a sauna is a hot, damp environment where electrical mistakes are dangerous. Do not run a heater circuit yourself unless you are qualified and your local code allows it.
Common insulation mistakes (and how to avoid them)
- Leaving gaps in the insulation. Even small gaps leak a surprising amount of heat. Cut batts to fit and fill every void, especially around windows and corners.
- Putting the vapour barrier on the wrong side. It belongs on the warm side, behind the panelling. On the cold side it traps moisture in the wall.
- Untaped seams. A foil barrier with open seams is barely a barrier at all. Tape every joint with aluminium tape.
- Compressing thick batts into shallow studs. Squashed insulation insulates worse, not better. Match batt thickness to stud depth.
- Insulating the walls and forgetting the ceiling. Hot air rises, so an uninsulated ceiling wastes more heat than an uninsulated wall.
- Using foil bubble wrap as the only insulation. It is a reflective layer, not insulation. It needs real insulation behind it.
- Sealing the wall but forgetting ventilation. The sauna needs controlled fresh air through proper vents, and the panelling needs an air gap behind it to dry.
- Exposing foam board near the heater. Foam must be fully covered and kept clear of heat sources. Check temperature limits on the datasheet.
Checking and maintaining your insulation
Insulation is mostly fit-and-forget, but a quick check once a year is worth it. Look for cold spots on the walls during a session, which can signal a gap or a damp patch. Check the exterior cladding for damage and the roof for leaks, since water getting into the wall is the main threat to insulation.
Inside, look for dark staining or a musty smell on the panelling, which can mean moisture is reaching the wood. If you find a problem, do not just cover it up. Find the source, whether it is a torn vapour barrier, a roof leak or a blocked vent, and fix that first. A seasonal check fits naturally into an outdoor sauna maintenance calendar, so the wall check happens before winter, not after the damage is done.
If your sauna is already built and poorly insulated, retrofitting is possible but harder than building it right the first time. Adding insulation from the inside means removing the panelling and the old barrier, then rebuilding the wall layers in the correct order. Adding it from the outside means removing cladding. Either way, the vapour barrier must end up on the warm side, so plan the job as a full wall rebuild, not a patch.
Frequently asked questions
Do outdoor saunas need insulation in cold climates?
Yes. In cold climates insulation is essential, not optional. Without it the heater works much harder, the room heats slowly and unevenly, and moisture condenses inside the walls, which can rot the timber. A well-insulated wall with a vapour barrier is what makes an outdoor sauna practical through winter.
Is rockwool safe to use in a sauna?
Yes. Rockwool, also called mineral wool or stone wool, is non-combustible and widely used in sauna walls. Wear gloves, a mask and long sleeves when handling it, because the fibres irritate skin and lungs. Once it is sealed behind the foil vapour barrier and interior panelling, the finished wall is safe.
Where does the foil vapour barrier go in a sauna wall?
The foil vapour barrier goes on the warm side of the insulation, directly behind the interior panelling. It must run continuously across walls and ceiling, with every seam overlapped and taped with aluminium tape. Putting it on the cold side traps moisture inside the wall.
How thick should outdoor sauna insulation be?
In cold climates, 100 mm of mineral wool in 100 mm studs is a common standard, giving roughly R-12 to R-15. Thinner 50 mm walls are common on budget kits but perform poorly in a real winter. If wall thickness is limited, rigid PIR foam board gives roughly double the R-value per inch, but it must be fully covered and kept away from heat sources.
Can I use foam board insulation in a sauna?
Yes, with care. PIR, EPS and XPS foam boards insulate well, but they are combustible and must never be left exposed inside the hot room. They must be fully covered by the foil barrier and panelling, kept clear of the heater and flue, and used within the temperature limits on the product datasheet. Mineral wool is the safer default for walls near a stove.
Is foil bubble wrap enough insulation for an outdoor sauna?
No. Foil bubble wrap has a low R-value of roughly R-1.0 to R-1.5 and works as a reflective layer, not as insulation. It should be used as a vapour barrier or as an extra layer over proper insulation such as rockwool or PIR board, never as the only insulation in a cold climate.
Does insulation stop condensation in a sauna?
Insulation alone does not stop condensation. The foil vapour barrier is what stops warm moist air from reaching the cold layers of the wall and condensing there. Insulation and the barrier work together: the insulation keeps surfaces warmer, and the barrier keeps moisture out. Both are needed, plus ventilation so the room and the panelling can dry.
Can I add insulation to an existing outdoor sauna?
Yes, but it is a bigger job than building it right the first time. Adding insulation from the inside means removing the panelling and the old vapour barrier, then rebuilding the wall layers in the correct order. Plan it as a full wall rebuild so the vapour barrier ends up on the warm side, and check the roof and floor at the same time.
The bottom line
Outdoor sauna insulation is not complicated, but it is unforgiving of shortcuts. The recipe is simple: a full depth of mineral wool between the studs, a continuous foil vapour barrier on the warm side with every seam taped, a ventilation gap behind the panelling, and the same care on the ceiling and floor as on the walls.
Get those layers right and your sauna heats faster, costs less to run, and stays dry and sound for decades. Get them wrong and you pay for it every winter, in heat, in money, and eventually in rotten timber. Build it once, build it properly, and check your local code and permit office before you start.
As with any sauna session, look after yourself as well as the building. Hydrate before and after, start with short sessions, leave immediately if you feel dizzy or unwell, and skip alcohol before or during a session. If you are pregnant, live with a heart or circulation condition or low blood pressure, or take medication that affects heat tolerance, check with your doctor first.