
A wood-fired sauna stove is the heart of an outdoor sauna. It heats the room, warms the stones, and gives the session its slow, crackling character. It also asks for regular care in return. A stove that is looked after heats faster, burns cleaner, and lasts far longer than one that is left to soot and rust.
This guide covers the three jobs that matter most: keeping the chimney clear of creosote, cleaning it properly, and handling ash safely. It also covers the stove body, the door gasket, and the stones, plus a seasonal checklist you can run before the cold months arrive. Everything here is practical and plain, and it follows one rule throughout: when in doubt, follow your stove and chimney manufacturer’s instructions and ask a professional.
Please note: This article is general guidance only, not a substitute for your stove or chimney manufacturer’s instructions, local building codes, or a licensed professional. Chimney fires and hot ash are real fire risks, so never leave a burning stove unattended, and check with your local permit or code office before changing a flue, chimney, or stove installation. If you are pregnant, live with a heart or circulation condition, or take medication that affects heat tolerance, check with your doctor before using a sauna.


#Paid Links
Why Wood-Fired Sauna Stove Care Matters
A wood stove is a simple machine, but it works in harsh conditions. Every fire leaves behind soot, ash, and sticky residues inside the flue. Over time those residues narrow the chimney, slow the draught, and raise the risk of a chimney fire. A clean stove and flue, by contrast, draw well, burn the wood fully, and fill the room with steady heat instead of smoke.
Good care also saves wood. A stove with a blocked flue or a leaking door gasket wastes fuel, because heat escapes up the chimney or around the door instead of warming the stones. Owners who clean on a routine often notice the difference at once: the fire catches faster, the room heats in less time, and far less smoke drifts back into the cabin when the door opens.
There is a safety side too, and it is the reason this guide exists. Creosote is flammable, and ash can hold live embers for days after a fire looks dead. Most stove problems are avoidable with a short routine, a metal ash bucket, and a habit of looking up the chimney before the heating season starts. The rest of this guide walks through each step in order.
How Creosote Forms Inside a Sauna Chimney
Creosote is the tarry residue left behind when wood smoke cools and condenses on the inside of a flue. Wood smoke carries water vapour, gases, and tiny unburned particles. When that smoke meets a cool chimney wall, some of it sticks. Layer by layer, it builds into a coating that can be flaky, crusty, or glazed and shiny, depending on how the stove has been run.
Three things make creosote worse. Burning wet or unseasoned wood is the biggest one, because the fire spends its energy boiling off water instead of burning cleanly, and the smoke stays cool and damp. Running the stove with the air supply choked down for long periods is another, because a slow, smouldering fire produces far more smoke than a hot, lively one. A cold or oversized flue is the third, because smoke cools before it can escape.
Sauna stoves are not immune to this, even though they run hot. A sauna fire is often lit from cold, loaded quickly, and run hard for a short session, then left to die down. That cycle of fast heating and cooling is exactly when condensation happens inside the flue. Short, hot burns with dry wood are far kinder to a chimney than long, smoky ones.


#Paid Links
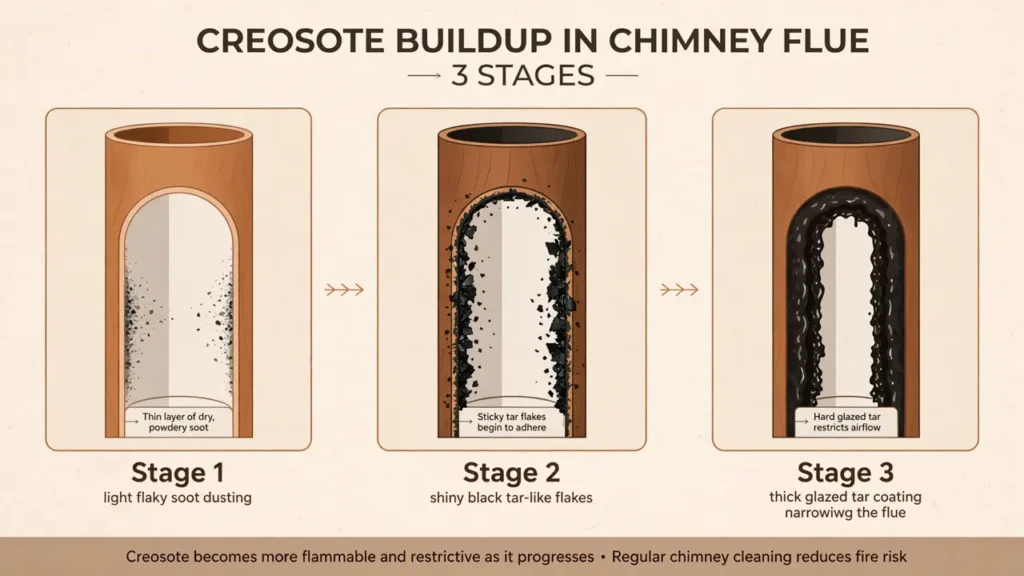
The Three Stages of Creosote
| Stage | What it looks like | How it forms | What to do |
|---|---|---|---|
| Stage 1 | Light, flaky soot that dusts off easily | Normal burning, especially with dry wood and hot fires | Brush it out during routine cleaning |
| Stage 2 | Shiny black flakes and crunchy tar deposits | Cooler fires, damp wood, or restricted air supply | Brush thoroughly and check again soon; improve burning habits |
| Stage 3 | Thick, glazed tar coating that narrows the flue | Repeated cool, smoky burning over a long period | Call a professional chimney sweep; do not rely on brushing alone |
Glazed creosote is the most dangerous stage because it is highly flammable and hard to remove with a brush. If your flue walls look shiny or tarry, book a sweep rather than trying to scrape it off yourself.
What Makes Creosote Worse in a Sauna Stove
Wet wood is the first culprit. Logs that have not been seasoned carry a large share of water, and that water cools the fire and the flue. The smoke stays damp, condenses quickly, and leaves heavy deposits. Dry, seasoned wood, split and stored under cover for a full season or more, burns hotter and cleaner, and it is the single best habit for a clean chimney.
The second culprit is how the fire is run. A stove damped right down so it smoulders for hours produces thick, cool smoke. A sauna stove works best with a lively fire and a good air supply while the room is heating, then a steady burn to hold the temperature. If you want a long, slow heat, add small loads of dry wood more often rather than choking one big load down.
The third factor is the flue itself. A flue that is too wide for the stove, too long, or exposed to cold air cools the smoke before it escapes. That is why the manufacturer’s flue size and routing matter, and why changes to the chimney should follow the manual and local code rather than guesswork. Insulated flue sections, where the manufacturer allows them, help keep smoke hot enough to leave cleanly.
Signs Your Chimney Needs Cleaning
You do not need to guess when to clean. A chimney tells you, if you know what to look for. The clearest sign is a change in how the stove behaves. If a fire that used to catch quickly now struggles, or smoke puffs back into the room when you open the door, the flue may be narrowed by deposits.
- Smoke spills into the room when you open the stove door or add wood, even with the air vent open.
- The fire is hard to light or dies down quickly, although the wood is dry and the vent is open.
- A strong, tarry smell hangs around the stove or the sauna, especially on damp or still days.
- Black, flaky soot falls onto the stove top or into the firebox when you tap the flue.
- Visible buildup when you shine a torch up the flue from below or look down from the top in daylight.
- The room heats slowly or never reaches its usual temperature, even with a full load of dry wood.
Any one of these signs is a reason to inspect the chimney soon. Two or more together mean cleaning should not wait. A quick visual check takes only a few minutes: wait until the stove is fully cold, open the cleanout or inspection point if your flue has one, and shine a torch up the pipe. If you cannot see the flue clearly, or the deposits look shiny and tarry, that is a job for a sweep.
Good draught depends on more than a clean flue, so it is worth checking the air supply too. A sauna room needs fresh air coming in, and a blocked or closed intake vent can starve the fire just as surely as a dirty chimney. Our guide to outdoor sauna ventilation explains how intake and exhaust vents work together and how to set them through the seasons.
How to Clean a Sauna Stove Chimney
Chimney cleaning is straightforward when the buildup is light and flaky, and it is a job many sauna owners do themselves between professional visits. The work is dirty but simple, and the tools are inexpensive. What matters most is doing it only when the stove is fully cold, protecting the room from soot, and knowing when to stop and call a sweep.
Start by gathering the right tools. You need a chimney brush sized to your flue, flexible rods to reach the full length, a dust mask and eye protection, old sheets or drop cloths, a bucket, and a torch. A brush that is too small will miss the walls, and one that is too large can jam. Check the flue diameter in your stove manual before buying, and buy rods long enough to reach from the cleanout to the cap.
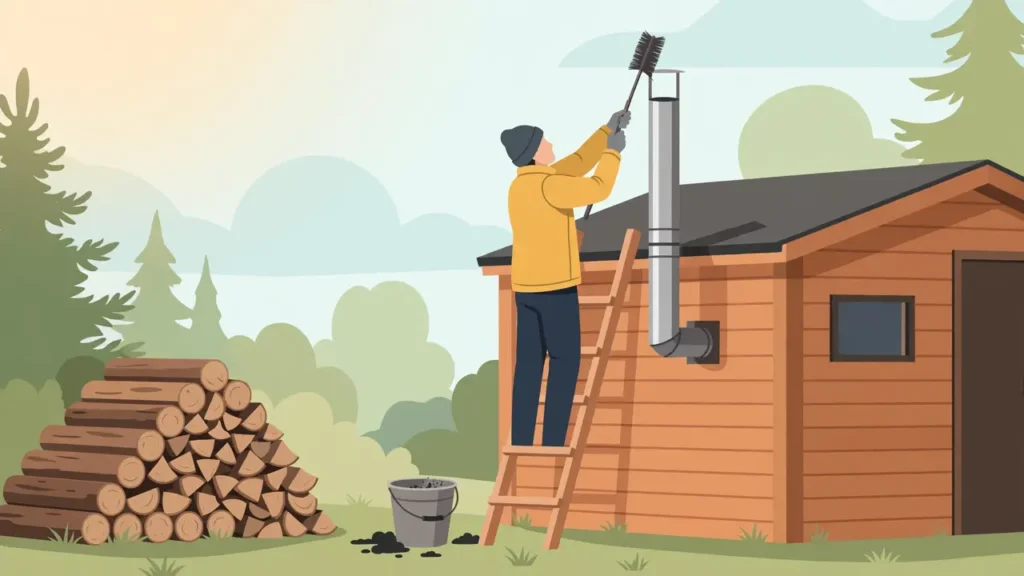
Step-by-Step Chimney Cleaning
- Let the stove go fully cold. Wait at least a full day after the last fire. The flue, stove, and ash must be cold to the touch before you start.
- Protect the room. Lay drop cloths over the benches and floor, close the stove door, and cover nearby surfaces. Soot travels further than you expect.
- Remove the stove pipe section if your setup allows. Some sauna flues have a removable lower section or a cleanout door. If yours does, take it apart over a bucket and brush each piece separately.
- Brush the flue in short passes. Push the brush up a rod length at a time, scrubbing as you go, and add rods as you climb. Work the brush up and down rather than spinning it hard, which can damage the flue lining.
- Clear the debris from below. Soot and flakes will fall into the firebox or the cleanout. Scoop them into a metal container and dispose of them with the ash, following the safe ash routine below.
- Check the chimney cap and spark arrestor. Clear leaves, nests, and soot from the cap and the mesh. A blocked cap chokes the draught just like a dirty flue.
- Inspect and reassemble. Shine a torch up the flue to check the walls are clean, then refit every section firmly. A loose joint leaks smoke into the room and wastes heat.
- Do a test fire. Light a small, hot fire with dry wood and watch the draught. The fire should catch quickly, and smoke should rise cleanly without spilling into the room.
If the flue is lined with glazed, shiny tar, stop. Brushing will not remove it, and scraping at it can damage the flue lining. That is a professional job, and a sweep has the rotary tools and the experience to remove glazed deposits safely. The same applies if the chimney has bends you cannot reach, a damaged liner, or a cap you cannot safely access from the ground or a stable ladder.
How Often Should You Clean the Chimney?
There is no single cleaning interval that fits every sauna, because use varies so much. A sauna used once a week in summer builds deposits far more slowly than one fired daily through winter. The honest answer is to inspect often and clean when the deposits tell you to, while keeping a minimum routine so nothing is left for years.
Cleaning Frequency Guide by Use
| How often you sauna | Inspect the flue | Clean the chimney | Professional sweep |
|---|---|---|---|
| Occasional, a few times a month | Every few months | At least once a year, before the main season | Once a year or when deposits look glazed |
| Weekly, year-round | Every 1 to 2 months | 1 to 2 times a year | Once a year, before winter |
| Several times a week or daily | Monthly | Several times a year, as deposits dictate | Once a year at minimum, more if burning damp wood |
| Any use, after a long break | Before the first fire | Before the first fire if deposits are present | If the flue was not checked in the past year |
These are general guidance ranges, not manufacturer rules. Always follow your stove and chimney manufacturer’s instructions, which take priority, and clean more often if you burn damp wood or run slow, smoky fires.
Wood type changes the pace too. Dry hardwood burns hotter and leaves less residue than damp or resinous softwood, so owners who burn only seasoned wood can often stretch the interval. Anyone burning wood of unknown moisture should inspect more often, because the deposits build faster and the risk rises with them. A moisture meter for firewood is a cheap tool that pays for itself in cleaner burning.
A yearly professional sweep is good practice for most wood-fired saunas, even when the owner brushes the flue themselves. A sweep inspects the whole system, including joints, the cap, and the flue lining, and can spot cracked liners or loose sections that a brush pass would miss. Think of it as a service visit, not a failure of your own cleaning routine.
When to Call a Professional Chimney Sweep
Some chimney jobs belong to a professional, and recognising them is part of good stove care. A sweep is trained to work with glazed creosote, damaged liners, and roofs, and carries tools that a home brush set cannot match. Calling one early is cheaper and safer than dealing with a chimney fire later.
- Glazed or tarry deposits that look shiny and will not brush off.
- A chimney fire has happened, even a small one. The flue must be inspected before the stove is used again.
- Smoke or smells persist after a thorough cleaning, which can point to a cracked liner, a blocked flue, or a design problem.
- You can see damage such as cracked flue sections, loose joints, rusted-through pipe, or a damaged chimney cap.
- Animals or nests are blocking the flue, or you hear movement inside the chimney.
- The chimney is hard to reach safely, for example a tall flue on a steep roof with no safe access.
When you book a sweep, ask whether they work with sauna stoves and small-diameter flues, since many sweeps mostly handle house chimneys. Ask them to check the stove-to-flue joint and the door gasket as well, because those are common leak points. Keep the sweep’s report with your sauna records, so you can track how fast deposits build from year to year.
Choosing a stove in the first place shapes how much of this work you will do. If you are still deciding between wood and electric heat, our wood-fired versus electric outdoor sauna heater comparison weighs running costs, heat-up time, and maintenance side by side.
Ash Handling and Disposal: The Hidden Fire Risk
Ash is the most underestimated hazard in wood-fired sauna care. A fire that looks completely dead can hide live embers under a grey crust, and those embers can stay hot enough to start a fire for days. Fire services regularly report fires started by ash stored in plastic bins, paper bags, or cardboard boxes, or tipped onto a garden bed too soon.
The safe routine is simple and worth making a habit. Always use a metal container with a tight-fitting metal lid, and always place it on a non-combustible surface away from the sauna, the woodpile, and the house. Never use a plastic bucket, a paper bag, or any container that can melt or catch fire, and never store ash indoors in a combustible bin.
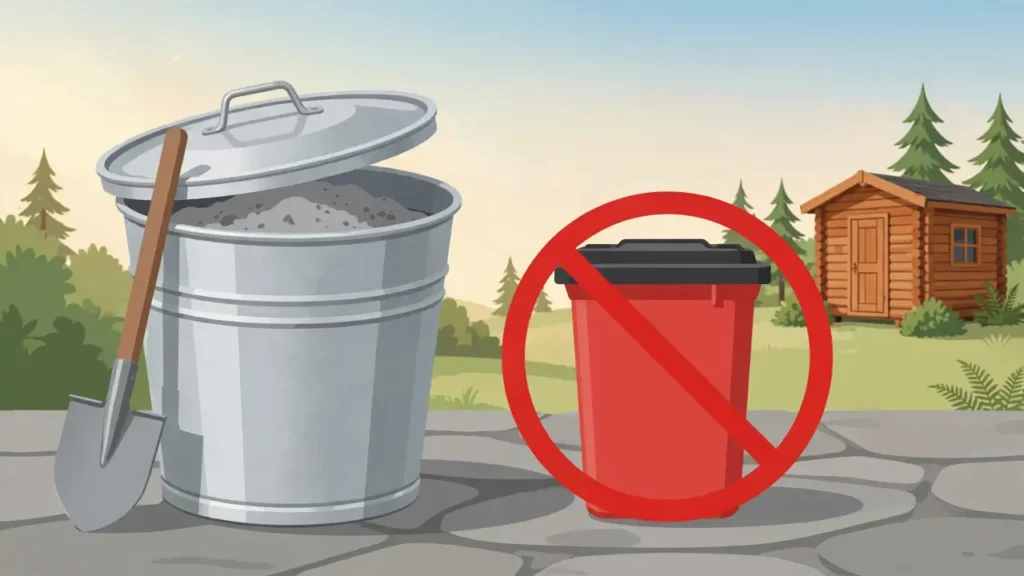
Ash Disposal: Do and Don’t
| Do | Don’t |
|---|---|
| Use a metal bucket with a tight metal lid | Use plastic bins, paper bags, or cardboard boxes |
| Let ash cool fully for several days before disposal | Tip warm ash onto soil, leaves, or a compost heap |
| Store the bucket on stone or concrete, away from buildings | Store ash in a garage, shed, or against a wooden wall |
| Dampen ash lightly before handling if it is dusty | Vacuum hot ash with a household vacuum cleaner |
| Keep the lid on until the ash is stone cold | Assume grey ash is cold ash |
As a rule of thumb, treat ash as potentially live for at least three days after the last fire. When in doubt, wait longer. The few minutes this costs are nothing against a fire.
How to Remove Ash From the Stove
Remove ash only when the stove is fully cold, and leave a thin layer behind. A small bed of ash insulates the firebox floor and helps the next fire catch. Scooping the stove completely bare every time is unnecessary and can wear the firebox lining faster. A depth of a couple of centimetres is a good guide, and your stove manual may give its own figure.
Use a small metal shovel and work slowly so the ash does not billow into the room. A dust mask helps, because fine ash irritates the lungs. If you need to vacuum, use only a vacuum rated for ash, with a metal canister and a proper filter, and only on fully cold ash. A standard household vacuum can spread fine ash through the room or, worse, draw a live ember into a bag full of dust.
Cooled wood ash can be useful in the garden in small amounts, since it is alkaline and contains minerals, but check local rules first and never spread ash that may contain treated wood, painted wood, or charcoal lighter residue. Ash from a sauna stove should only ever come from clean, untreated firewood. If you are unsure, dispose of it with household waste once it is stone cold.
Stove Body, Door Gasket, and Sauna Stones
The chimney gets most of the attention, but the stove body deserves a regular look too. Heat, moisture, and ash wear a stove down over the seasons, and small problems caught early are cheap to fix. A short inspection each month during the heating season is enough for most owners.
Checking the Door Gasket
The door gasket is the heat-resistant rope seal around the stove door, and it keeps air from leaking in around the edges. When it wears flat or frays, the fire pulls in extra air, burns too fast, and wastes wood. A simple check is to close the door on a thin strip of paper and try to pull it out. If it slides out easily, the seal is weak and the gasket may need replacing.
Replacing a gasket is a straightforward job on most stoves, but use the size and type your manufacturer specifies, and fit it exactly as the manual shows. A gasket that is too thick can stop the door closing, while one that is too thin will not seal at all. Check the door hinges and latch at the same time, since a sagging door will not seal no matter how new the gasket is.
Looking After the Stove Body and Firebox
Brush loose ash and soot from the firebox after each clean-out, and look for cracks in the firebrick or lining, warped baffles, or rust spots on the outside. Surface rust on a cast-iron stove can be brushed off and touched up with stove paint made for high temperatures, following the product instructions. Never paint a hot stove, and never use ordinary paint, which can give off fumes when heated.
Check the stove pipe joints where the flue meets the stove and where sections join. Soot stains around a joint are a sign of a leak, and a leaking joint lets smoke into the room and reduces the draught. Tighten or reseal the joint as the manual directs, and replace any section that is rusted through or warped. A stove that lives outdoors in a damp climate will need this check more often than one in a dry shed.
Sauna Stones and the Firebox
The stones on top of the stove spread heat and hold it between loads, and they wear out over time. Stones that have cracked, crumbled, or gone soft should be replaced, because broken stones block airflow through the pile and can let the firebox overheat. Restack the stones loosely, with gaps for air, rather than packing them tight, and check the manual for the stone type your stove is built for.
Never use stones collected from a riverbank or a building site. They can hold water inside, crack explosively when heated, or contain minerals that are unsafe at sauna temperatures. Use only stones sold for sauna use, such as olivine diabase or volcanic rock, and replace them when they show signs of breaking down. Our outdoor sauna maintenance calendar covers stone replacement and the other seasonal jobs in one place.
Seasonal and Pre-Season Stove Checklist
A stove that sits unused for months needs a proper check before the first fire of the season. Damp, insects, and rust can all move in while the sauna is quiet, and a blocked flue after a long break is a common cause of smoke-filled first sessions. Run this checklist in autumn, before the cold weather arrives, and again after any long break.
- Inspect the flue from top to bottom for soot, nests, leaves, and damage, and clean it before the first fire.
- Check the chimney cap and spark arrestor for blockages, rust, and a secure fit.
- Test the door gasket with the paper-strip check and replace it if the seal is weak.
- Look over the firebox lining and baffle for cracks, warping, or missing pieces.
- Inspect the stove pipe joints for soot stains, looseness, or rust.
- Check the stones and replace any that are cracked, crumbled, or soft.
- Clear the wood store of damp or rotten logs and restock with dry, seasoned wood.
- Make sure the ash bucket is sound, with a tight metal lid and no rust holes.
- Check the area around the stove for stored items, towels, or wood kept too close to the heat.
- Light a small test fire and watch the draught before the first full session.
Winter brings its own demands for an outdoor sauna, from frozen wood stores to snow loading on the roof. Our winter heating and snow tips for outdoor saunas cover heating a cold cabin, clearing snow safely, and keeping the stove fed through the coldest months.
Signs of Trouble: Smoke, Smells, and Poor Draught
Most stove problems announce themselves early, and the fix is usually simple. The table of symptoms below covers the common ones, but treat it as a starting point, not a diagnosis. If a problem persists after cleaning and checking the obvious causes, stop using the stove and ask a professional to look at it.
Troubleshooting Common Stove Problems
| Symptom | Likely cause | What to check first |
|---|---|---|
| Smoke spills into the room | Blocked or narrowed flue, cold flue, blocked cap | Clean the chimney, clear the cap, warm the flue with a small fire |
| Fire will not catch or keeps dying | Damp wood, poor air supply, blocked intake vent | Use dry seasoned wood, open the air vent and room intake |
| Strong tarry smell | Creosote buildup, slow smoky burning | Inspect and clean the flue, burn hotter with dry wood |
| Room heats slowly | Worn door gasket, blocked flue, broken stones | Test the gasket, clean the flue, check the stones |
| Roaring or rumbling from the chimney | Possible chimney fire | Close the air supply, leave the building, call the fire service |
| Soot stains around a flue joint | Loose or leaking joint | Refit and reseal the joint, replace damaged sections |
A chimney fire is an emergency. Do not try to put it out from inside the sauna. Close the stove air supply, get everyone out, and call your local fire service. Have the flue inspected by a professional before using the stove again.
Off-grid sauna owners face a few extra wrinkles, from hauling water to keeping a fire going far from help. Our off-grid sauna guide to wood stoves, water, and safety covers the setup basics that pair with the care routine in this article.
Burning Better: Habits That Keep the Chimney Clean
Cleaning matters, but burning well matters more, because it slows the buildup in the first place. The habits below cost nothing and make the biggest difference to how often the chimney needs attention. They are also the habits that give the best heat for the least wood.
- Burn only dry, seasoned wood. Split it, stack it under cover with airflow, and give it a full season or more to dry. Never burn painted, treated, or varnished wood, plywood, or household rubbish.
- Build a hot fire first. Let the fire burn lively while the room heats, with the air supply open, so the flue warms up and smoke leaves cleanly.
- Add small loads often. Several small loads of dry wood burn cleaner than one large load choked down to smoulder.
- Keep the air supply open enough. A starved fire makes thick, cool smoke and heavy creosote, so do not damp the stove down hard for long periods.
- Let the fire burn down properly. At the end of a session, let the remaining wood burn to ash rather than smothering it, so the flue stays warm and clear.
- Store wood dry and close by. Wet logs brought in from the rain undo all the good habits above, so keep a dry stack within easy reach of the stove.
These habits also make the sauna more pleasant to use. A hot, clean fire means less smoke in the room, faster heat, and a clearer view through the stove glass. It is the difference between a sauna that feels like a chore and one that feels like a ritual.
Frequently Asked Questions
How often should I clean my sauna stove chimney?
Inspect the flue every few months and clean at least once a year, before your main sauna season. If you sauna weekly or daily, clean one to two times a year or more, and always clean when you notice smoke spilling into the room, a tarry smell, or a fire that struggles to catch. Always follow your stove and chimney manufacturer’s instructions, which take priority over general guidance.
What is creosote, and is it dangerous?
Creosote is the tarry residue left when wood smoke cools and condenses inside a chimney. It is flammable, and a thick layer can catch fire inside the flue. Light, flaky creosote can be brushed out during routine cleaning, but thick, glazed creosote needs a professional chimney sweep.
How long should ash cool before I throw it away?
Treat ash as potentially live for at least three days after the last fire. Store it in a lidded metal container on a non-combustible surface away from buildings, and only dispose of it once it is stone cold. Never put ash in a plastic bin, a paper bag, or a compost heap while it could still hold embers.
Can I clean my sauna chimney myself?
Yes, if the buildup is light and flaky and you have the right brush size for your flue. Work only when the stove is fully cold, protect the room from soot, and check the cap and joints as you go. If the deposits are glazed and tarry, the flue is damaged, or you cannot reach the chimney safely, call a professional sweep.
What kind of wood should I burn in a sauna stove?
Burn only dry, seasoned, untreated firewood, split and stored under cover for a full season or more. Dry wood burns hotter and leaves far less creosote. Never burn painted, treated, or varnished wood, plywood, or household rubbish, which can release harmful fumes and damage the stove.
What should I do if my chimney catches fire?
Close the stove air supply, get everyone out of the sauna, and call your local fire service. Do not try to fight a chimney fire from inside the sauna. Have the flue inspected by a professional before you use the stove again.
References
- Chimney Safety Institute of America — chimney cleaning and creosote guidance: csia.org
- National Fire Protection Association — NFPA 211, Standard for Chimneys, Fireplaces, Vents, and Solid Fuel-Burning Appliances: nfpa.org
- U.S. Fire Administration — heating fire safety and ash disposal guidance: usfa.fema.gov
- U.S. Environmental Protection Agency — Burn Wise best burn practices for wood stoves: epa.gov/burnwise
Stove care is a small habit with a large payoff. A clean chimney, a sound door gasket, and a safe ash routine keep the heat where it belongs, in the room and on the stones, and keep the risks where they belong, outside the sauna. Put the seasonal checklist on your calendar, burn dry wood, and your wood-fired stove will repay the care for many winters to come.