
A steam shower enclosure is not a regular shower with a steam generator bolted on. It is a sealed room inside your bathroom, built to hold warm vapour in, keep water where it belongs, and dry out safely after every session. When the enclosure is designed well, the steam stays dense, the glass stays clear enough to see through, and the room feels calm instead of cramped. When it is designed badly, steam escapes through gaps, water pools in corners, and mould finds a home behind the tiles.
This guide walks through the three decisions that shape every steam shower enclosure design: the glass, the layout, and the showerheads. You will learn which glass thickness suits each panel size, how corner, alcove and walk-in layouts compare, and where to place two showerheads so they work together instead of fighting each other. The guide also covers sealing, ventilation, sizing, materials and budget planning, so you can brief a builder with confidence or judge a quote you have already received.
The advice here applies to a dedicated steam shower enclosure in a home bathroom. It is not a guide to converting a whole bathroom into a steam room, and it is not a substitute for a licensed plumber or electrician. If you are planning a full conversion, read our guide on how to turn your shower into a steam sauna first, because it covers the wider changes a conversion needs.


#Paid Links
Please read first: This article gives general guidance only. It is not a substitute for your local building code, your local permit office, or a licensed professional. Steam and plumbing work must follow local rules, and installation should be done by licensed electricians and plumbers. Steam sessions also carry health limits. Hydrate before and after, keep sessions short, leave straight away if you feel dizzy or unwell, avoid alcohol before and during sessions, and check with a doctor first if you are pregnant, live with a heart or circulation condition, or take medication that affects heat tolerance.


#Paid Links
What Makes a Steam Shower Enclosure Different from a Regular Shower
A regular shower only has to contain splashing water. A steam shower enclosure has to contain vapour, and vapour behaves very differently from water. It rises, it finds every gap, and it condenses on the coldest surface it meets. That is why the enclosure needs a sealed ceiling, a door that closes tightly, and surfaces that can cope with constant moisture and heat.
The ceiling is the first big difference. A standard shower often has no ceiling at all, or it opens into the wider bathroom. A steam enclosure needs a ceiling that slopes slightly, usually by about one to two inches over its run, so condensation runs down to the wall instead of dripping cold water onto the person below. A flat ceiling collects droplets that fall straight down, which is uncomfortable and wastes heat.
The second difference is the seal. Every joint matters in a steam enclosure. The door, the glass panels, the bench, the ceiling joint and the drain all need to work as one sealed system. A gap of a few millimetres around a door can let enough steam escape to make the room slow to heat and hard to keep at temperature. Our guide to steam room bench, door, glass, layout, seating height and sealing mistakes shows the most common sealing errors and how to avoid them.
The third difference is drainage and drying. A steam room produces far more condensation than a normal shower. The floor needs a fall toward the drain, the drain needs to cope with the extra water, and the room needs ventilation that can dry it out after use. Without that, mould and mildew will appear behind tiles and under benches. Our guide to steam shower drain and ventilation explains how to size the drain and plan the drying cycle.
Choosing the Glass for Your Steam Shower Enclosure
Glass is the most visible part of any steam shower enclosure design, and it is also one of the most expensive. Three styles dominate the market: frameless, semi-frameless and framed. Each one changes the look of the room, the cleaning routine, and the price. The right choice depends on your budget, your bathroom style, and how much maintenance you are willing to do.
All steam shower glass should be tempered safety glass. Tempered glass is heat treated so that it is much stronger than ordinary glass, and if it does break, it shatters into small blunt pieces instead of sharp shards. This is a safety requirement in most building codes for shower enclosures, and it is not a place to cut corners. Always confirm with your supplier that every panel is tempered and marked as such.


#Paid Links
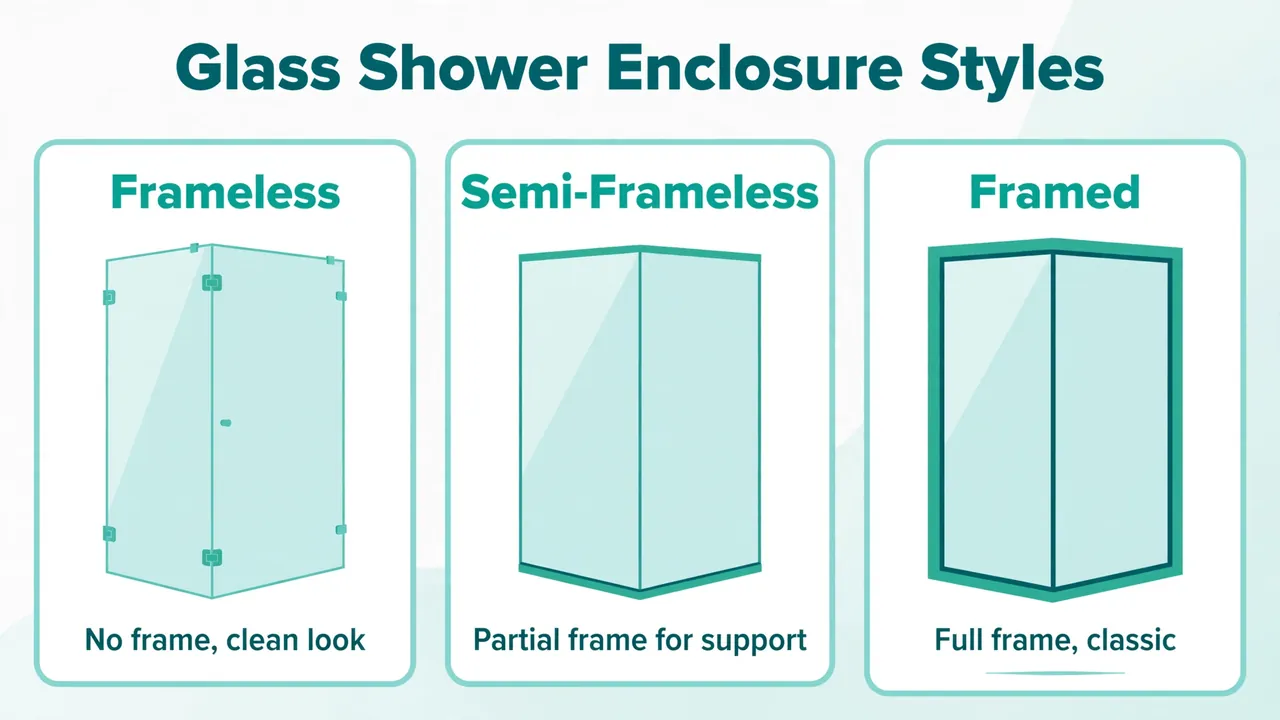
Frameless Glass: The Cleanest Look
Frameless enclosures use thick glass panels held by small clamps and hinges, with almost no metal frame around the edges. The result is a clear, open view into the shower that makes a small bathroom feel larger. Frameless glass is the most popular choice for high end steam showers, and it suits modern bathrooms with stone or large format tiles.
Semi-Frameless Glass: The Middle Ground
Semi-frameless enclosures have a frame around the door or around the fixed panels, but not both. The frame gives the structure extra rigidity, which means the glass can be thinner, usually 8 mm, and the whole unit costs less than a fully frameless design. Many homeowners choose this style because it keeps most of the open look while saving a meaningful amount of money.
The frame also helps with sealing. A metal channel along the bottom of a fixed panel gives the installer a forgiving surface to seal against, and a framed door closes against a defined edge. The downside is that the frame creates more edges and joints to clean, and water can collect in the channels if they are not kept clear.
Framed Glass: The Practical Budget Choice
Framed enclosures surround every panel with a metal frame, usually aluminium. The frame carries the load, so the glass can be as thin as 6 mm, which keeps the price down. Framed enclosures are the most forgiving to install, because the frame can absorb small errors in wall straightness, and they are the easiest to seal well.
The look is busier than frameless glass, and the frame will show water marks and soap residue more readily. For a steam shower, that matters, because condensation forms on every surface. If you choose framed glass, pick a finish that hides water spots, such as brushed nickel or matte black, rather than polished chrome.
| Glass style | Typical glass thickness | Relative cost | Best for | Main drawback |
|---|---|---|---|---|
| Frameless | 10 to 12 mm | Highest | Modern bathrooms, small rooms that need an open feel | Needs very straight walls, hardest to seal |
| Semi-frameless | 8 mm | Mid range | Balanced look and budget, most family bathrooms | More joints to clean than frameless |
| Framed | 6 mm | Lowest | Tight budgets, older bathrooms with uneven walls | Busiest look, frame shows water marks |
Glass Thickness: What the Numbers Mean
Glass thickness is not just about strength. Thicker glass flexes less, which matters for a tall door that swings on two hinges. A 6 mm door on a tall opening can wobble and may not seal evenly. A 10 mm or 12 mm door stays rigid and closes true every time. As a rough guide, fixed panels can be thinner than doors, because they do not move, but any panel wider than about 900 mm benefits from 10 mm glass even when it is fixed.
Clear, Frosted or Tinted Glass
Clear glass is the default for steam showers, because it keeps the room bright and lets you see the controls and the bench. It also shows water spots and steam residue, so it needs a squeegee after each session. Frosted or patterned glass gives privacy and hides water marks, but it darkens the enclosure and can make a small steam room feel closed in.
Protective Coatings Worth Considering
Many glass suppliers offer a factory applied water repellent coating. The coating makes water bead and run off, which reduces spots and makes cleaning faster. It adds to the cost, and it wears over time, so it needs reapplication every year or two depending on use. For a steam shower that is used daily, a coating is worth the money, because the glass is wet far more often than in a normal shower.
Layout Configurations: Corner, Alcove and Walk-In
The layout is the second big decision, and it is often fixed by the shape of your bathroom. A steam shower enclosure needs two or three solid walls to work well, because every glass panel is a surface that loses heat and needs sealing. The fewer glass panels you need, the easier the enclosure is to heat, seal and clean. That is why corner and alcove layouts are so common for steam showers.
Before you choose a layout, measure the space twice and mark it out on the floor with tape. Stand in the taped outline and mime the movements you will make: stepping in, sitting down, reaching for the controls, and stepping out. A layout that looks fine on paper can feel cramped when you try to turn around with wet feet. Leave at least 600 mm of clear floor in front of the door so you can step out safely.
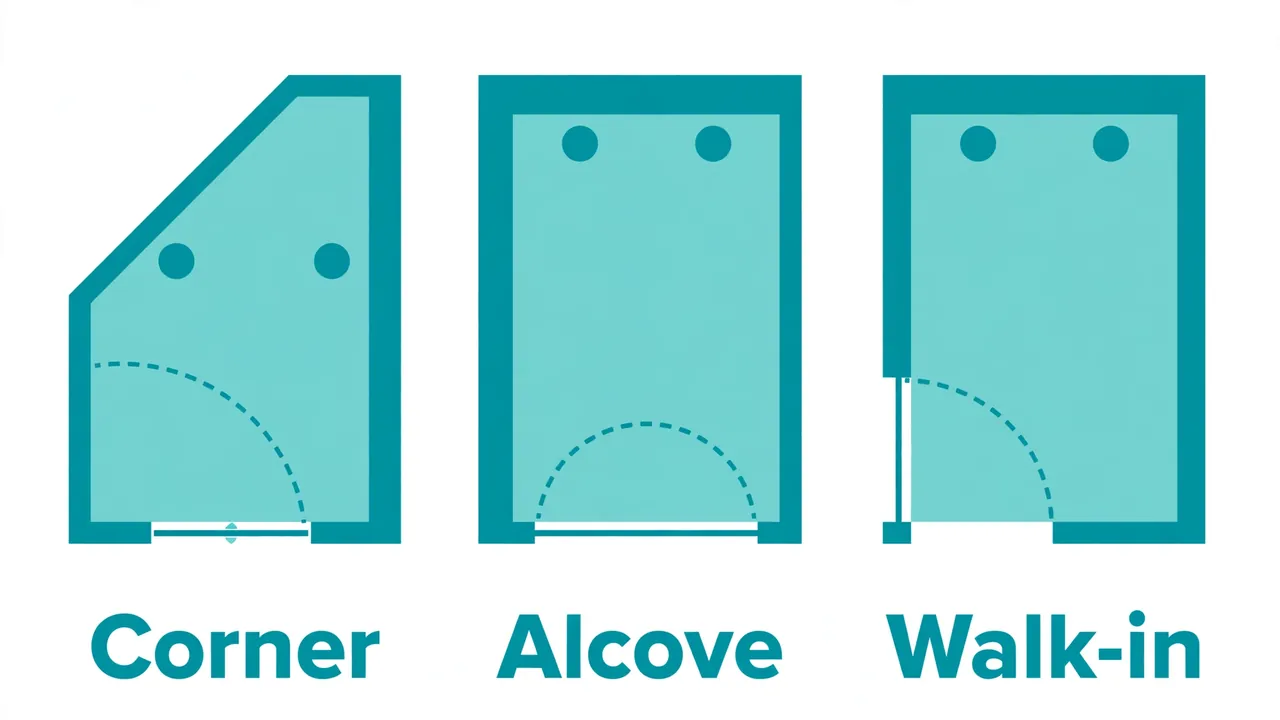
Corner Enclosures: The Space Saver
A corner enclosure uses two existing bathroom walls and adds glass on the other two sides. It is the most efficient layout for a small bathroom, because it turns a dead corner into a steam room without taking floor space from the middle of the room. A common corner size is 900 mm by 900 mm, which fits one person comfortably, while 1000 mm by 1000 mm gives room for a small bench and a second showerhead.
The corner layout has one weakness: the door. A corner enclosure usually has a single hinged door or a sliding door on the diagonal face, and the door is the main route for steam to escape. Choose a door with a full height magnetic seal and a bottom sweep, and make sure it swings outward, not inward. An inward swinging door can trap a person inside if they feel unwell and fall against it.
Alcove Enclosures: The Easiest to Seal
An alcove enclosure sits in a recess between three walls, with glass only on the open front. This is the easiest layout to seal, because there is only one glass wall and one door to worry about. It is also the easiest to heat, because three solid walls hold warmth far better than glass. If your bathroom has a natural alcove, or you can build one with a stud wall, this layout gives the best steam performance for the money.
The alcove width decides what fits inside. A 900 mm wide alcove fits a single showerhead and a standing user. A 1200 mm wide alcove fits a bench along one wall and two showerheads. A 1500 mm wide alcove can fit a full length bench and a proper two person steam room. Measure the alcove carefully, because a few centimetres can decide whether a bench is usable or just decorative.
Walk-In Enclosures: The Luxury Option
A walk-in enclosure has no door, or a door that stays open, and relies on a long entry path to keep steam inside. It looks generous and modern, and it is easy to enter, which suits users with limited mobility. It is also the hardest layout to make work as a steam room, because steam escapes through the open entry. A walk-in steam shower needs a larger steam generator, a longer warm up time, and a well planned entry that turns at least once before reaching the steam zone.
As a rule, do not choose a walk-in layout for a steam shower unless the room is at least 1500 mm deep and you are willing to pay for a bigger generator and longer heat up times. For most homes, a door is the better investment. If step free access matters, a wide hinged door with a low threshold gives most of the benefit of a walk-in design without the steam loss.
| Layout | Typical footprint | Glass panels needed | Steam retention | Best for |
|---|---|---|---|---|
| Corner | 900 x 900 mm to 1200 x 1200 mm | Two sides | Good | Small bathrooms, one person |
| Alcove | 900 to 1500 mm wide, 900 to 1200 mm deep | Front only | Best | Best steam performance, benches, two people |
| Walk-in | 1500 mm deep or more | One side or none | Weakest | Large bathrooms, step free access |
Where the Bench Goes
The bench decides how the enclosure feels during a steam session. A bench should sit on the wall opposite the steam outlet, so the steam rises past the seated user instead of blasting directly at them. The bench height matters too. A seat around 450 mm high suits most adults, and a depth of 400 mm to 450 mm gives enough room to sit comfortably without sliding forward.
Door Swing and Entry Clearance
Doors must always swing outward in a steam shower. This is a safety rule, not a preference. If a user feels faint and falls against the door, an outward swinging door can still be opened from outside. An inward swinging door can be blocked by the fallen person. Check this on every plan and every quote, because some suppliers will default to an inward swing for a neat look.
Ceiling Height and Slope
Keep the ceiling low. A steam enclosure ceiling around 2100 mm to 2400 mm high heats quickly and keeps the steam dense at head height. A ceiling above 2400 mm creates a large volume of warm air above the user, which wastes energy and makes the steam feel thin. If your bathroom ceiling is high, build a dropped ceiling over the enclosure to bring it down to the right height.
Dual Showerheads: Placement, Heights and Controls
Dual showerheads are the feature that turns a steam enclosure into a proper shower room. One head alone forces a compromise: a rain head is relaxing but slow to rinse shampoo, while a wall head is practical but less luxurious. Two heads let you use the right one for each job, and they let two people shower at once in a larger enclosure. The trick is placing them so they do not spray each other, the controls, or the door.
Start with the roles. The rain head is the relaxation head. It mounts overhead, usually from the ceiling or a high wall arm, and gives a soft, wide pattern that falls straight down. The wall head is the workhorse. It mounts on the wall at shoulder height and gives a focused spray for rinsing hair and body. A handheld head on a slide bar is a useful third option, and it is the best choice for rinsing the bench, the walls and the floor after a steam session.
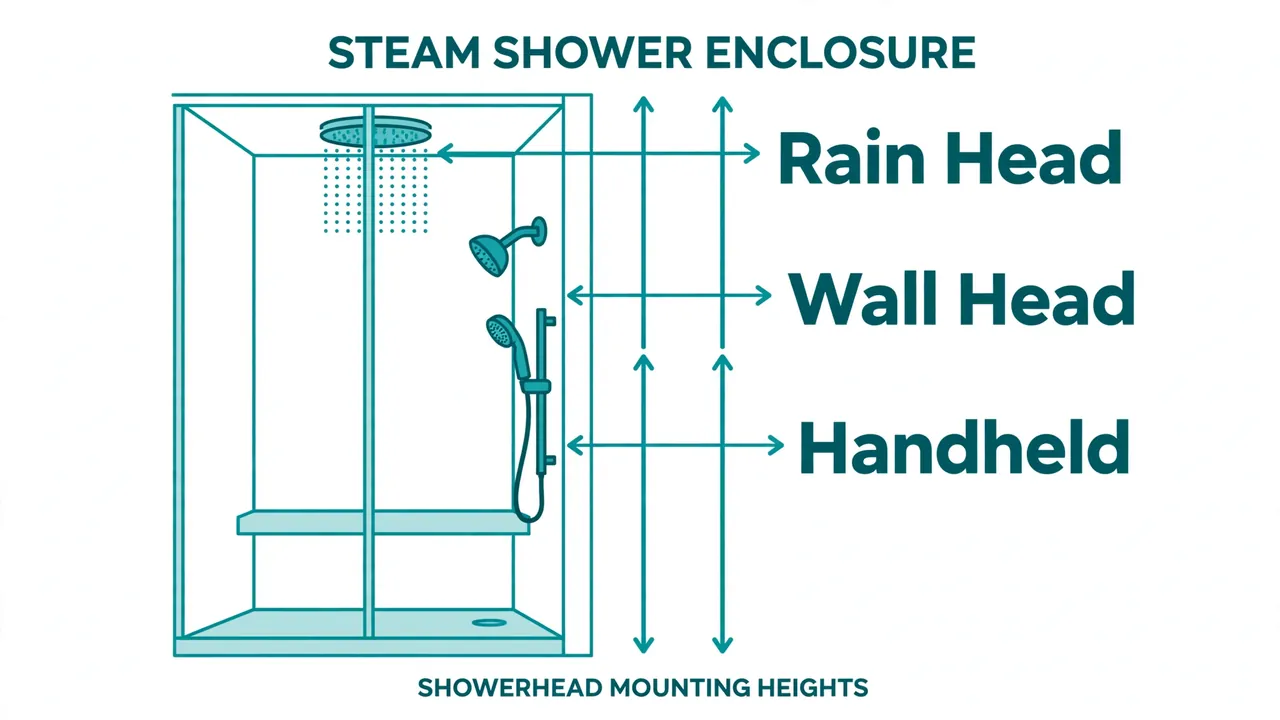
Mounting Heights That Work
Height is the most common mistake in dual showerhead design. A rain head mounted too low feels like standing under a tap, and a wall head mounted too high sprays over the top of the user and onto the ceiling. Use the heights below as a starting point, then adjust for the tallest person who will use the shower regularly.
| Showerhead | Typical mounting height | Position | Notes |
|---|---|---|---|
| Overhead rain head | 2100 to 2300 mm from the floor | Ceiling or high wall arm, centred over the standing area | Keep at least 200 mm above the tallest user |
| Wall head | 1900 to 2100 mm from the floor | Wall, angled slightly down | Shoulder to head height for most adults |
| Handheld on slide bar | Slide bar from 1200 to 2000 mm | Wall near the bench or door | Useful for rinsing, cleaning and seated users |
If the household includes people of very different heights, the handheld head on a slide bar is the great equaliser. It adjusts in seconds, and it lets a seated user rinse without standing up. Mount the slide bar on the wall where it is easy to reach from the bench, and keep the hose long enough to reach every corner of the enclosure for cleaning.
Spacing Two Heads So They Do Not Clash
Two heads need distance between them. If they are too close, their sprays overlap and the user gets wet from two directions at once, which is uncomfortable and wastes water. As a rough guide, keep at least 600 mm between the centre of the rain head and the centre of the wall head. In a 1200 mm wide enclosure, that usually means the rain head over the centre of the standing area and the wall head on the opposite wall or the adjacent wall.
Think about the spray paths. A rain head sprays straight down in a circle roughly 400 mm to 500 mm across. A wall head sprays out and down in a cone that reaches the floor about 600 mm to 900 mm from the wall. Draw both spray cones on your plan before the plumbing is fixed. If the cones overlap heavily, move one head. If a cone hits the door or the controls, move the head or add a small deflector panel.
Controls: Reach Them Without Walking Through Spray
Controls should sit near the door, at about 1000 mm to 1200 mm from the floor, so you can turn the water on and set the temperature before stepping under the spray. This is even more important in a steam shower, because you also need to reach the steam control without crossing a hot spray. Put the steam control on the same wall as the shower controls, or on the wall just inside the door, where it is easy to reach from the bench.
Use a thermostatic mixer valve for the shower. It holds the water temperature steady even when someone elsewhere in the house runs a tap, which matters when the room is already hot from steam. A thermostatic valve also has a built in safety stop, usually around 38 degrees Celsius, which prevents accidental scalding. Check the valve rating with your plumber and confirm it suits a dual head setup.
Water Pressure and Flow: The Hidden Constraint
Two showerheads need more water than one. A rain head and a wall head running together can demand twice the flow of a single head, and if your supply cannot deliver it, both heads will dribble. Before you commit to dual heads, ask a plumber to measure your water pressure and flow rate at the bathroom. Most rain heads need at least 1 bar of pressure to feel right, and a dual setup needs a supply that can hold that pressure with both heads open.
If the flow is not enough, you have three options. You can fit a diverter valve so only one head runs at a time, which is the cheapest fix and works well for most households. You can upgrade the supply pipe to the bathroom, which is more work but gives a real improvement. Or you can fit a pump, which adds noise and maintenance. A diverter is the sensible default, and it also saves water, because you only run the head you are actually using.
Which Combinations Work Best
- Rain head plus wall head: the classic pairing. Rain for relaxing, wall for rinsing. Best for most enclosures 1200 mm wide or larger.
- Rain head plus handheld: the flexible pairing. The handheld covers rinsing, cleaning and seated use. Best for smaller enclosures where two fixed heads would clash.
- Wall head plus handheld: the practical pairing. Lower cost and lower water demand. Best for tight budgets and smaller bathrooms.
- Rain head, wall head and handheld: the full setup. Needs a larger enclosure, a diverter, and a strong water supply. Best for large two person steam rooms.
Sealing, Venting and Drying: The Parts Nobody Sees
A steam shower enclosure lives or dies on its seals. The glass and tiles get all the attention, but the seals decide whether steam stays in the room and whether water stays out of the walls. Plan the sealing at the design stage, not after the tiles are laid, because the best seal in the world cannot fix a joint that was never designed to be sealed.
Door Seals That Actually Hold Steam
A steam door needs seals on three sides plus a sweep at the bottom. Magnetic seals work well on frameless doors, because they pull the door closed and hold it tight. Compression seals work well on framed doors, where the frame gives the seal a firm edge to press against. Whichever type you choose, check that the seal runs the full height of the door with no gaps at the corners, because steam will find a gap of even a few millimetres.
Ventilation and the Drying Cycle
A steam shower needs ventilation that does two jobs. During a session, the room should stay sealed so the steam stays dense. After a session, the room needs to dry out quickly, or mould and mildew will follow. The usual solution is an extractor fan with a timer or a humidity sensor, mounted high on a wall or in the ceiling outside the direct steam path, and switched on after the session ends.
For the full picture on drains and fans, read our guide to steam shower drain and ventilation. It covers drain sizing, fan placement and the drying routine in more detail.
Sizing Your Enclosure: Three Worked Examples
Sizing a steam shower enclosure is a balance between comfort, heating cost and available space. A room that is too small feels cramped and heats unevenly. A room that is too large takes a long time to fill with steam and needs a bigger generator. The three examples below show how the same design principles play out at different sizes. Use them as starting points, then adjust for your own bathroom.
Example 1: Compact Corner Enclosure for One Person
A 900 mm by 900 mm corner enclosure is the smallest practical steam shower. It fits a standing user, a single rain head, and a small folding seat, but not a full bench and not two showerheads. The glass run is short, so a frameless design is affordable here, and the small volume heats quickly with a modest generator. This size suits a single person in a small bathroom, or a guest bathroom where the steam shower is an occasional treat.
Example 2: Alcove Enclosure for Two People
A 1500 mm wide by 1200 mm deep alcove enclosure is a comfortable two person steam shower. It fits a full length bench along one wall, a rain head over the standing area, and a wall head on the opposite wall, with at least 600 mm between the two spray centres. The three solid walls hold heat well, so the generator does not have to work hard, and the single glass front is easy to seal.
This is the size to aim for if you have the space. It gives room for a proper bench, room to move, and room for dual showerheads without spray overlap. The bench can run 1200 mm long, which is enough for one person to lie down or two people to sit side by side. Add a handheld head on a slide bar near the bench, and the enclosure works for seated rinsing as well as standing showers.
Example 3: Large Walk-In Style Enclosure
A 2000 mm by 1500 mm enclosure with a wide entry is a luxury steam room. It fits a long bench, two fixed heads and a handheld, and it gives two people plenty of room. It also needs a larger generator, because the volume is roughly three times that of the compact corner example, and it needs a longer warm up time. Budget for that, and budget for the extra tiling and glass as well.
| Example | Size | Users | Bench | Showerheads | Generator demand |
|---|---|---|---|---|---|
| Compact corner | 900 x 900 mm | 1 | Folding seat only | 1 rain head | Lowest |
| Alcove | 1500 x 1200 mm | 2 | Full length bench | Rain plus wall head | Moderate |
| Large walk-in style | 2000 x 1500 mm | 2 | Long bench | Rain, wall and handheld | Highest |
Materials, Waterproofing and Finishes
Every surface inside a steam enclosure is wet, hot and repeatedly cycled between the two. Ordinary bathroom materials can fail in that environment. Plasterboard swells, standard grout cracks, and some natural stones stain or degrade. Choose materials that are made for wet heat, and confirm each one with the manufacturer before you buy.
Porcelain tiles are the safest choice for steam shower walls and floors. They absorb almost no water, they cope with heat, and they come in sizes that reduce the number of grout joints. Large format tiles, 600 mm by 600 mm or larger, mean fewer joints to seal and fewer places for mould to start. Use epoxy grout rather than cement grout, because epoxy resists water and staining far better in a steam environment.
Waterproofing sits behind the tiles, and it is the layer you cannot fix later without stripping the room back to the studs. A full tanking membrane on every wall and the floor is the standard for a steam shower, and it must be continuous, with sealed joints at every corner and penetration. Our guide to steam room waterproofing, tiling and ceiling materials explains the membrane options and the detailing that matters most.
Benches and Niches
Build the bench from the same waterproofed structure as the walls, then tile it. A tiled bench is easy to clean, holds heat well, and matches the rest of the room. Wood benches look warm and natural, but they need regular oiling and they will degrade faster in constant steam. If you want wood, use a timber rated for wet heat, such as teak or cedar, and accept that it will need more care than tile.
Steam Generator and Plumbing Placement
The steam generator is the engine of the room, and its placement affects both performance and maintenance. The generator should sit as close to the enclosure as possible, usually in a nearby cupboard, under a vanity, or in the ceiling void above, with easy access for servicing. Long steam pipe runs lose heat and produce condensation, which can spit hot water into the room, so keep the run short and sloped back toward the generator where the instructions allow.
Size the generator to the volume of the enclosure, not to the floor area alone. A tall room needs more power than a low room of the same footprint, because the volume is larger. Our guide to how to size a steam generator walks through the volume calculation step by step, including the adjustments for glass panels, stone tiles and high ceilings.
Place the steam outlet low on the wall, about 150 mm to 300 mm above the floor, and on the wall opposite the bench, so the steam rises past the seated user. Keep it away from the door, the controls and any seating, because the outlet itself gets hot and the steam jet is hottest close to the outlet. Fit a protective cover over the outlet, and warn users not to touch it during a session.
Electrical and plumbing work for a steam shower must be done by licensed tradespeople. Steam generators draw significant power, and the combination of water and electricity in a small sealed room leaves no room for shortcuts. Our guide to steam sauna electrical and plumbing requirements sets out the questions to ask your electrician and plumber before work starts, including supply capacity, earthing, and water feed.
Budget Planning: What to Expect in 2026
Costs vary widely by region, brand and installer, so treat every figure in this section as a planning estimate for 2026, not a quote. Get at least two local quotes before you commit, and check current listings for the exact products you want. The figures below are meant to help you judge whether a quote is in the right range, not to replace one.
Glass is usually the largest single cost after tiling. A frameless glass enclosure for a standard alcove can cost roughly twice as much as a framed unit of the same size, because the glass is thicker and the hardware is heavier. Semi-frameless sits between the two. If your budget is tight, choosing framed glass and spending the saving on better waterproofing is a sensible trade, because waterproofing protects the house while glass only changes the look.
Dual showerheads add cost in three places: the heads themselves, the diverter valve, and the extra plumbing. A good thermostatic mixer with a diverter costs more than a basic single head mixer, and the plumber will need more time to run the second feed. Allow for that in the budget, and ask the plumber to price the dual head option separately, so you can see exactly what it adds.
| Budget item | What drives the cost | Where to save | Where not to save |
|---|---|---|---|
| Glass enclosure | Style, thickness, size | Choose semi-frameless over frameless | Never use non-tempered glass |
| Waterproofing | Area, membrane type | Standard membrane over premium brands | Never skip tanking any wall |
| Tiling and grout | Tile size, stone vs porcelain | Porcelain over natural stone | Never use cement grout in steam |
| Showerheads and valves | Number of heads, finish | Two heads instead of three | Never skip the thermostatic valve |
| Steam generator | Power rating, brand | Right size, not oversized | Never undersize the generator |
| Labour | Plumbing, electrical, tiling | Book trades in sequence to avoid rework | Never use unlicensed trades |
Common Steam Shower Enclosure Design Mistakes
- Designing the ceiling flat. Condensation drips onto the user instead of running to the wall. Slope the ceiling from the start.
- Putting the door on the wrong swing. An inward swinging door can trap a person who feels unwell. Doors must swing outward.
- Placing controls under the spray. You should be able to set the temperature before stepping under the water, not after.
- Mounting the two heads too close together. Overlapping sprays waste water and feel uncomfortable. Keep at least 600 mm between centres.
- Skipping the drying routine. A steam room that is never dried grows mould, no matter how good the tiles are. Plan the fan and the squeegee habit from day one.
- Undersizing the generator. A generator matched to the floor area but not the volume will heat slowly and never feel dense. Size by volume, including the ceiling height.
- Using standard grout and plasterboard. Both fail in constant steam. Use epoxy grout and a proper tanking membrane.
- Forgetting the bench clearance. A bench that blocks the door swing or leaves no room to stand up turns the exit into a hazard.
Your Planning Checklist, Step by Step
- Measure the space and mark the outline on the floor with tape. Check the door swing and the bench clearance in real life, not just on paper.
- Choose the layout: corner, alcove or walk-in. Pick the one that uses the most existing walls and needs the least glass.
- Decide the glass style and thickness. Confirm every panel is tempered, and check the weight against the hinge ratings.
- Plan the showerheads: rain, wall, handheld, or a combination. Draw the spray cones on the plan and keep at least 600 mm between centres.
- Ask a plumber to measure water pressure and flow. Decide whether you need a diverter, a supply upgrade, or both.
- Size the steam generator by room volume, using the ceiling height and the glass area. Place the outlet low, opposite the bench.
- Plan the ceiling slope, the drain fall, and the extractor fan. Write the drying routine into the handover notes.
- Choose tiles, grout and the waterproofing membrane. Confirm each product is rated for steam use.
- Get written quotes from licensed tradespeople, with the glass, generator and valves priced separately. Add a 10 percent contingency.
- Check permits and local code with your local office before work starts, and confirm the electrical supply can carry the generator load.
Frequently Asked Questions
What glass thickness is best for a steam shower enclosure?
For most homes, 10 mm tempered glass is the best all round choice. It is rigid enough for a tall door, it seals well, and it suits frameless and semi-frameless designs. Use 8 mm for smaller fixed panels in a semi-frameless setup, and 12 mm for very tall or wide doors. Always confirm the weight with your supplier and check that the hinges are rated for it.
Can I have two showerheads in a small steam shower?
Yes, if the enclosure is at least 1200 mm wide and the two heads are at least 600 mm apart. In a smaller enclosure, a rain head plus a handheld head on a slide bar is a better pairing, because the handheld can be moved out of the way when it is not in use. Check your water pressure and flow first, and fit a diverter so you can run one head at a time.
Do steam shower doors need to swing outward?
Yes. Steam shower doors should always swing outward, so a person who feels unwell inside can still be reached from outside. An inward swinging door can be blocked if someone falls against it. This is a safety rule that applies to every steam shower layout, and it should be checked on every plan and quote.
How high should a steam shower ceiling be?
Aim for a ceiling height of 2100 mm to 2400 mm, sloped by about 25 mm to 50 mm so condensation runs to the wall instead of dripping on the user. A higher ceiling wastes heat and makes the steam feel thin. If your bathroom ceiling is higher, build a dropped ceiling over the enclosure to bring it down to the right height.
How do I stop mould in a steam shower enclosure?
Dry the room after every session. Leave the door open, run the extractor fan for 20 to 30 minutes, and squeegee the glass and tiles. Use epoxy grout, a full tanking membrane behind the tiles, and a sloped ceiling and floor so water drains instead of pooling. No material choice replaces the drying routine, so build the habit from the first day you use the room.
Is a walk-in layout suitable for a steam shower?
A walk-in layout can work, but only in a large room of at least 1500 mm deep, with a bigger steam generator and a longer warm up time. Steam escapes through the open entry, so the room is harder to heat and harder to keep dense. For most homes, a door gives better steam performance for less money, and a wide outward swinging door gives most of the access benefit of a walk-in design.
A well designed steam shower enclosure rewards you every time you use it. The glass stays clear, the steam stays dense, the bench is comfortable, and the room dries out without a fight. Take the time to plan the glass, the layout and the showerheads together, because each one shapes the others. Check the plan against the checklist above, talk it through with licensed tradespeople, and build it once, properly.