
Please read this first: This guide gives general information only. It is not a substitute for your local building code, your local permit office, or a licensed professional. Check local permit and code rules before you build, and use licensed electricians and plumbers for installation work. Any cost figures in this guide are planning estimates, not quotes. A steam room is not maintenance free. Ventilation, drying, and regular grout and seal checks matter for the life of the room.
Steam room waterproofing is the work that decides whether a steam room lasts for years or starts to fail behind the tile. Steam reaches every surface, every joint, and every small gap. It also finds its way into places that liquid water from a shower may never reach. That is why a steam room needs a full waterproofing system, not just water resistant tile and a hopeful coat of sealer.
This guide is a materials deep dive. It covers waterproofing systems, tile types, grout choices, ceiling materials, and sloped ceiling design. It also covers bench and floor junctions, common failure modes, a pre tile checklist, and a simple seal inspection routine. For the wider build steps, see our guide on how to build a steam sauna at home. For power and water connections, see the electrical and plumbing requirements guide. Generator sizing and temperature control are covered in separate guides linked later in this article.


Paid Links - As an Amazon Associate, I earn from qualifying purchases.
Key takeaways for steam room waterproofing
- Waterproof the whole enclosure, including walls, ceiling, floor, bench bases, and every penetration, before any tile goes on.
- Tile is a wearing surface, not the waterproof layer. The membrane behind the tile does the real waterproofing work.
- Seams, corners, and pipe openings fail first, so treat them with the same care as the large flat walls.
- A sloped ceiling moves condensation toward a wall instead of letting it drip on people below.
- Porcelain tile, epoxy grout where suitable, and sealed movement joints suit constant steam better than many standard bathroom finishes.
- Plan drying and ventilation from the start, and inspect seals on a regular schedule after the room is in use.
Why constant steam is harder on materials than a shower
A shower sends water down in a clear direction. A steam room fills with warm vapour that condenses on cooler surfaces. That condensation can form on walls, on the ceiling, behind benches, and around light fittings. It can also collect in joints that look dry from the front. Over time, repeated wetting and drying cycles stress grout, sealant, and board edges.


Paid Links - As an Amazon Associate, I earn from qualifying purchases.
Steam also moves through small gaps. A pinhole in a membrane, a seam that was not fully covered, or a screw head that was left untreated can become a slow leak path. The damage may stay hidden for months because the tile face still looks fine. By the time paint bubbles on the other side of a wall or a musty smell appears, the repair may mean removing tile and rebuilding part of the enclosure.
That risk is the reason to slow down at the waterproofing stage. The membrane, the board behind it, and the detailing at joints matter more than the colour of the tile. A plain tile job over a careful membrane system will outlast a beautiful tile job over a rushed one. Choose materials that are rated for continuous wet use, and follow the membrane maker instructions for that exact product rather than borrowing steps from a general bathroom guide.
The waterproofing system, layer by layer
Think of steam room waterproofing as a system of layers that work together. No single layer should be asked to do every job. The structure carries the load. The backer board gives a stable, water tolerant surface. The membrane stops water and vapour. The thinset bonds the tile. The tile protects the layers below it from wear, cleaning, and direct steam. The grout and sealant finish the joints and allow for movement.
If one layer is weak, the layers around it cannot fully cover for it. A strong membrane over a board that swells when wet will still move and crack. A dense tile over a membrane with open seams will still let steam through at those seams. Check each layer on its own merits, and check how the layers connect at corners, changes of plane, and openings.
Liquid applied membranes
A liquid applied membrane is brushed, rolled, or sprayed onto the backer board and cures into a continuous coating. Its main strength is that it can cover complex shapes, niches, and bench bases without many seams. It also makes it easy to coat screw heads and small details in the same pass as the wall. Its main risk is uneven coverage. A thin spot, a missed pinhole, or a coat applied over dust can leave a weak point that is hard to see after it dries.
Good practice with a liquid membrane starts with surface preparation. The board must be clean, dry, and free of loose material. Apply the number of coats the maker specifies, and let each coat cure as directed before the next one goes on. Use a wet film check or the maker recommended coverage check where one is given. Pay extra attention to inside corners, outside corners, and the floor to wall junction, and reinforce those areas with the fabric or tape the system specifies.


Paid Links - As an Amazon Associate, I earn from qualifying purchases.
Sheet membranes
A sheet membrane is a factory made sheet that is bonded to the board with thinset or adhesive. Its main strength is consistent thickness. Unlike a brushed coating, a sheet does not depend on the applicator holding an even film across a whole wall. Its main risk is at the joints between sheets. Every seam must be overlapped and sealed exactly as the maker directs, and every cut around a pipe or fitting must be sealed rather than left as a raw edge.
Sheet systems suit large flat walls and ceilings where sheets can run in long lengths with few joints. They need careful planning at corners so that folds do not create hollow pockets or bridging. A pocket behind a sheet can trap moisture and can also make tile bond poorly in that spot. Plan sheet layout before you start, so seams land where they can be sealed cleanly and inspected before tiling.
Cement board plus a membrane
Cement board is often used as the tile backer in a steam room because it does not swell and break down in wet use the way standard plasterboard does. It is important to be clear about its role. Cement board is water tolerant, but on its own it is not a waterproof membrane. Water and vapour can still pass through it and reach framing and insulation behind it.
That is why most sound steam room builds pair cement board with a separate membrane layer. The board gives a stable surface for tile. The membrane, liquid or sheet, gives the waterproof barrier. Fasteners must be the type the board maker specifies, and every fastener head in the wet zone should be treated under the membrane system. Joints between boards should be taped and filled as the board and membrane makers direct, not left as open gaps behind tile.
Foam boards and other backer options
Some builders use foam core backer boards that carry a waterproof facing. These boards can be light, easy to cut, and useful for shaping benches and curved details. They still need correct joint treatment. Seams between boards, screw points, and edges at the floor and ceiling must be sealed with the system specified for that board. Do not assume a board labelled waterproof needs no seam work. The seams are part of the system.
Whatever backer you choose, check three things before you commit. First, is it rated by its maker for continuous wet use in a steam room, not just for a shower? Second, does the membrane you plan to use bond to it, and is that combination approved by both makers? Third, can you detail its joints, corners, and penetrations cleanly with the tapes and sealants in that system? If any answer is unclear, ask the maker or choose a combination with clear published guidance.
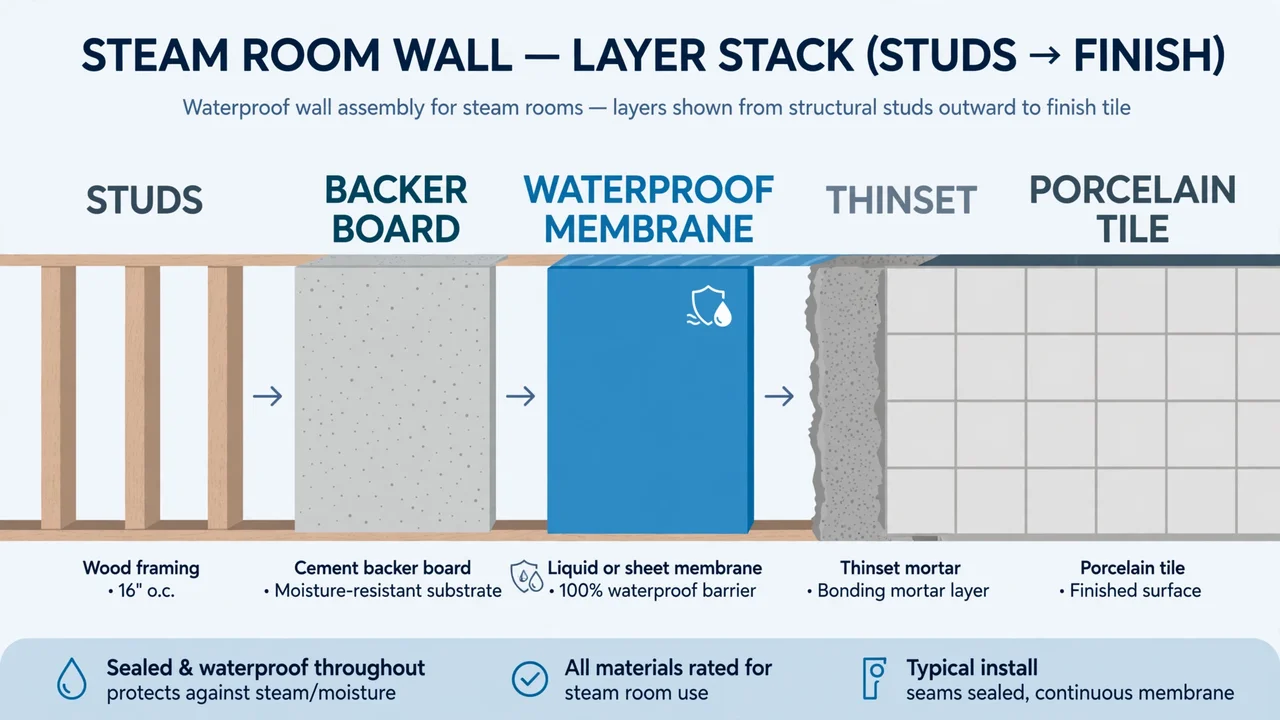
Waterproofing materials compared
The table below compares the main options at a glance. It is a planning aid, not a substitute for maker instructions. Local code, room shape, and installer experience can change which option fits a given build best.
| System | Best for | Main strength | Main risk to control |
|---|---|---|---|
| Liquid applied membrane | Complex shapes, niches, bench bases | Continuous coating with few seams | Thin spots and pinholes from uneven coats |
| Sheet membrane | Large flat walls and ceilings | Even factory thickness | Seams and cuts that are not fully sealed |
| Cement board plus membrane | Most standard steam rooms | Stable board plus a true barrier layer | Assuming the board alone is waterproof |
| Foam board with waterproof facing | Light benches and shaped details | Easy shaping and built in facing | Board seams and fixings left unsealed |
Some builds combine systems, for example a sheet membrane on large walls and a liquid membrane for niches and tricky details. A combined approach can work well, but only if the two systems are compatible and the junction between them is sealed as both makers direct. Do not mix products at a junction on guesswork. If compatibility is not stated in writing, keep to one system for the full enclosure or get maker guidance first.
Choosing tile that survives constant steam
Tile choice in a steam room is about water absorption, grip underfoot, grout joint size, and cleaning. Looks matter, but they should come after those practical tests. A tile that absorbs little water, holds its surface under steam and cleaning, and bonds well to the membrane system will serve the room far better than a porous tile in a prettier colour.
Porcelain tile
Porcelain is the usual first choice for steam room walls, floors, and ceilings, and for good reason. Dense porcelain absorbs very little water, resists staining, and holds up well to repeated steam cycles and cleaning. Large format porcelain gives a calm, modern look with fewer grout lines on walls. On floors, smaller porcelain tiles or textured porcelain give more grout lines and more grip, which helps on a wet floor.
Check the tile rating and finish before you buy. A polished porcelain that looks fine dry can be slippery when wet, so floors and bench tops need a finish suited to wet bare feet. Ask the supplier for the slip resistance rating for the exact tile and finish, and test a sample wet if you can. For ceilings, weight and bond matter as much as looks, so confirm that the tile size and adhesive suit overhead use under the membrane system you have chosen.
Ceramic tile
Glazed ceramic tile can work on steam room walls where water absorption and wear are less severe than on the floor. It is often lighter and easier to cut than porcelain, and it comes in a wide range of colours and shapes. The glaze protects the face, but the body of many ceramic tiles absorbs more water than porcelain. That makes ceramic a weaker choice for floors, bench tops, and any area that stays wet for long periods.
If you use ceramic on walls, keep it to vertical surfaces that drain and dry well, and keep the membrane system behind it to full steam room standard. Do not use a wall ceramic on a floor just because the colour matches. Floor tiles need the wear, grip, and water performance that the floor demands, and a wall tile may not carry those ratings.
Mosaic tile
Mosaic tile, often in small porcelain or glass pieces on a mesh sheet, suits curved benches, niches, and floor areas where grip matters. The many grout lines give bare feet more traction, and small pieces follow curves that large tiles cannot. Mosaic also suits sloped floors and ceiling details where a large tile would need many cuts.
The trade off is grout volume. More grout lines mean more grout to seal, clean, and inspect. In a steam room, that trade off is often worth it on floors and benches, but it raises the maintenance load. Choose a grout suited to constant wet use, and be honest about whether you will keep up with cleaning and resealing. Glass mosaic needs care with adhesive choice and with grout colour, since some adhesives and grouts can show through or stain light glass.
Natural stone: beautiful, but higher upkeep
Natural stone can look superb in a steam room, but it brings higher upkeep and higher risk than porcelain. Many stones are porous, can stain, and can react to cleaning products and to minerals in steam condensate. Sealing helps, but sealer is not a permanent waterproof layer and it needs reapplying on the schedule the sealer maker gives.
If you love stone, use it where you can manage that upkeep, test a sample under steam and cleaning first, and keep the membrane system behind it to full standard regardless of the stone face. Avoid soft or highly porous stone on floors and bench tops unless the supplier confirms in writing that it suits continuous steam use. For most owners, porcelain that mimics stone gives the look with far less risk.
Grout, epoxy grout, and sealers explained
Grout is often treated as a cosmetic choice. In a steam room it is a working part of the system. Standard cement grout is porous, can absorb moisture, and can stain or support mould growth if it stays damp and dirty. It can still work in a steam room, but it needs sealing and regular cleaning, and it needs more attention in the wettest areas.
Epoxy grout is a common upgrade for steam rooms because it is far less porous than cement grout, resists staining, and holds up better under constant moisture and cleaning. It is harder to apply, sets faster, and costs more in material and labour, so it needs an installer who has worked with it before. It also needs the right joint width and clean joints during application, since epoxy is less forgiving of rushed work than cement grout.
Sealers sit on top of grout and, where suitable, on stone. A sealer slows absorption and makes cleaning easier, but it does not turn grout into a waterproof membrane and it does not fix a failed membrane behind the tile. Treat sealer as maintenance, not as waterproofing. Reapply it on the maker schedule, and test whether water still beads on grout lines during your routine inspection. If water soaks in quickly instead of beading, the sealer coat is due for renewal.
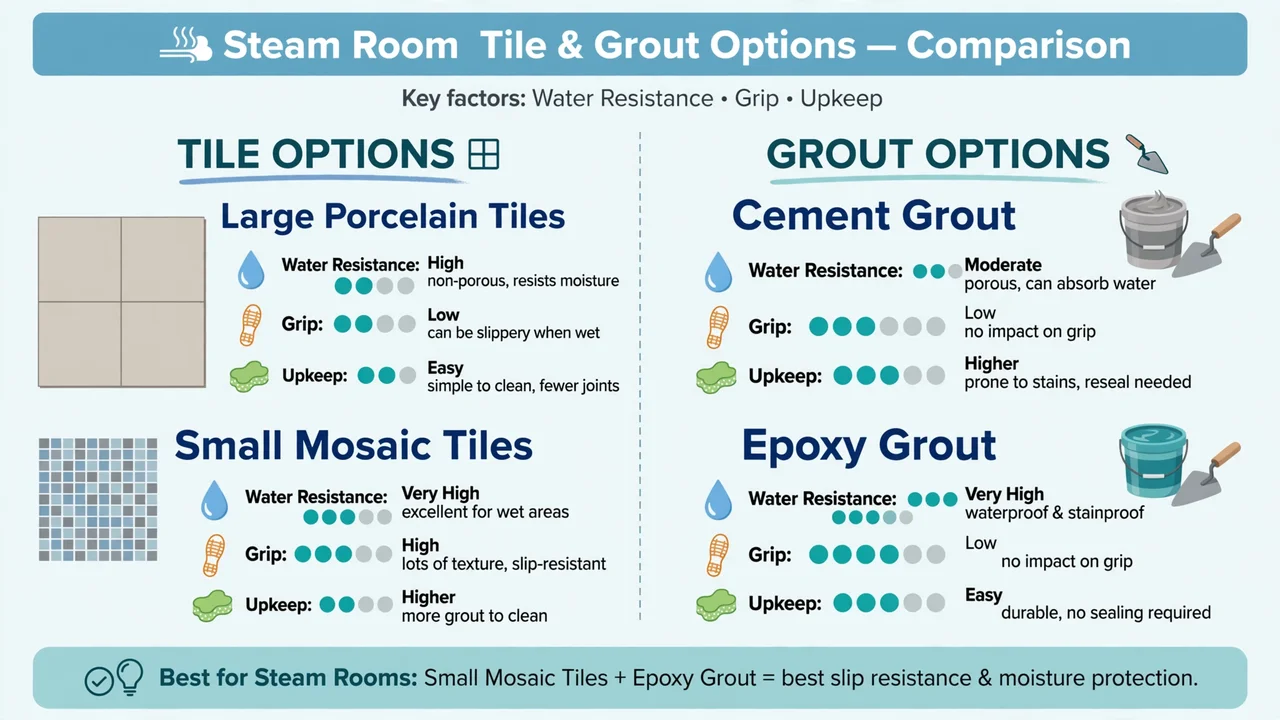
| Tile and grout choice | Water performance | Grip and upkeep | Where it fits best |
|---|---|---|---|
| Porcelain, large format | Very low absorption | Easy to clean, fewer joints | Walls and dry leaning areas |
| Porcelain, small or textured | Very low absorption | More grip, more joints to clean | Floors and bench tops |
| Glazed ceramic | Moderate, varies by tile | Easy to cut, wide colour range | Walls that drain and dry well |
| Mosaic, porcelain or glass | Depends on tile body and grout | High grip, high grout upkeep | Curves, niches, wet floors |
| Cement grout, sealed | Porous, needs sealer | Easy to apply, needs resealing | Walls with a strict cleaning routine |
| Epoxy grout | Very low absorption | Hard to apply, low staining | Floors, benches, wettest joints |
Ceiling materials and sloped ceiling design
The ceiling takes the hardest steam exposure in the room. Warm vapour rises, condenses on the ceiling, and then either runs to a wall or drips back down. A flat ceiling gives condensation nowhere to go, so drips fall on people using the room and water sits in joints. A sloped ceiling solves that problem by giving condensation a path. The slope should run toward a wall, not toward the centre of the room, and it should be continuous, with no flat pockets where water can pool.
Follow the membrane and tile maker guidance for the slope in your build, and confirm the slope with your local code office where code sets a rule for it. The exact slope is less important than three outcomes: water runs to a wall, it does not pool, and it does not drip from the centre. A ceiling that looks sloped but has a flat section near a light fitting or a vent will still drip from that flat section, so detail those fittings into the slope rather than cutting a flat patch around them.
Tiled ceilings
A fully tiled ceiling matches the walls and gives a continuous, easy to clean surface. It needs a backer and membrane system rated for overhead use, an adhesive rated for ceilings, and tile sizes that bond safely overhead. Large heavy tiles on a ceiling raise bond and safety questions, so many builders use smaller or lighter tiles overhead even when walls carry large format tile. Every ceiling tile joint, light opening, and vent opening must be sealed under the same membrane system as the walls.
Panel and board ceilings
Some steam rooms use waterproof panels or coated boards on the ceiling instead of tile. Panels can be faster to fit, give fewer joints, and can be easier to remove for access to services above. Their weak points are the joints between panels and the fixings that hold them. Those joints need the sealant and trim system the panel maker specifies for steam use, and fixings must not puncture the membrane behind the panel without sealing.
Whichever ceiling finish you choose, keep services in mind. Lights, speakers, and vents in a steam room ceiling must be rated for wet and steam use, and their openings must be sealed. A light fitting that is not rated for steam can fail early and can also create an unsealed hole in the membrane. Plan fitting positions before the membrane goes on, so openings are cut cleanly and sealed in the same system, not patched after tiling.
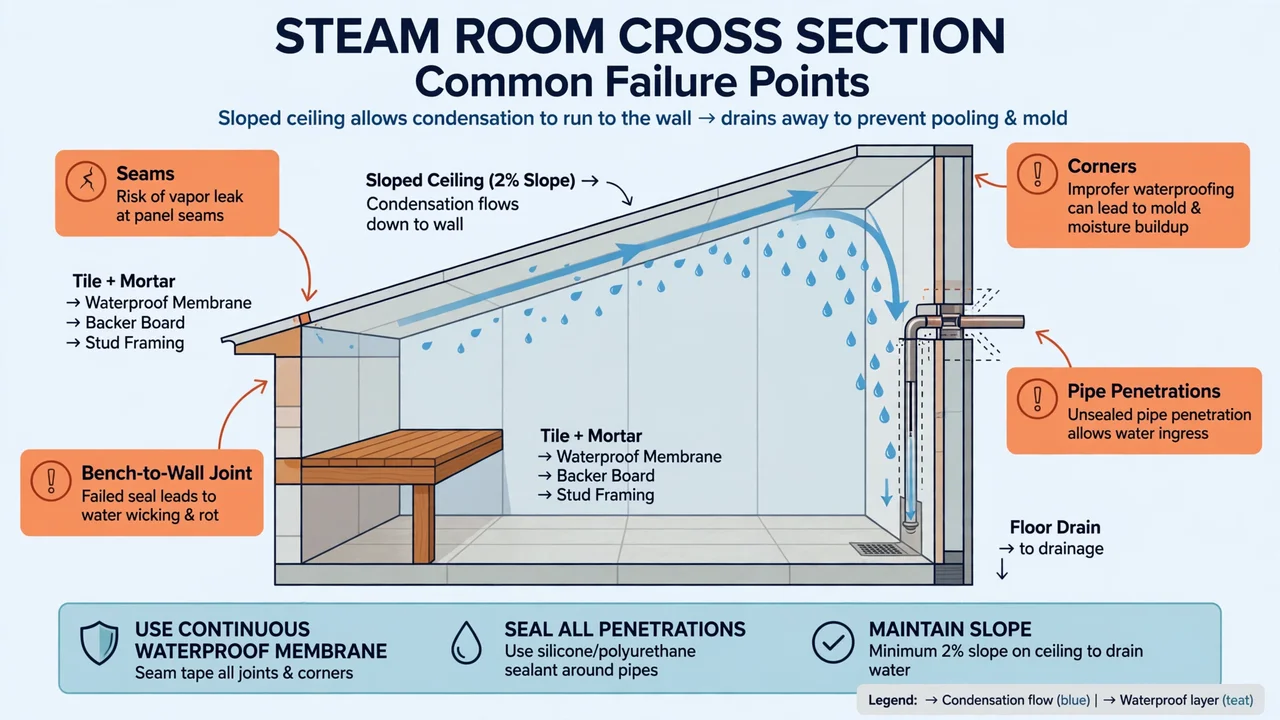
Bench, floor, and drain junctions
Junctions are where steam rooms fail most often, so give them more attention than flat walls. The floor to wall junction, the bench to wall junction, and the bench top to bench front junction all change plane, and each change of plane moves slightly as the room heats and cools. A rigid grout line alone cannot absorb that movement for long. Movement joints filled with a flexible sealant rated for wet use belong at those junctions, and at any junction between different materials.
Benches deserve special care. A tiled bench top collects condensation and cleaning water, and its front face hides the bench base. Waterproof the bench base fully, including the underside edges and the junction with the floor, before the bench top goes on. Slope the bench top slightly toward the room or toward a drain path as the design allows, so water does not sit on the bench after use. Seal the bench to wall joint with flexible sealant, not with rigid grout alone.
Floors need a fall toward the drain so water leaves the room instead of pooling at walls or under benches. Confirm the fall and drain position before tiling, and keep the drain grate and trap accessible for cleaning. The membrane must run into the drain assembly as the drain maker directs, with no gap between membrane and drain flange. A drain that looks tidy on top but is not sealed to the membrane below it is a leak waiting to happen.
For help with the wider room layout, including generator placement and water supply, read our guide on how to build a steam sauna at home. For power and water connection rules, read the steam sauna electrical and plumbing requirements. Those guides cover the services side in depth, so this article can stay focused on materials and waterproofing detail.
Penetrations: steam heads, pipes, lights, and vents
Every penetration through the membrane is a potential leak path. Steam heads, pipe entries, shower fittings, light fittings, and vents all cut through the waterproof layer. Each one needs a seal that belongs to the membrane system, not a dab of general sealant added after tiling. Plan penetration positions early, cut openings cleanly, and seal them before tile covers the area, so the seal can be inspected.
Steam heads need extra care because they sit in the hottest, wettest part of the wall and they expand and contract with heat. Use the head maker gasket and trim system, and seal around the penetration as the membrane maker directs. Do not rely on tile grout to seal a steam head. Grout around a hot fitting will crack with heat cycling, and the crack will become a steam path behind the tile.
After tiling, check every penetration again. Look for gaps between trim and tile, cracked grout rings around fittings, and sealant that has pulled away from one side. Those small defects are cheap to fix at handover and costly to fix after moisture has worked behind the tile for months. Add penetrations to your routine inspection list, and recheck them after the first weeks of use when heat cycling has settled the room.
Common failure modes and how to prevent them
- Pinholes in a liquid membrane. Prevention: full coats to maker coverage, good lighting during application, and a careful check before tiling.
- Open sheet seams. Prevention: planned overlaps, sealed seams to maker instructions, and no tiling over an unchecked seam.
- Unsealed screw heads and board joints. Prevention: treat every fastener and joint in the wet zone under the membrane system.
- Flat ceilings that drip. Prevention: a continuous slope toward a wall, with fittings detailed into the slope.
- Wrong grout for the wettest areas. Prevention: epoxy grout where suitable on floors and benches, sealed cement grout only where upkeep is realistic.
- Rigid grout at movement junctions. Prevention: flexible sealant at wall to floor, bench to wall, and material change junctions.
- Unsealed penetrations. Prevention: system seals at steam heads, pipes, lights, and vents, checked before and after tiling.
- No drying between uses. Prevention: ventilation and a drying routine after each session, plus regular seal checks.
Most failures share one pattern. The flat walls were done well, but a detail was rushed. That is why a steam room build should budget extra time for corners, junctions, and penetrations, and why the pre tile inspection matters more than any single product choice. A second pair of eyes at that stage, even a careful owner check with a torch and the membrane checklist in hand, can catch defects while they are still easy to fix.
Pre tile checklist: do not tile over an unchecked membrane
- Confirm the backer board is the type and thickness the makers specify for steam use, and that fixings match the board guidance.
- Confirm the membrane product is rated for continuous steam room use, and that it is compatible with the backer and adhesive you plan to use.
- Check full membrane coverage on walls, ceiling, floor, bench bases, niches, and inside corners, with no thin spots or pinholes visible.
- Check every seam, overlap, and tape joint, and confirm each one is sealed to maker instructions.
- Check every screw head, board joint, and change of plane, and confirm each one is treated under the membrane system.
- Check the floor fall toward the drain, and confirm the membrane seals into the drain assembly as the drain maker directs.
- Check the ceiling slope runs toward a wall with no flat pockets, and that light and vent openings sit within the slope.
- Check every penetration for a system seal, including steam heads, pipes, lights, speakers, and vents.
- Check movement joint positions at floor to wall, bench to wall, and material change junctions, and confirm flexible sealant is planned there.
- Confirm cure times have been met for membrane, adhesive, and any joint treatment before tiling starts, following maker guidance.
- Photograph the finished membrane before tiling, so you have a record of coverage and detailing if a problem appears later.
If any checklist item fails, fix it before tiling. Removing tile to repair a membrane is far more costly and disruptive than delaying tiling by a day. Keep the membrane maker instructions on site during this check, and tick items off against that document rather than from memory.
Sizing and temperature: link, do not repeat
Waterproofing and generator sizing interact, but they are separate decisions. A room that is underpowered for its volume may run long sessions that keep surfaces wet, while a room that is oversized may cycle in ways that stress materials. This article does not repeat the sizing method here. Use our steam generator sizing guide to match generator output to room volume, and our steam sauna temperature guide for temperature expectations and controls. Get those decisions right first, then build the waterproofing system to suit the room you have sized.
Maintenance and seal inspection routine
A steam room needs a short routine after use and a longer check on a regular schedule. After each session, leave ventilation running as the room maker directs, wipe standing water from benches, and leave the door open or vented until surfaces feel dry. That simple habit reduces the time grout and sealant spend wet, which extends their life.
| Check | How often | What to look for |
|---|---|---|
| Surface drying and ventilation | After every session | Standing water, damp corners, musty smell |
| Grout lines and sealant joints | Monthly visual check | Cracks, gaps, discolouration, soft sealant |
| Penetrations and trim | Monthly visual check | Gaps around steam heads, pipes, lights, vents |
| Sealer beading test | Every few months | Water soaking into grout instead of beading |
| Drain and grate | Monthly clean | Blocked grate, slow draining, debris build up |
| Full seal review | At least once a year | Any failed joint, stain, or damp patch to repair |
Clean with products the tile and grout makers approve for steam room use, and avoid harsh abrasives on grout lines and sealant. Rinse cleaning residue fully, since residue left in joints can hold moisture and feed mould growth. If you find a cracked joint, a failed seal, or a damp patch that does not dry, repair it promptly and look for the cause behind the tile face, not just at the surface. For ongoing care of the generator side of the room, see our steam generator maintenance and descaling guide.
Brief safety basics for steam room use
Keep sessions comfortable and short enough that you feel well throughout. Leave the room if you feel dizzy, unwell, or overheated, and do not use a steam room after drinking alcohol. Make sure ventilation and drying run after use, and keep the room clean and dry between sessions. These basics protect both users and materials, since a room that dries properly lasts longer than one left damp.
When to call a licensed professional
Call a licensed professional for electrical work, plumbing work, gas work where relevant, and any structural change to walls, floors, or ceilings. Also seek professional help if you find damp patches on the far side of a steam room wall, soft or swollen board behind tile, persistent mould that returns after cleaning, or a drain that backs up. Those signs can point to a membrane failure that needs tile removal and rebuild, not a surface reseal.
A professional installer can also be worth the cost at the membrane stage itself, even for a keen DIY builder. Membrane detailing at corners, drains, and penetrations is skilled work, and a small error there can undo an otherwise good build. If you do the tiling yourself, consider having the membrane stage inspected before you start, and keep the maker instructions and photographs of the finished membrane for future reference.
Conclusion: build the barrier first, choose tile second
Steam room waterproofing rewards patience and detail. Choose a backer and membrane system rated for continuous steam use, detail every seam, corner, and penetration to maker instructions, slope the ceiling toward a wall, and use porcelain tile with grout suited to the wettest areas. Then protect that work with ventilation, drying, and a regular seal inspection routine. A room built in that order will look good, feel good, and stay dry behind the tile for years.
Frequently asked questions
Is tile alone enough to waterproof a steam room?
No. Tile is a wearing surface, not the waterproof layer. A steam room needs a membrane behind the tile, with sealed seams, corners, and penetrations, to stop steam and condensation reaching framing and insulation.
Should I use a liquid membrane or a sheet membrane?
Both can work well when applied to maker instructions. Liquid membranes suit complex shapes and niches with few seams, while sheet membranes give even factory thickness on large flat walls. Choose the system that fits your room shape and installer experience, and detail its seams carefully.
Is cement board waterproof on its own?
No. Cement board is water tolerant and stable in wet use, but it is not a waterproof membrane on its own. Pair it with a liquid or sheet membrane rated for steam room use, and treat all board joints and fastener heads under that membrane system.
What tile is best for a steam room floor?
Small or textured porcelain tile usually suits a steam room floor best, because it absorbs very little water and its many grout lines give bare feet more grip. Check the slip resistance rating for the exact tile and finish, and test a wet sample if you can.
Should I use epoxy grout in a steam room?
Epoxy grout is a strong choice for floors, benches, and the wettest joints because it absorbs far less water than cement grout and resists staining. It is harder to apply and sets faster, so use an installer experienced with epoxy grout and follow maker instructions closely.
Why does a steam room ceiling need a slope?
A sloped ceiling moves condensation toward a wall instead of letting it drip from the centre of the room. A flat ceiling gives condensation nowhere to go, so drips fall on users and water sits in joints. Keep the slope continuous, with no flat pockets around lights or vents.
Where do steam rooms fail most often?
Seams, corners, bench and floor junctions, and penetrations fail first. Pinholes in liquid membranes, open sheet seams, unsealed screw heads, rigid grout at movement joints, and unsealed steam heads or pipe entries are the most common weak points to check before tiling.
How often should I inspect steam room seals?
Check grout lines, sealant joints, penetrations, and drains with a monthly visual check, test sealer beading every few months, and carry out a full seal review at least once a year. Repair cracked joints or failed sealant promptly, and investigate any damp patch that does not dry.