
Step into a well-ventilated outdoor sauna and the air feels different right away. It is warm but not heavy, easy to breathe, and evenly heated from the benches to the ceiling. Step into one with poor airflow and the same heater can feel stuffy, uneven, and tiring, with hot air trapped above your head and cold air pooling around your feet.
Ventilation is the quiet system that makes a sauna comfortable. It brings in fresh air, moves heat around the room, carries away moisture, and keeps the air safe to breathe. This guide explains how outdoor sauna ventilation works, where to place the intake and exhaust vents, how heater placement changes airflow, and how to adjust your vents through the seasons.
Please note: This article is general guidance only, not a substitute for your sauna manufacturer’s instructions or local building codes. Vent, heater, and electrical work should follow the manufacturer’s manual, and you should check with your local permit office and use a licensed professional for installation work. Saunas are wellness tools, not medical treatments, so this article is not medical advice. If you are pregnant, live with a heart or circulation condition, or take medication that affects heat tolerance, check with your doctor before using a sauna.


Paid Links - As an Amazon Associate, I earn from qualifying purchases.
Why Ventilation Matters in an Outdoor Sauna
A sauna is a small, sealed, very hot room, and people inside it are breathing hard, sweating, and using up oxygen. Without a steady supply of fresh air, the room slowly fills with stale, carbon-dioxide-rich air. That is why even the best heater cannot rescue a sauna with no airflow.
Good ventilation does five jobs at once. It supplies fresh air to breathe, spreads heat evenly so the benches feel as warm as the ceiling, removes excess moisture so the wood dries between sessions, keeps the air from feeling heavy or oppressive, and helps the heater work efficiently instead of fighting cold pockets near the floor.
- Fresh air to breathe: A steady intake keeps oxygen levels comfortable during longer sessions.
- Even heat: Moving air carries warmth from the heater across the room instead of letting it collect at the ceiling.
- Comfort: A gentle flow of air makes high heat feel easier to sit in, especially on the upper bench.
- Moisture control: Airflow after a session helps the benches, floor, and walls dry, which protects the wood over time.
- Safety: Fresh air matters most with a wood-fired stove, because combustion uses oxygen and produces exhaust gases that must leave the room safely through the chimney, not linger inside.
Outdoor saunas need this even more than indoor ones. They face wind, rain, snow, and big temperature swings, so the vent system has to work in summer heat and in a January freeze. Getting the layout right at build time is far easier than fixing it later, which is why ventilation deserves a plan before the first board goes up. If you are still planning the build, our guide to building an outdoor sauna covers the full project from foundation to first heat.
How Air Moves Through a Sauna
Sauna ventilation runs on a simple idea: cool air comes in low, warms up at the heater, rises, circulates around the bathers, and leaves high on the far side of the room. Hot air rises, so the system works with gravity instead of against it. This natural loop is called gravity flow, and it is how most outdoor saunas are ventilated.
Picture the path. Fresh air enters through the intake vent near the floor, usually right beside or beneath the heater. It passes over the hot stones, warms quickly, and rises toward the ceiling. From there it drifts across the room, washes over the benches, and finally exits through the exhaust vent high on the opposite wall. That slow, steady loop replaces the air in the room several times during a session.
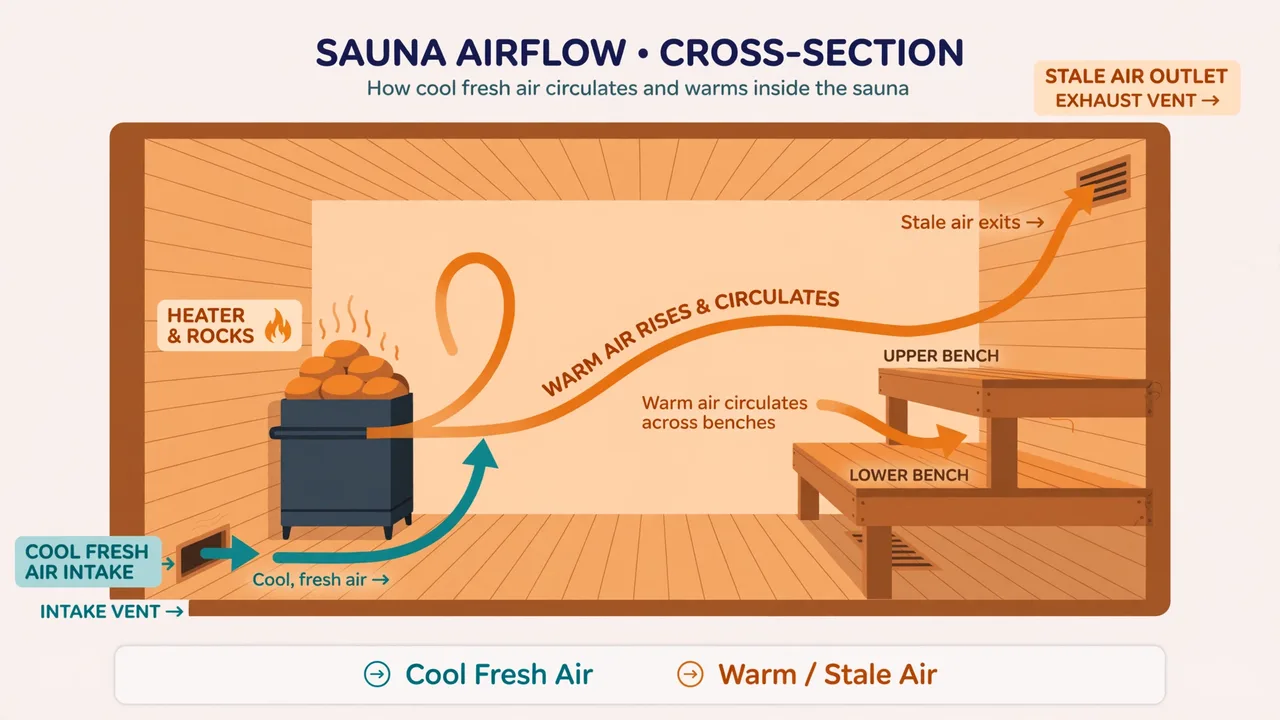
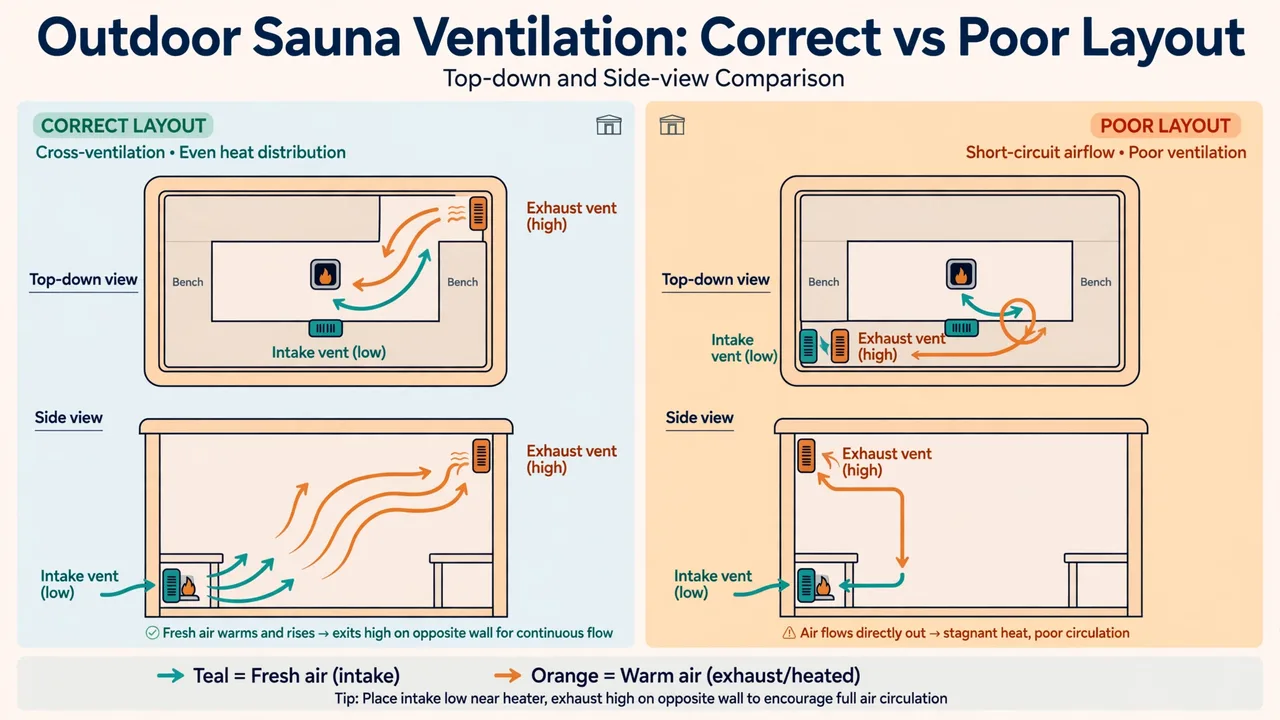
The loop only works when the two vents are in the right places. If both vents sit on the same wall, air can shortcut straight from intake to exhaust without ever crossing the room. If the intake is high and the exhaust is low, the flow fights gravity and stalls. Placement is the whole game, and the next sections show exactly where each vent belongs.



Paid Links - As an Amazon Associate, I earn from qualifying purchases.
Intake Vent vs Exhaust Vent at a Glance
The intake and exhaust do opposite jobs, and they sit at opposite ends of the room. Keep this comparison in mind while planning, because mixing up the two roles is the most common ventilation mistake in a new build.
| Feature | Intake Vent | Exhaust Vent |
|---|---|---|
| Job | Brings fresh, cool air into the room | Removes stale, warm, moist air from the room |
| Height | Low, near the floor | High, near the ceiling |
| Typical spot | Beside or beneath the heater | Opposite wall from the intake |
| Air temperature | Cool outdoor air | Warm room air |
| Control | Adjustable vent cover, often left open | Adjustable vent cover, often partly open |
| After a session | Open to help the room dry | Open to let moisture escape |
Think of the pair as one system rather than two separate holes in the wall. The intake sets the supply, the exhaust sets the exit, and the distance between them decides how well the air mixes. A long diagonal path across the room gives the best circulation, which is why opposite walls and opposite heights are the standard layout.
Where to Put the Intake Vent
The intake vent belongs low on the wall, close to the floor, and as near the heater as practical. The usual spot is directly beside the heater or underneath it, low enough that incoming air must pass over the hot stones before it rises. That way the coldest air in the room is warmed immediately instead of blowing across your feet.
There are two widely used intake positions, and both work well when the exhaust is placed correctly. An intake behind or below the heater feeds air straight into the hottest part of the room, which gives the most even warm-up. An intake low on the wall beside the heater is easier to build and service, and it still sends air past the stones on its way up. Either choice beats an intake placed high on the wall or far from the heater.
Intake vent placement rules
- Place the intake low, near floor level, so cool air enters at the bottom of the room.
- Keep it close to the heater, beside it or beneath it, so incoming air warms up at once.
- Put it on the opposite side of the room from the exhaust vent, so air crosses the full space.
- Fit an adjustable cover or sliding vent so you can reduce the flow in cold weather or open it fully in summer.
- Keep the outside opening clear of snow, leaves, and stored firewood, and fit mesh to keep insects out.
One detail people miss is the path the air takes outside the sauna. An intake that opens into a sheltered spot, such as under a porch roof or beside a fence, pulls in calmer air than one facing open wind. Strong wind blowing straight into the intake can over-ventilate the room and cool the benches, so a wind-sheltered intake position is worth planning, especially on an exposed site.
Where to Put the Exhaust Vent
The exhaust vent belongs high on the wall, near the ceiling, on the opposite side of the room from the intake. Stale, warm, moist air rises, so the exhaust should sit where that air naturally gathers. Placing it high lets the room clear itself without a fan in most outdoor saunas.
There is one placement debate worth knowing about. Some builders put the exhaust high on the wall above the lower bench, while others place it lower, just below the upper bench level, on the theory that it pulls the hottest air from sitting height rather than from the ceiling. Both can work, and the choice depends on your bench layout and your heater. The key rule stays the same either way: the exhaust goes on the opposite wall from the intake, and it sits higher than the intake by a clear margin.
Exhaust vent placement rules
- Place the exhaust high, near the ceiling or just below the top bench, on the opposite wall from the intake.
- Never put the exhaust low near the floor, or warm air will pool at the ceiling while the benches stay cool.
- Fit an adjustable cover so you can close it down while the room heats up and open it during the session.
- Route the outside opening so rain and snow cannot blow in, and fit mesh to keep insects out.
- Keep the exhaust path short and straight where possible, since long bends slow the airflow.
If your sauna has a window on the exhaust wall, plan the vent so it does not sit directly behind anyone’s head on the upper bench. A steady stream of warm air leaving right past a bather’s neck feels drafty and uncomfortable. A few feet of offset makes the room feel calm while the air still moves.
Heater Placement and How It Works With Your Vents
The heater is the engine of the airflow loop. Its position decides where the warm air starts, so it belongs on the same wall as the intake vent, with the intake feeding air directly into it. When the heater and intake sit together on one wall and the exhaust sits high on the opposite wall, the whole room becomes one clean diagonal of moving air.
Move the heater to the exhaust wall and the loop breaks. Warm air rises next to the exhaust and leaves the room before it has crossed the benches, so bathers sit in cooler air while heat escapes through the vent. The same heater, the same vents, and a different wall can turn a great sauna into a drafty one, which is why heater placement and vent placement should be planned as a pair.
Electric heaters
Electric heaters are compact and usually mount on the wall near the floor, which makes the classic layout easy: intake low beside or below the heater, exhaust high on the opposite wall. Follow the heater manufacturer’s clearance instructions exactly, since the intake opening must never block airflow around the heater or sit so close that it interferes with the controls. Electrical work should always be done by a licensed electrician. If you are choosing between heater types, our comparison of wood-fired and electric outdoor sauna heaters walks through heat-up, running costs, and maintenance.
Wood-fired stoves
Wood-fired stoves add a second airflow job, because the fire itself needs combustion air. The stove draws air through its own air inlet, and that air must come from somewhere, so a dedicated combustion-air supply near the stove is important. Never rely on the room’s general intake vent alone if the stove manual calls for a separate combustion-air inlet.
Fire safety comes first with any wood-fired setup. Keep clearances exactly as the stove manufacturer instructs, never leave a burning stove unattended, and keep the chimney and ash area clean and inspected on a regular schedule. The chimney carries smoke and exhaust gases outside, which is a separate path from the room’s exhaust vent, and the two should never be confused or combined.
Bench height changes the airflow
Bench height changes where the warm air sits, so it changes how the vents feel. On a high upper bench, bathers sit in the warmest layer of air near the ceiling, and an exhaust placed just below the top bench pulls air across them gently. On a low bench layout, the same exhaust position can feel drafty. If you are still deciding bench heights, our guide on how to size an outdoor sauna covers bench depth, ceiling height, and heater power together, since all three shape the airflow.
Vent Sizing: What to Know Before You Cut a Hole
There is no single vent size that fits every outdoor sauna, because the right size depends on the room volume, the heater output, and the climate. That is why the honest answer is to size vents from your sauna kit or heater manufacturer’s instructions, not from a random number found online. Manufacturers test their heaters with specific airflow rates, and their guidance is the safest starting point.
A few general principles still help. The intake and exhaust should be roughly matched in size, so the air that enters has an equal path out. An exhaust much smaller than the intake will choke the flow, while an intake much smaller than the exhaust will starve the room of fresh air. Adjustable vents solve most sizing worries, because you can tune the flow by feel once the sauna is running.
- Start with the manufacturer: Follow the vent size and position in your sauna kit or heater manual first, before any general advice.
- Match the pair: Keep the intake and exhaust roughly the same size so air flows freely in both directions.
- Go adjustable: A vent you can open, close, and fine-tune beats a fixed hole, because every season and every session is different.
- Think about the room: Larger rooms and more bathers need more airflow, so size up the vents rather than squeezing more air through a small opening.
- Do not guess at structure: Cutting a vent through a load-bearing wall or a sealed panel is a job for the kit instructions or a professional, not a guess.
If your sauna came as a kit, the vent positions are often pre-cut or marked, and the manual explains why they sit where they do. Resist the urge to move them for cosmetic reasons. A vent moved to a tidier spot on the same wall can silently break the airflow loop, and the room will feel wrong for reasons that are hard to diagnose later.
Gravity Flow or a Mechanical Fan?
Most outdoor saunas ventilate by gravity flow alone. Hot air rises, cool air sinks, and the height difference between the low intake and the high exhaust drives a gentle, continuous circulation. No power, no noise, and nothing to break. For a standard backyard sauna with a well-placed vent pair, gravity flow is usually enough.
A mechanical fan changes the picture. It forces air through the room at a set rate, which can help in a large sauna, a sauna with a long or bent exhaust path, or a room where the vent layout was fixed by the building and cannot follow the ideal diagonal. Fans also help with drying the room after a session. The trade-off is noise, wiring, and another part that needs maintenance in a hot, humid space.
| Factor | Gravity Flow (Passive) | Mechanical Fan (Active) |
|---|---|---|
| How it works | Hot air rises and pulls fresh air in low | A fan pushes or pulls air through the vents |
| Power needed | None | Electricity and safe, heat-rated wiring |
| Noise | Silent | Some fan noise, depending on the model |
| Control | Adjustable vent covers only | Fan speed plus vent covers |
| Best for | Standard saunas with a good vent layout | Large rooms, awkward vent paths, or fast drying |
| Maintenance | Almost none, just keep vents clear | Fan cleaning and occasional replacement |
| Cost | Low, just the vents | Higher, fan plus installation |
If you do add a fan, put it on the exhaust side so it pulls air out of the room rather than blowing air in. An exhaust fan supports the natural rising flow instead of fighting it. Any fan and wiring inside or near a sauna must be rated for heat and moisture, and the electrical work should be done by a licensed electrician. A cheap bathroom fan is not a sauna fan, and the wrong fan can fail quickly in the heat.
How to Use Adjustable Vents During a Session
Adjustable vents are meant to be used, not set once and forgotten. The right setting changes through heat-up, bathing, and cool-down, and learning the rhythm takes only a few sessions. The pattern below is a good starting point for most outdoor saunas.
- Heat-up: Close the exhaust vent most of the way and leave the intake open a crack, so the room warms up quickly without losing heat out the top.
- First bathers in: Open the exhaust partway once the room reaches temperature, so fresh air starts circulating while you settle in.
- During the session: Adjust by feel. If the air feels heavy or your breathing feels labored, open the exhaust a little more. If the benches feel cool or drafty, close it down slightly.
- Water on the stones: The burst of steam raises humidity fast, so open the exhaust briefly afterward to clear the heaviest steam, then return it to your normal setting.
- Between rounds: Open both vents a little wider while the room is empty, so fresh air sweeps through before the next round.
- After the session: Open both vents fully and leave the door ajar if your manual allows it, so the room dries out. Close the vents once the wood feels dry to the touch.
One habit to avoid is closing both vents completely during a session to trap heat. A sealed sauna heats fast, but the air goes stale quickly, and breathing gets uncomfortable. A small, steady flow of fresh air keeps the session pleasant and is far more important than squeezing out a little extra heat. Short sessions, plenty of water before and after, and stepping out the moment you feel dizzy or unwell matter more than any vent setting.
Ventilation in Winter and Cold Climates
Winter changes the ventilation equation. Cold outdoor air is denser and heavier, so it rushes in harder through the intake, and the temperature gap between inside and outside is at its largest. A vent setting that felt perfect in July can make the benches feel cold in January, so winter calls for smaller openings and more attention.
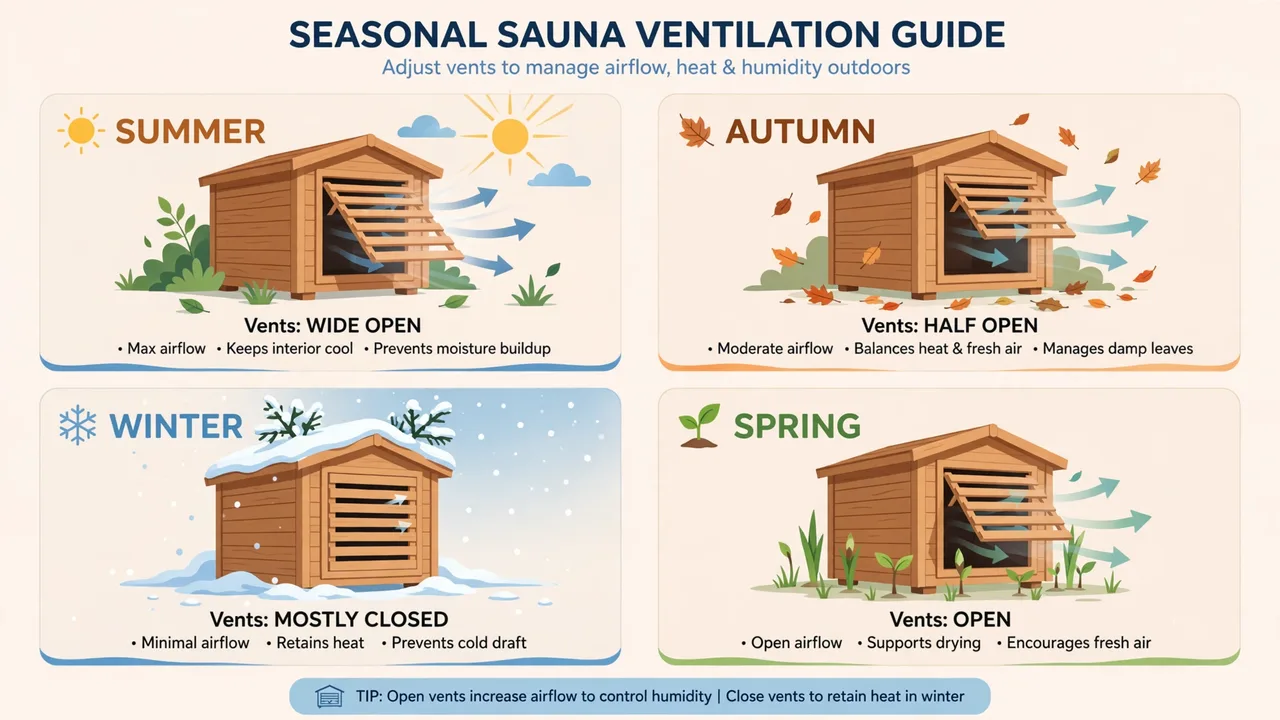
The most common winter mistake is shutting the vents completely to hold heat. That does warm the room faster, but it also traps moisture and stale air, and the room will feel heavy within minutes. The better approach is to keep both vents open just a crack, enough for a slow trickle of fresh air, and to accept a slightly longer heat-up time in exchange for air you can breathe comfortably.
- Start small: Open the intake and exhaust only a little in cold weather, then widen them gradually if the air feels stale.
- Clear the intake: Check the outside intake opening for snow and ice before every winter session, since a blocked intake stops airflow entirely.
- Expect a longer heat-up: Cold air and cold wood take longer to warm, so start the heater earlier than you would in summer.
- Dry the room well: Moisture left in a freezing sauna can damage wood and fittings, so leave the vents open after the session until the room is dry, then close them against snow and wind.
- Watch the wind: A strong winter wind blowing into the intake can chill the room fast, so a simple wind baffle or a sheltered intake position helps on exposed sites.
Snow brings its own quirks. A roof overhang that sheds snow onto the intake opening will block it without you noticing, and drifting snow can bury a low intake entirely. Keep the ground around the intake clear, and check it as part of your pre-session routine, just as you would check the chimney on a wood-fired stove. For more cold-weather guidance, our winter heating and snow tips for outdoor saunas cover heat-up, snow loads, and freeze protection in more depth.
Seven Ventilation Mistakes to Avoid
Most ventilation problems come from a short list of avoidable errors. If your sauna feels stuffy, uneven, or drafty, check this list before changing anything else, because one of these is usually the cause.
- Both vents on the same wall. Air shortcuts from intake to exhaust without crossing the room, so the benches sit in still air.
- Intake placed high. Cool air enters at the top and drops straight onto bathers instead of warming at the heater first.
- Exhaust placed low. Hot air pools at the ceiling while the benches stay cool, and the room never feels evenly heated.
- Heater on the exhaust wall. Warm air leaves the room before it reaches the benches, so the heater works harder for less comfort.
- Fixed vents with no adjustment. A hole you cannot close is too open in winter and too closed in summer, and you have no way to tune the session.
- Vents sealed shut during sessions. The room heats fast but the air goes stale, breathing feels heavy, and moisture has nowhere to go.
- Blocked or forgotten vents. Leaves, snow, stored firewood, or a wasp nest can close a vent silently. Check both openings as part of your regular upkeep, alongside the rest of your outdoor sauna maintenance calendar.
Troubleshooting: What the Air Is Telling You
A sauna gives clear feedback when the airflow is wrong. Use this table to match what you feel with the likely cause, then make one change at a time and test it over a full session before changing anything else.
| What you notice | Likely cause | What to try |
|---|---|---|
| Air feels heavy and hard to breathe | Not enough fresh air coming in | Open the intake and exhaust a little wider |
| Feet are cold but head is very hot | Weak circulation or exhaust too low | Check the vent layout and open the exhaust higher up |
| Cold draft across the benches | Intake too far from the heater or open too wide | Close the intake partway and check its position |
| Room heats very slowly | Too much cold air rushing in | Close the exhaust most of the way during heat-up |
| Steam hangs and the room feels damp | Exhaust closed or blocked | Open the exhaust after water on the stones and check for blockages |
| Wood stays damp after sessions | Vents closed too soon after bathing | Leave both vents open until the room is fully dry |
| Smoke smell with a wood-fired stove | Poor draft or a chimney issue, not a vent setting | Check the chimney and flue, and never use the sauna until it is fixed |
A smoke smell deserves special care. It usually points to the chimney or the stove, not to the room vents, and it should never be ignored. Stop using the sauna, let the fire go out safely, and inspect the chimney and stove before the next session. If you are unsure what caused it, ask a professional rather than guessing.
Vent Placement Checklist
Use this checklist when planning a new build or reviewing an existing sauna. Every item should be a yes before you call the ventilation finished.
- Intake vent sits low, near the floor, beside or beneath the heater.
- Exhaust vent sits high, near the ceiling, on the opposite wall from the intake.
- Heater and intake share the same wall, so incoming air warms at once.
- Both vents are adjustable, so you can tune the flow by season and by session.
- Outside openings are clear of snow, leaves, and firewood, with mesh fitted against insects.
- Vent sizes follow the sauna kit or heater manufacturer’s instructions.
- Exhaust path is short and straight, with no long bends slowing the air.
- Wood-fired stoves have a dedicated combustion-air supply if the manual calls for one.
- After-session drying is part of the routine, with both vents left open until the wood is dry.
- Vent positions and sizes are noted for future reference, so a later repair does not undo the layout.
Frequently Asked Questions
Does an outdoor sauna need ventilation?
Yes. Every outdoor sauna needs a working intake and exhaust vent. Ventilation supplies fresh air to breathe, spreads heat evenly, and lets moisture escape so the wood dries between sessions. A sauna with no vents will feel stuffy, heat unevenly, and stay damp after use.
Where should the intake vent go in an outdoor sauna?
The intake vent goes low on the wall, near the floor, beside or beneath the heater. This position forces incoming cool air to pass over the hot stones and warm up before it rises, so the air reaches the benches already heated instead of blowing cold across your feet.
Where should the exhaust vent go in an outdoor sauna?
The exhaust vent goes high on the wall, near the ceiling, on the opposite side of the room from the intake. Warm, stale, moist air rises, so a high exhaust on the far wall lets it leave naturally while fresh air crosses the room to replace it.
Should sauna vents be open or closed during a session?
Keep both vents at least partly open during a session. Close the exhaust most of the way while the room heats up, then open it partway once bathers are inside. Closing both vents completely traps heat but makes the air stale and hard to breathe, so a small steady flow of fresh air is always better.
Can both sauna vents be on the same wall?
It is best to avoid it. When both vents sit on the same wall, air can shortcut straight from the intake to the exhaust without ever crossing the room, leaving the benches in still, uneven air. Opposite walls with the intake low and the exhaust high give the longest, most even airflow path.
Do I need a fan in my outdoor sauna?
Most outdoor saunas ventilate well by gravity flow alone, with no fan. A fan can help in a large sauna, a room with a long or bent exhaust path, or when you want faster drying after a session. If you add one, put it on the exhaust side and use a model rated for heat and moisture, with wiring done by a licensed electrician.
How do I ventilate an outdoor sauna in winter?
In winter, open both vents only a crack, since cold air is dense and rushes in hard. Check the outside intake for snow and ice before every session, expect a longer heat-up, and leave the vents open after the session until the room is fully dry, then close them against snow and wind. More winter detail is in our winter heating and snow tips for outdoor saunas.
Why does my sauna feel stuffy even with vents?
The most common causes are vents closed too far, a blocked intake or exhaust, or both vents placed on the same wall. Check that both openings are clear and at least partly open, confirm the intake is low near the heater and the exhaust is high on the opposite wall, and open the exhaust a little wider during the session. If the problem stays, the vent sizes may not match the room, so check the manufacturer’s guidance.
Final Thoughts
Outdoor sauna ventilation is simple once the pattern clicks: fresh air in low beside the heater, warm air out high on the opposite wall, and adjustable vents so you can tune the flow by season and by session. The layout costs almost nothing to get right at build time, and it pays off every time you sit down in a room that feels warm, even, and easy to breathe in.
If you are planning a new sauna, settle the vent and heater positions before the walls go up, and follow your kit or heater manufacturer’s instructions for sizes and clearances. If your existing sauna feels stuffy or uneven, work through the checklist and the troubleshooting table above before spending money on a fan or a rebuild, because a vent in the wrong place is the most common cause and the cheapest to fix. For the bigger picture, including costs and the full build process, see our outdoor sauna cost guide for 2026 and our complete guide to outdoor saunas.