
Step out of an outdoor sauna and the first thing you notice is not the view or the cool air. It is the ground under your bare feet. A smooth deck board feels warm and kind after the heat of the cabin.
A wet stone paver can feel cold and slippery. Loose gravel can sting. That short walk from the sauna door to your chair, your shower or your cold plunge is part of every single session, yet the flooring underfoot is one of the last things most owners plan.
This guide is about that ground. It covers the surfaces you walk on in and around an outdoor sauna: wood deck boards, stone and pavers, gravel aprons and slatted duckboards. You will learn how each one handles water, bare feet, heat and cold, how drainage works underfoot, and how to choose and look after a surface that stays safe and comfortable for years.


#Paid Links
If you are still deciding what your sauna should sit on, that is a different question, and our guide to the best foundation for an outdoor sauna covers concrete, pavers, deck and gravel as structural bases. This article is about the walking surface on top of all that.
Please read first: This article is general guidance only, not a substitute for local building codes or a licensed professional. Always check with your local permit and code office before building or changing a sauna base, deck or drainage, and use a licensed tradesperson for electrical or plumbing work. Cost bands in this guide are broad planning estimates, not quotes, and prices vary by region, supplier and installer. As with all sauna use, drink water before and after a session, keep sessions short, leave straight away if you feel dizzy or unwell, and do not drink alcohol before or during a session. If you are pregnant, live with a heart or circulation condition or low blood pressure, or take medication that affects how you handle heat, check with your doctor first.
Why the Floor Underfoot Matters More Than It Looks
An outdoor sauna is used barefoot, wet, and often in a hurry. You step out hot, dripping and relaxed, and your feet meet whatever surface is there. A good floor makes that moment pleasant and safe.
A poor one turns it into a slip, a stubbed toe, a shock of cold stone, or a puddle that soaks your feet every time it rains. The floor is also the part of a sauna setup that takes the most punishment. It is rained on, splashed, walked on with wet feet, frozen in winter and baked in summer sun.
Flooring also decides how long the rest of your sauna lasts. Water that pools against the cabin wall soaks into timber and invites rot and mould. A deck that traps water underneath rots from below, where you cannot see it.
Good drainage underfoot protects the cabin as much as it protects your feet, which is why this guide treats flooring and drainage as one subject. For the wider picture of keeping a cabin dry, see our guide to rain, humidity, roofing and mould prevention for outdoor saunas.


#Paid Links
The barefoot test
Every flooring choice for an outdoor sauna should pass a simple test: walk on it barefoot, wet, in the dark, after a hot session. If it is comfortable, grippy and free of puddles in that state, it will serve you well. If it is rough, slippery, sharp or cold, you will notice it every time you use the sauna, and guests and children will notice it even more.
Test samples with bare wet feet before you commit. A board that looks lovely in a showroom can feel very different under wet feet.
Comfort is not only about texture. Heat matters too. Dark stone in full summer sun can become too hot to stand on comfortably. Pale wood stays cooler underfoot.
In winter the reverse applies, and a stone surface can feel icy while wood feels merely cool. Think about the seasons you use the sauna most, and about who uses it. Older users, children and anyone with sensitive feet will feel the difference more sharply than a healthy adult in summer.
Water is the real enemy
Every outdoor sauna produces water. Rain falls on the roof and runs off at the eaves. Splash water comes out of the door with every bather. If you pour water on the stones, steam and drips escape too.
Add a cold plunge or an outdoor shower nearby and the amount of water doubles. A floor that cannot move that water away will stay wet, grow algae and mould, and become slippery. Worse, standing water against timber is the fastest route to rot in an outdoor sauna.
The answer is not one magic surface. It is a system: a walking surface with grip, gaps or joints that let water through, a slope that sends water away from the cabin, and a layer underneath that carries water off. The sections below look at each part of that system in turn, starting with the surfaces themselves.
The Main Flooring Choices at a Glance
Four surfaces cover almost every outdoor sauna setup: wood deck boards, stone or concrete pavers, a gravel apron, and slatted duckboards. Most gardens use a mix, such as a wood deck at the sauna door, stone pavers for the path, and gravel around the edges. The table below compares them on the five things that matter most underfoot. Ratings are practical, based on how each surface behaves when wet and barefoot, and cost bands are broad planning estimates only, not quotes.
| Surface | Barefoot comfort | Slip resistance when wet | Drainage | Upkeep | Cost band |
|---|---|---|---|---|---|
| Wood deck boards | High, warm and smooth | Medium, depends on finish | Medium, water passes through gaps | Medium, needs cleaning and oiling | Moderate |
| Stone or concrete pavers | Medium, hard and cool | Medium, varies with texture | Low through the surface, water runs off the top | Low, occasional sweep and wash | Higher |
| Gravel apron | Low, uneven underfoot | High, water drains straight through | High, excellent drainage | Low, rake and top up | Low |
| Slatted duckboard | High, raised and warm | High, gaps shed water fast | High, water falls through slats | Medium, lift and clean underneath | Moderate |
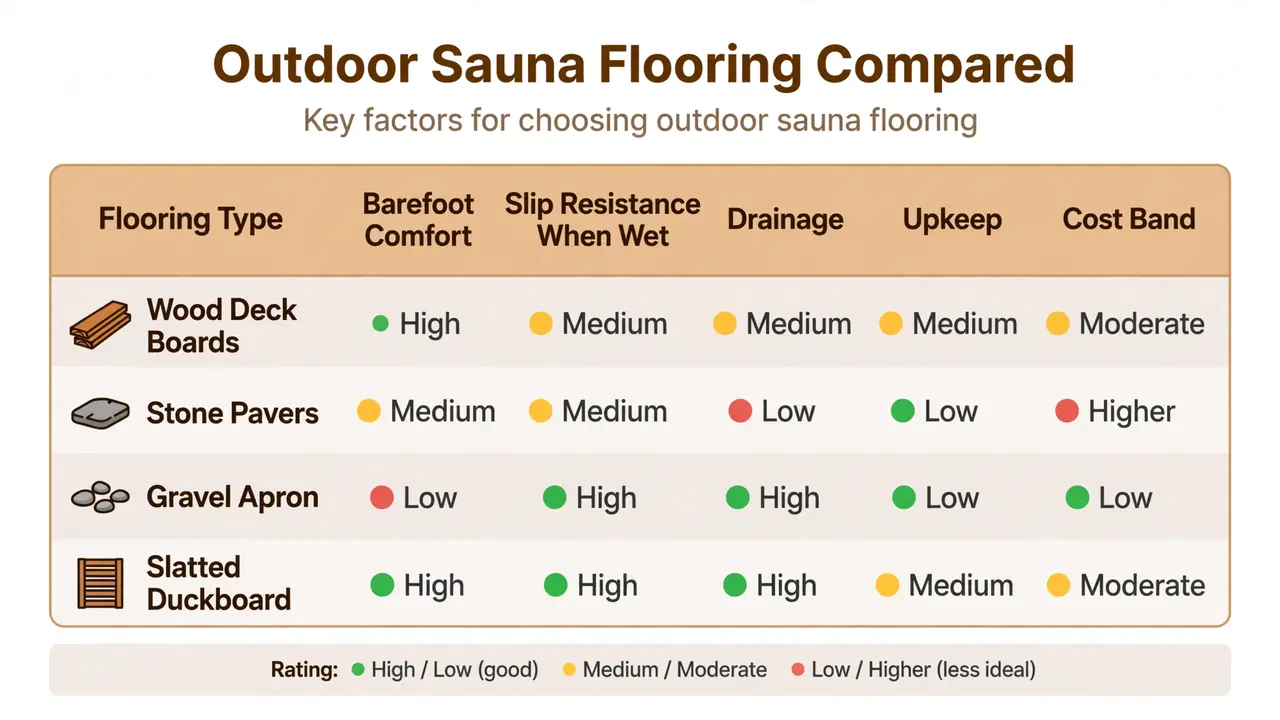
No single surface wins on every factor. Wood is the most comfortable but needs the most care. Stone is the toughest but the least forgiving underfoot.
Gravel drains brilliantly but is not a surface you want to walk on barefoot for long. Duckboards are excellent at the sauna door but are not a whole garden floor. The right answer is usually a combination, matched to how you use the space.
Wood deck boards
Wood is the classic outdoor sauna floor, and for good reason. It is warm underfoot, it matches the cabin, it is easy to walk on barefoot, and it can be repaired one board at a time. Cedar and other naturally durable softwoods are the usual choice for sauna settings because they handle moisture better than untreated pine, but any deck timber used around a sauna must be rated for outdoor use and fixed to allow air underneath.
Boards laid tight together with no gaps will trap water and rot. Boards with even gaps let water through and dry out between sessions.
The finish matters as much as the wood. A smooth planed board is comfortable but can become slippery when wet, especially if algae builds up in shade. A lightly grooved or brushed surface gives bare feet more grip.
Avoid glossy paints and varnishes on walking surfaces, since they turn slick when wet and peel under constant moisture. A penetrating deck oil, reapplied as part of routine care, protects the wood without creating a slippery film. If you are building the sauna itself as well as the deck, our guide on how to build an outdoor sauna covers the wider project.
Wood decking needs regular attention. Sweep it often, wash it when it looks grey or green, and check the fixings each spring. Screws that have worked loose can lift a board edge and catch a bare toe.
Boards that have cupped or split should be replaced promptly, since a damaged board is both a trip hazard and a place where water collects. With that care, a good wood deck around a sauna can last for many years.
Stone and pavers
Stone and concrete pavers are the hardest wearing option, and they suit a sauna path or terrace that also serves as a general garden surface. They do not rot, they do not need oiling, and they shrug off rain, snow and sun. Natural stone with a riven or flamed finish gives bare feet good grip, while smooth polished stone can be dangerously slippery when wet and should be avoided around a sauna. If you cannot test a sample wet, choose a rougher finish and accept the trade off in looks.
The weakness of pavers is drainage through the surface itself. A solid paver does not let water through, so rain and splash water run across the top instead. That is fine if the paved area is sloped away from the cabin and has somewhere for the water to go, such as a gravel strip or a channel drain at the edge.
It is a problem if the paving is flat and water pools against the cabin wall. Wide joints filled with grit or sand let some water through and help, but they need topping up as the filler washes out.
Stone is also the coldest surface underfoot in winter and the hottest in strong summer sun, especially darker colours. Pale stone stays noticeably cooler than dark stone on a sunny day. If your sauna area gets full afternoon sun, choose a lighter colour or plan shade over the walking route. Our guide to outdoor sauna placement for sun, wind, drainage and privacy explains how orientation and shade affect the whole setup, including the floor.
Gravel aprons and stepping stones
A gravel apron is a band of clean stone laid around the sauna, usually over a permeable membrane and a compacted base. It is not a surface for long barefoot walks, since the stones are uneven and can be sharp, but it is one of the best drainage tools available. Water falling from the roof or splashed from the door sinks straight through gravel and away from the cabin, which keeps the timber base dry and stops muddy puddles forming at the door.
Gravel works best as a supporting player. Lay it under the eaves where roof water lands, around the edges of a deck or paved area, and along the path to a cold plunge or shower. Pair it with stepping stones or a duckboard for the actual walking route, so bare feet only cross gravel for a step or two.
Use rounded pea gravel rather than sharp crushed stone where bare feet will touch it, and keep the layer deep enough that feet do not sink through to mud underneath. Rake it level from time to time and top it up when stones scatter onto the lawn.
Slatted duckboards
A duckboard is a small slatted wooden mat, usually made of cedar or a similar durable wood, that sits on the floor or the ground. Inside the sauna it goes on the cabin floor, keeping feet off any damp surface and letting water fall through. Outside, a duckboard at the door gives you a clean, grippy, raised surface to step onto, and it can be lifted and moved in seconds.
That portability is its greatest strength. You can take it inside to dry, hose it down, or move it to the shower area when guests arrive.
Duckboards are not a substitute for a proper floor. They cover a small area, they can rock on uneven ground, and the wood needs the same care as deck boards. Use them as a finishing touch at the door, in a changing area, or on top of a paved surface that is too cold or too slippery on its own.
Choose slats with rounded edges and gaps wide enough to drain but narrow enough that toes cannot catch. A duckboard that lifts easily and dries quickly will get used every session.
Inside the Cabin: The Floor You Stand On
The floor inside the sauna deserves the same thought as the deck outside, because it is where the hottest and wettest feet land. Most outdoor sauna cabins have a wooden floor, often the same timber as the walls, with a slatted duckboard on top in the changing area or in front of the benches. The duckboard keeps feet off the main floor, lets water fall through, and can be lifted out for cleaning and drying. That simple arrangement solves most interior floor problems before they start.
Water inside a cabin comes from wet feet, drips from hair and towels, and water ladled onto the heater stones. A small amount is normal, and a well built cabin floor handles it by letting water run out under the door or through gaps to a drain below. What a cabin floor should never do is hold standing water.
If you find puddles inside after a session, the floor may be level when it should fall gently towards the door, or the duckboard may be trapping water underneath. Lift the duckboard after sessions and let both surfaces dry, and air the cabin with the door open after use.
What not to put on a cabin floor
Some materials that work well in a bathroom are a poor fit inside a sauna cabin. Wall to wall carpet holds moisture and smells, and it cannot be dried out between sessions. Smooth ceramic tile can be slippery and very hot near the heater, and it cracks if the cabin moves with the seasons.
Loose rugs slide under wet feet. Stick to wood and removable slatted mats inside the cabin, and keep the floor clear so air can move across it. If your cabin has a tiled changing room outside the hot room, that is a different space, and the same rules as an outdoor stone floor apply there.
Cleaning the cabin floor is simple and should be done often. Sweep out leaves and grit after outdoor sessions, wipe the floor with a damp cloth, and let it dry fully with the door open. Avoid harsh chemicals and strong detergents inside the hot room, since heat can release fumes from residues and the smell lingers in the timber. Plain water and a brush deal with most dirt, and a mild soap used sparingly is enough for the rest.
Drainage Underfoot: Where the Water Goes
Good drainage is invisible when it works and obvious when it fails. A well drained sauna area dries within hours of rain, never has standing water at the door, and keeps the cabin base dry. A poorly drained one has a permanent damp patch by the wall, green algae on the deck, and a musty smell that follows you inside.
The difference is not expensive. It is a gentle slope, gaps that let water through, and somewhere for the water to go once it leaves the walking surface.
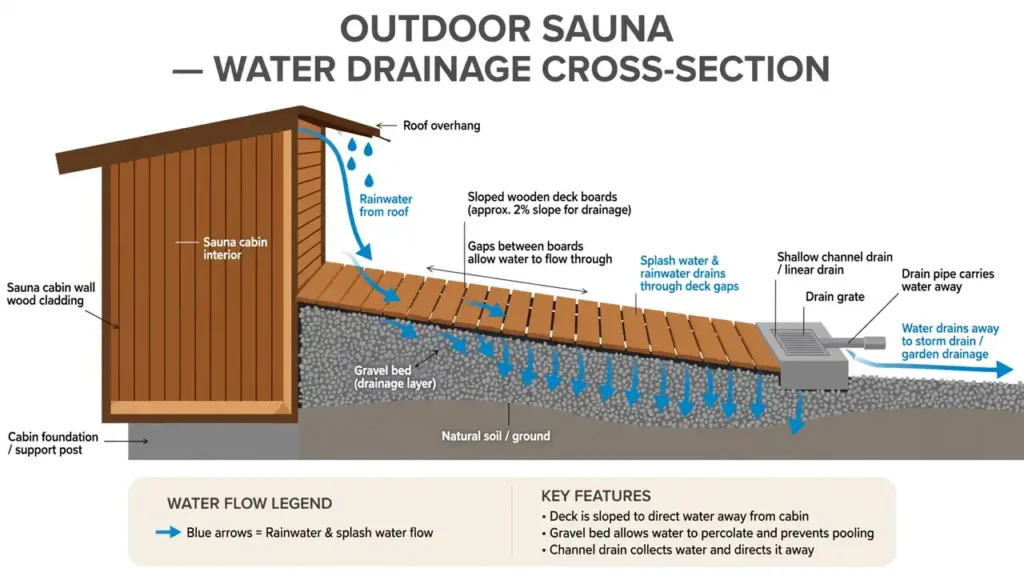
The gentle slope away from the cabin
Every surface around a sauna should fall very slightly away from the cabin, so that rain and splash water run outwards instead of pooling against the walls. You do not need a steep ramp. A gentle fall that you can barely see is enough, and a steeper slope would feel odd underfoot and make furniture slide.
The important thing is that the fall is consistent, with no dips or hollows where water can sit. Check it after heavy rain by looking for puddles. Any puddle that stays for a day after the rain has stopped is telling you where the fall has failed.
On a deck, the slope is built into the frame. On paving, it is built into the base. On a gravel apron, it is the shape of the ground underneath.
Whichever surface you have, the rule is the same: water should leave the cabin area, not gather at it. If you are planning the site from scratch, read our placement guide first, since the slope of the ground itself decides how easy drainage will be. Our guide to outdoor sauna placement for sun, wind, drainage and privacy covers choosing a spot where water naturally runs away from the cabin.
Gaps, gravel and channel drains
Water needs a way down as well as a way across. Deck boards need gaps between them so water can fall through to the ground below. That ground should not be bare soil that turns to mud, but a free draining layer such as gravel, which lets water sink away instead of sitting under the deck.
Keep the space under a deck clear of leaves and debris, since a blocked gap is as useless as no gap at all. A quick sweep and a check that the gaps are open should be part of your regular care routine.
Where a lot of water gathers, such as at the foot of a roof slope or beside a cold plunge, a channel drain is worth adding. A channel drain is a long shallow grate set into the surface that collects water along its length and carries it away through a pipe. It is a modest job for a landscaper or a competent DIY builder, and it solves the one problem a slope alone cannot: water arriving faster than the surface can shed it.
Make sure the drain outlet goes somewhere sensible, such as a soakaway or a garden drainage point, and not towards a neighbour or a public path. If you are unsure where your water should go, ask your local code office or a drainage professional before you dig.
Roof water deserves a mention too. A sauna roof without gutters drops a curtain of water onto the ground at the eaves, which is exactly where people walk. A simple gutter and downpipe, or a gravel strip under the drip line, stops that water from eroding the ground and splashing mud onto the deck.
If your cabin has no gutters, a wide gravel apron under the eaves is the simplest fix. Keep it clear of leaves so it keeps draining.
Slip Resistance When Everything Is Wet
A sauna floor is wet by design, and a slip on wet wood or stone can cause a serious fall, especially for older users or anyone stepping out hot and light headed. Slip resistance should be treated as a safety feature, not a nice extra. The good news is that most of what makes a floor grippy is simple: a rough texture, a surface that sheds water instead of holding a film of it, and regular cleaning so algae and soap residue never build up.
Wood is naturally grippy when it is clean and dry, but it loses grip as algae grows in damp shade. Brushing a deck with a stiff broom and washing it when it starts to look green restores most of the grip. Stone varies more.
A rough textured stone holds a bare foot well, while a smooth or polished one can be treacherous when wet, even if it looks safe. If your stone floor is slippery, a non slip treatment applied by a professional can add texture, or a duckboard over the worst stretch can solve the problem for far less money.
Five ways to make a floor safer underfoot
- Choose textured finishes. Grooved deck boards, brushed concrete and rough cut stone all grip bare feet better than smooth ones.
- Keep it clean. Algae, soap scum and fallen leaves are the most common reasons a safe floor becomes slippery.
- Let water escape. Gaps, joints and slopes stop the thin film of water that causes most slips.
- Put duckboards on the danger spots. A slatted mat at the door and by the shower covers the wettest few steps.
- Light the route. A slip is more likely when you cannot see a puddle or a step edge, so make sure the path from the sauna is lit for evening sessions.
Footwear is a personal choice, but it is worth noting that many sauna users go barefoot the whole time, and a floor should be safe for them. If you do wear shoes or sandals between the sauna and the house, choose something with a good tread and a strap that keeps it on your foot. Loose flip flops on a wet deck are a trip hazard of their own.
Heat and Cold Underfoot
The temperature of the floor changes with the weather far more than the temperature inside the cabin, and it affects comfort more than most owners expect. In summer, a dark stone terrace in full sun can become uncomfortably hot for bare feet, while a pale wood deck in the same sun stays easy to walk on. The difference is the colour and the material.
Dark surfaces absorb more heat, and dense stone holds it longer than wood. If your sauna faces the afternoon sun, a light coloured floor or shade over the walking route will make summer sessions far more pleasant.
In winter the problem reverses. Stone and concrete feel icy underfoot and can hold frost long after the air has warmed up. Wood feels cold but rarely icy, and it warms quickly under a bare foot.
Snow and ice need clearing from any surface, but wood is easier to brush clear, and it does not hold a sheet of ice the way a flat stone slab can. Take care with de-icing salt near a sauna, since it can damage wood and stone alike. A stiff brush and a shovel are safer, and a duckboard over the cleared path gives extra grip on frosty mornings.
The cabin floor itself stays warm during a session, since heat rises from the stove and the wooden floor absorbs some of it. That is one reason a duckboard inside the cabin is useful in winter. It lifts your feet off a floor that may be cold at the start of the session and warm by the end, and it keeps the temperature underfoot more even. Step out onto the deck after a hot session and the cool boards underfoot are part of the pleasure, as long as they are dry and clean.
Choosing Flooring for Your Climate, Budget and Habits
There is no single best outdoor sauna floor, because gardens, climates and budgets differ so much. A rainy garden needs drainage above all else, so a wood deck over gravel with a channel drain will serve better than flat paving. A dry sunny garden can use stone with confidence, since puddles are rare and the stone will dry fast.
A cold climate favours wood, which stays friendlier underfoot in frost. A coastal garden needs materials that resist salt air and frequent washing down.
Budget shapes the choice too, and the honest way to compare is by total cost over the life of the floor, not just the day you build it. Gravel is the cheapest to lay and the cheapest to keep, but it is not a walking surface on its own. Wood decking sits in the middle on price, with regular oiling and occasional board replacement as the ongoing cost.
Stone and pavers cost the most up front but need the least attention afterwards, which can make them the cheapest option over a decade of use. All cost bands in this guide are broad planning estimates, not quotes. Get local quotes before you buy, and check what your supplier charges for delivery and for the base materials underneath, which are often a large part of the total.
Match the floor to how you actually use the sauna
Think about your routine before you choose. If you use the sauna alone, a simple deck and a duckboard may be all you need. If you host friends, the walking route gets more traffic, more water and more wear, so a harder wearing surface such as stone pays off.
If you pair the sauna with a cold plunge, the area between the two is the wettest part of the garden and needs the best drainage you can give it. Our guide to backyard contrast therapy with an outdoor sauna and cold plunge looks at that whole setup, including the wet route between the two.
Size matters as well. A small sauna for one or two people needs only a modest area of good flooring at the door and a short path to the house. A large cabin that seats six or more needs a bigger deck or terrace, room for chairs and towels, and a route that several wet people can use at once without crowding. If you are still deciding how big the cabin should be, our guide to how to size an outdoor sauna will help you plan the footprint, and the floor should be sized to match it.
Installation Details That Make or Break a Floor
A flooring project fails far more often on details than on the choice of material. A beautiful deck laid flat will hold water. Lovely stone laid on a poor base will sink and wobble.
The steps below are the details that matter most, in the order you should deal with them. They are general guidance for planning, not a substitute for a professional installer or your local code office, and you should check whether your project needs a permit before you start. Our guide to whether you need a permit for an outdoor sauna explains the questions to ask.
- Sort the ground first. Clear the area, remove soft topsoil, and shape the ground so it falls gently away from the cabin.
- Lay a free draining base. A compacted layer of gravel under a deck or paving stops water pooling underneath and gives the surface something solid to sit on.
- Build in the slope. Set deck frames and paving bases to a gentle, even fall away from the cabin, and check it with a long level before you fix anything.
- Leave gaps for water. Space deck boards evenly, keep paver joints open enough to drain, and never butt boards tight together.
- Ventilate under the deck. Air must be able to flow beneath deck boards so the timber dries between sessions. Do not box in the sides of a deck with solid boards.
- Fix with the right fixings. Use stainless or coated screws rated for outdoor use, since ordinary steel fixings rust, stain the timber and work loose.
- Plan the water exit. Decide where roof water, splash water and drain water will go, and add a channel drain or gravel strip where the flow is heaviest.
- Test it with water. Before you call the job done, pour a bucket of water on the surface and watch where it goes. It should run away from the cabin and disappear, not pool at the door.
That last test is the most useful check in this whole guide, and it costs nothing. Do it again after the first heavy rain, and after the first winter, since ground settles and boards move. A floor that passed the bucket test on day one can develop a dip a year later, and catching it early is a small repair instead of a rebuild.
Cleaning and Care Through the Year
A sauna floor needs little care, but it needs it regularly. Dirt, leaves and algae build up fast in a damp garden, and a floor that is cleaned twice a year will outlast one that is ignored for three. The work itself is simple, and it fits neatly into the wider upkeep of the cabin. Our outdoor sauna maintenance calendar covers the whole year for the cabin, and the floor care below slots into the same rhythm.
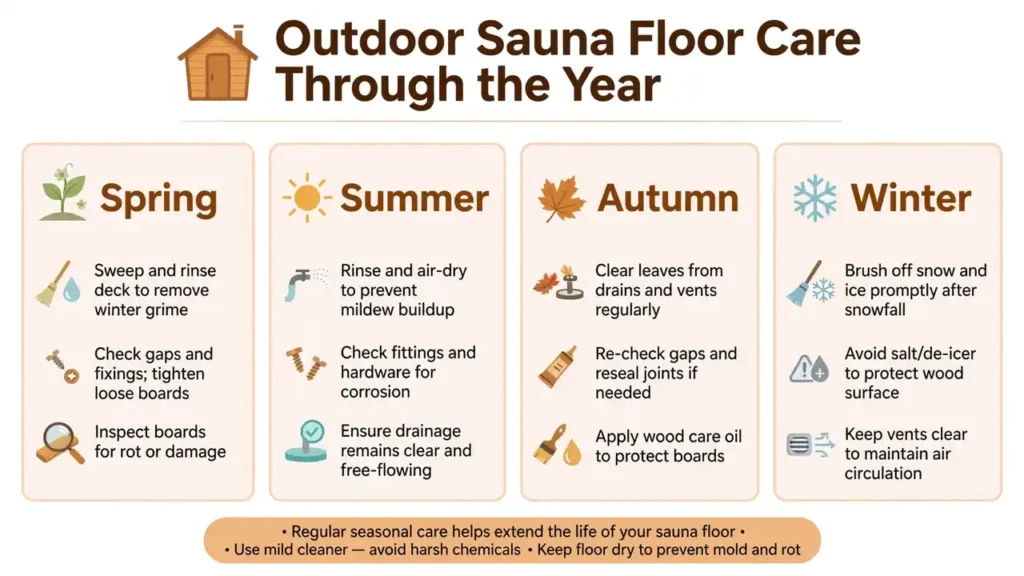
Spring: inspect and wash
Spring is the main inspection season. Sweep the deck and paving, rinse off winter grime, and look at every board and paver with fresh eyes. Check deck gaps are clear, screws are tight, and no board has lifted or split over winter.
Look for soft spots in timber that suggest rot, and for pavers that have sunk or rocked. Replace damaged boards now, before the busy summer season, and re-oil the deck if the finish has worn thin.
Summer: keep it dry and clean
Summer is the easiest season for a sauna floor, but also the one when algae grows fastest in shade. Rinse the deck after heavy use, sweep off leaves and grass cuttings, and check that drainage is still clear and free flowing. This is the best time to oil a wood deck, since warm dry days let the oil soak in properly. Let the deck dry fully before oiling, and keep the sauna out of use until the oil has soaked in and the surface is dry to the touch.
Autumn: clear the leaves
Autumn leaves are the biggest threat to drainage, because a mat of wet leaves over a deck gap or a drain grate stops water dead. Clear leaves from the deck, the gravel and the drains regularly through autumn, and check the gaps again after the last fall. This is also a good time to apply wood care oil to the boards, so the timber goes into winter protected, and to re-check joints and fixings before frost arrives.
Winter: clear snow and ice promptly
Brush snow and ice off the deck and path promptly after snowfall, before it compacts into ice. Use a plastic shovel or a stiff brush rather than a metal edge that can gouge the wood. Avoid de-icing salt on wood and natural stone, since it can damage both, and keep the vents clear so air keeps moving around the cabin. A duckboard over the cleared path gives bare feet extra grip on frosty mornings, and it can be brought inside to dry after use.
Flooring Mistakes to Avoid
Most outdoor sauna flooring problems come from a short list of avoidable mistakes. If you are planning a new floor or fixing an old one, check your plans against this list before you spend any money. Each of these is cheap to prevent and expensive to fix later.
- Laying the floor flat. A level floor holds water against the cabin. Build in a gentle fall away from the walls.
- Butting deck boards tight together. Boards need gaps to drain and to swell in wet weather. Tight boards trap water and rot.
- Choosing smooth polished stone. It looks elegant and becomes a skating rink when wet. Pick a rough textured finish.
- Boxing in the deck sides. A deck needs airflow underneath to dry. Solid skirts trap damp and rot the frame.
- Forgetting the roof water. Without gutters or a gravel strip, roof runoff lands on the walking route and erodes the ground.
- Using indoor materials outside. Carpet, indoor tile adhesive and ordinary steel fixings all fail fast in a wet garden.
- Skipping the bucket test. Pour water on the finished surface and watch where it goes before you use the sauna.
Frequently Asked Questions
What is the best flooring for an outdoor sauna?
There is no single best choice, because it depends on your climate, budget and how you use the sauna. Wood deck boards are the most comfortable under bare feet and suit most gardens, while stone or concrete pavers are the toughest and need the least upkeep, though they are colder and need a slope so water runs off. A gravel apron is the best drainage layer, and a slatted duckboard is the best finishing touch at the door, so most good setups combine two or more of these.
Do I need drainage under my outdoor sauna floor?
Yes. Every outdoor sauna produces water from rain, splash and wet feet, and that water has to go somewhere. A gentle slope away from the cabin, gaps between deck boards, a gravel layer underneath and, where needed, a channel drain at the edge will keep the floor dry and protect the cabin timber from rot and mould. A floor that holds standing water will become slippery and will damage the cabin over time.
Is a wood deck slippery when wet around a sauna?
A clean wood deck has reasonable grip when wet, but it becomes slippery if algae, soap residue or leaves build up on it. Choose lightly grooved or brushed boards rather than a smooth glossy finish, sweep and wash the deck regularly, and keep the gaps clear so water drains away. A slatted duckboard at the door covers the wettest steps and adds grip where it matters most.
Can I put stone pavers around an outdoor sauna?
Yes, stone and concrete pavers work well around an outdoor sauna as long as you choose a rough textured finish and lay them with a gentle slope away from the cabin. Solid pavers do not let water through, so the slope and a channel drain or gravel strip at the edge are essential. Pale stone stays cooler than dark stone in summer sun, which matters for bare feet.
What should I put on the floor inside the sauna cabin?
A wooden floor with a removable slatted duckboard on top is the usual and best arrangement. The duckboard keeps feet off the main floor, lets water fall through, and can be lifted out for cleaning and drying. Avoid carpet, loose rugs and smooth tile inside the hot room, since they hold moisture, slide under wet feet, or become very hot near the heater.
How do I stop water pooling at my sauna door?
First check the slope, since water pooling at the door usually means the floor is flat or falls towards the cabin. Then check that deck gaps, paver joints and any drains are clear of leaves and dirt. A gravel strip or a channel drain across the front of the door will catch water that the slope cannot move. If the ground itself slopes towards the cabin, you may need to reshape it or add drainage, and a local landscaper or drainage professional can advise.
Start From Your Feet and Work Up
The floor underfoot is the most used and least celebrated part of an outdoor sauna. Get it right and every session starts and ends well, with warm boards or cool stone underfoot, no puddles, and no slips. The formula is simple: a comfortable surface with grip, a gentle slope away from the cabin, gaps and gravel that let water through, and a little care each season.
Test samples with bare wet feet, pour a bucket of water on the finished surface before you use it, and keep the drains clear. Your feet will thank you every time you step out of the heat.
If you are planning the whole sauna project, work through the related guides in order. Start with placement and sizing, then the foundation the cabin sits on, then the build itself, and finish with the floor and drainage in this guide. Each step depends on the one before it, and a floor laid on a well chosen site with a sound foundation will last far longer than the same floor laid on a damp hollow. Plan it once, build it well, and enjoy it barefoot for years.