
An infrared sauna in a basement can turn an underused room into a daily wellness retreat, but a basement is not the same as a spare bedroom or a garage. It brings its own set of questions about damp air, low ceilings, and how fresh air moves through the space. Answering those questions before you buy saves you from a cabin that never quite fits or a room that stays damp after every session.
This guide walks through the three checks that matter most: moisture, ventilation, and headroom. You will also find guidance on floors, drainage, and electrical basics, plus a pre-install checklist you can work through in an afternoon. Everything here is general guidance for planning, not a substitute for your sauna manual, your local code office, or a licensed electrician.
Please read first: This article is general guidance only, not a substitute for local building code or a licensed professional. Check with your local permit and code office before building or altering a basement space, and use a licensed electrician for installation work. Saunas are wellness tools, not treatments. Hydrate before and after each session, start with short sessions, leave immediately if you feel dizzy or unwell, and do not drink alcohol before or during a session. If you are pregnant, live with a heart or circulation condition or low blood pressure, or take medication that affects heat tolerance, check with your doctor first.
Why a Basement Needs Extra Checks Before an Infrared Sauna
Basements sit partly or fully below ground level, so they behave differently from rooms upstairs. Ground moisture presses against foundation walls, cool surfaces can collect condensation, and windows are often small or absent. An infrared sauna adds heat to that environment, and heat moves moisture around, so a basement that seems dry in winter can feel damp once a sauna runs regularly.


Paid Links - As an Amazon Associate, I earn from qualifying purchases.
None of this rules a basement out. Many people run infrared saunas in basements happily for years. The difference between a good setup and a frustrating one is usually decided before the cabin arrives, by measuring the room, testing for moisture, and planning airflow. A few hours of checking now is cheaper than moving a heavy cabin later.
It also helps to think about the room as a whole, not just the cabin. The sauna heats the air inside its walls, but the basement around it still needs to dry out between sessions. A dry, well ventilated room protects the cabin, the house, and the people using it.



Paid Links - As an Amazon Associate, I earn from qualifying purchases.
Basement Moisture: Sources, Signs, and Simple Checks
Moisture is the first thing to check, and the most common reason a basement sauna disappoints. Infrared saunas do not add steam the way a steam room does, but people still sweat, towels get damp, and warm air can push moisture into cool corners. If the basement already has a dampness problem, the sauna will make it more obvious, not less.
Where basement moisture comes from
Most basement moisture arrives in one of four ways. Groundwater can seep through cracks or porous concrete, especially after heavy rain. Humid outdoor air enters through windows, gaps, and stairwells in summer. Condensation forms when warm, humid air meets a cool foundation wall or floor slab. And everyday sources add up too, including laundry, a bathroom, or a sump pit that is not sealed.
Knowing which source you have matters, because the fix is different for each one. A dehumidifier helps with humid air, but it will not stop water seeping through a wall crack. That kind of problem needs a builder or waterproofing specialist first, before any sauna goes in.
- Seepage: water stains, damp patches, or efflorescence (white salty marks) on walls or floors after rain.
- Condensation: beads of water on cool walls, pipes, or windows, often in summer when humid air meets a cool slab.
- High indoor humidity: a musty smell, clammy air, or condensation on cold surfaces even when nothing is visibly wet.
- Plumbing or drainage leaks: a damp spot that never dries, a running sump pump, or a floor drain that backs up.
The checks to run before you buy
Start with your senses and a cheap hygrometer, which measures relative humidity and costs little at a hardware store. Walk the basement after a rainy day and again on a warm, humid day, and note any smells, stains, or damp spots. A basement that smells musty already has a moisture story to solve, even if you cannot see water.



Paid Links - As an Amazon Associate, I earn from qualifying purchases.
Then run the plastic sheet test on the wall and floor where the sauna will sit. Tape a square of clear plastic sheeting, about 60 cm by 60 cm, tightly to the surface and leave it for two or three days. Moisture on the room side of the plastic points to condensation. Moisture on the wall side points to water coming through the wall, which is a job for a specialist.
Track humidity over a week if you can. The US Environmental Protection Agency suggests keeping indoor relative humidity between 30 and 50 percent, and below 60 percent to discourage mold growth. If your basement sits above 60 percent for long stretches, plan for a dehumidifier sized for the room and run it before the sauna arrives, not after problems appear.
| What you observe | What it usually means | What to do next |
|---|---|---|
| Relative humidity under 50 percent, no stains or smell | Dry basement, good candidate | Proceed with the ventilation and headroom checks |
| Humidity 50 to 60 percent, occasional musty smell | Humid air, manageable | Add a dehumidifier and recheck after a week |
| Humidity above 60 percent for days at a time | Moisture load too high for a sauna room as it stands | Find the source, run a dehumidifier, and delay the sauna |
| Damp patches, stains, or water after rain | Seepage through walls or floor | Bring in a waterproofing specialist before buying |
| Moisture on the wall side of the plastic sheet test | Water moving through the wall | Do not install until the wall is assessed and fixed |
One more check is easy to miss: the sump pump, if you have one. Make sure it runs, the discharge line is clear, and the pit has a sealed lid. An open sump pit pours humid air into a basement all day, and a failed pump can flood the exact spot where a sauna would sit.

Ventilation and Airflow for a Basement Infrared Sauna
Ventilation is the second big check, and it is the one most often skipped. An infrared sauna cabin has its own small vents, but the basement room around it needs fresh air too. Without it, warm, humid air lingers after each session, and the room slowly gets damper. Good airflow also keeps the air feeling fresh while you sit inside, which matters more than most people expect.
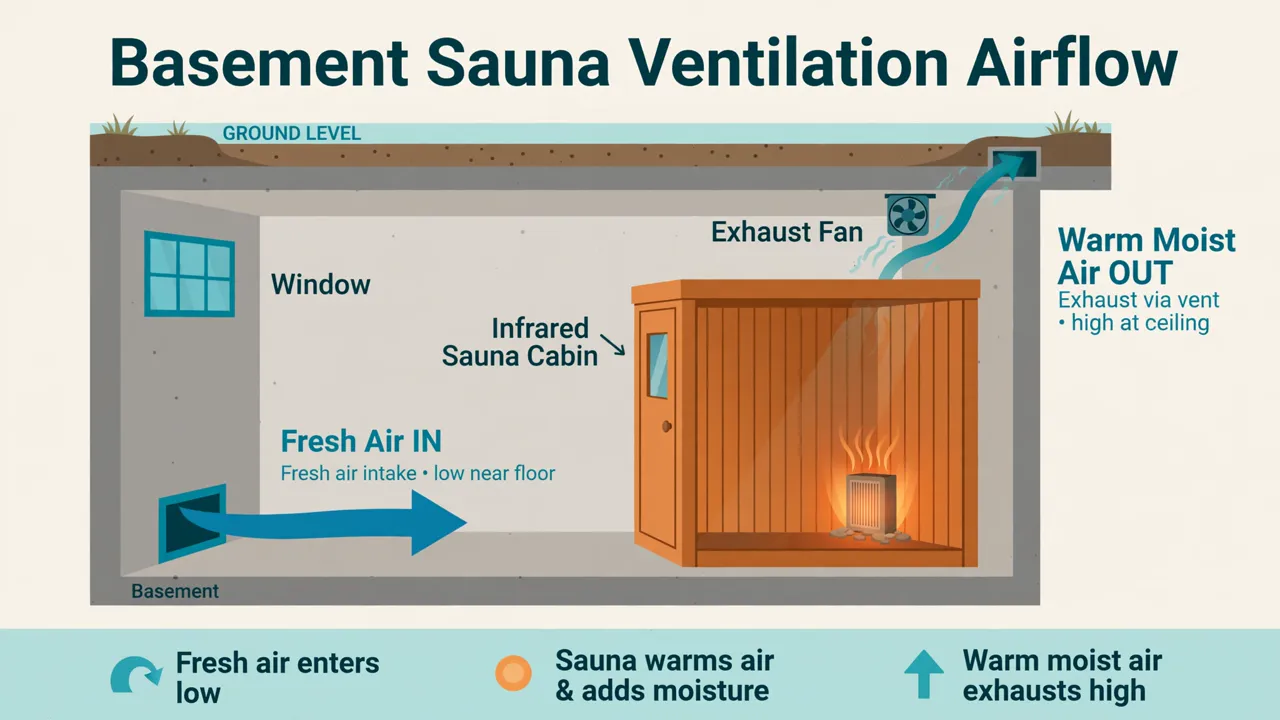
Think of ventilation in two parts: air into the sauna room, and air out of the basement. Fresh air should enter low, near the floor, and leave high, near the ceiling, because warm air rises. That simple pattern, low in and high out, drives most of the practical options below.
Ventilation options, from simplest to most involved
- Passive vents: a louvered vent low on the door or wall and another high on the opposite wall. No power needed, and often enough for a small cabin used a few times a week.
- Exhaust fan: a quiet bathroom style fan high on the wall, vented outdoors, run during and for 20 to 30 minutes after each session. This is the most common upgrade for basement setups.
- Window plus fan: if the basement has a window, opening it with a fan running after a session can clear the room quickly in mild weather.
- Tied into existing HVAC: a supply and return run extended to the sauna room, sized and balanced by an HVAC professional. Best for finished basements that are used daily.
Whatever option you choose, vent moist air outdoors, not into another part of the house. Venting into a hallway or an attic just moves the moisture problem somewhere harder to see. If you are unsure how to route a duct, ask an HVAC professional rather than guessing.
| Ventilation option | Best for | Effort and cost | Watch out for |
|---|---|---|---|
| Passive vents | Small cabin, light use, dry basement | Low, a simple install | Weak airflow on still, humid days |
| Exhaust fan | Most basement setups | Moderate, a fan and duct run | Must vent outdoors, not into the house |
| Window plus fan | Basements with a working window | Low, if a window exists | Not useful in cold or rainy weather |
| HVAC tie in | Finished basements, daily use | Higher, needs a professional | System must be balanced so other rooms still heat and cool well |
A simple airflow routine after each session
Good habits matter as much as hardware. Leave the sauna door open after a session so the cabin dries inside. Run the exhaust fan or open a vent for 20 to 30 minutes. Hang towels to dry outside the sauna room, and wipe the bench and floor if they are damp. These small steps keep the room dry between sessions and protect the wood.
If your basement already has a ventilation setup for another purpose, such as a workshop or a laundry area, check whether it can serve the sauna room too. Our guide to outdoor sauna ventilation covers the same low in, high out principle, and the airflow ideas there transfer well to a basement.
Headroom and Ceiling Height: Measure Before You Order
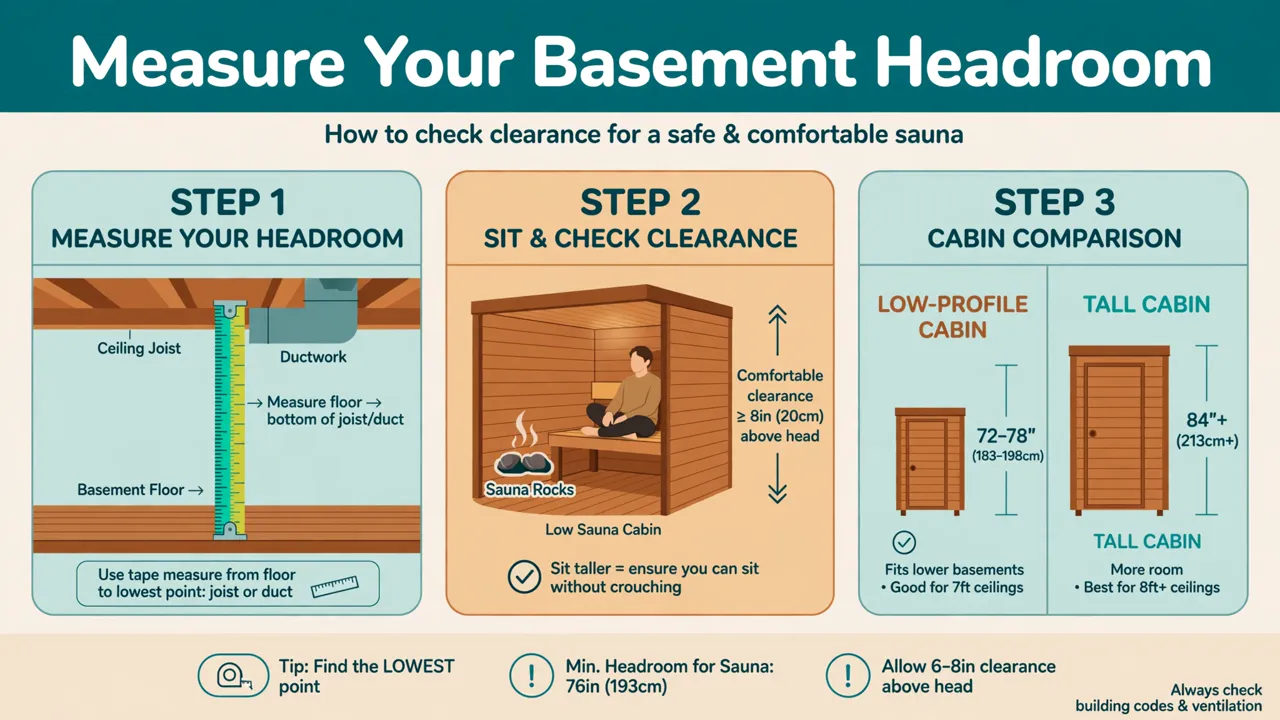
Headroom is the check that causes the most returns and rebuilds, because it is easy to get wrong. A sauna cabin is a tall box, and a basement ceiling is often lower than the rooms upstairs, with ducts, pipes, and beams hanging below the joists. The cabin height listed on a product page is only half the story. The other half is the lowest point in your room.
How to measure your basement properly
Measure in three places: the spot where the sauna will stand, the path from the stairs or door to that spot, and the lowest beam, duct, or pipe along that path. A cabin that fits the room but cannot get through a low doorway is no use at all. Write down the smallest measurement, not the average, because the cabin has to clear the lowest point.
Measure from the finished floor to the lowest obstruction, and measure twice. If the floor is not finished yet, measure from the surface the sauna will actually sit on, including any flooring you plan to add. A rug or a floating floor can take a centimetre or two that you thought you had.
- Measure floor to ceiling at each corner of the sauna spot, and at the centre.
- Measure under every beam, duct, and pipe that crosses the sauna spot or the delivery path.
- Measure the narrowest doorway and the tightest turn on the way in, including stair headroom.
- Subtract a small margin, about 5 cm, for assembly clearance above the cabin.
- Compare the smallest number with the assembled height in the model manual, not the shipping box size.
What counts as enough headroom
Many compact infrared cabins are listed around 72 to 79 inches tall when assembled, and many basements have ceilings around 7 to 8 feet, so most combinations work. Problems start when a basement ceiling drops below 7 feet, or when a duct crosses the exact spot you picked. Always check the assembled height in the manual for the model you are considering, since heights vary by brand and by size.
| Ceiling height at the sauna spot | What it usually allows | What to check |
|---|---|---|
| 8 feet or more | Most cabin sizes, including taller models | Delivery path and doorways, not the ceiling |
| 7 to 8 feet | Most compact and mid size cabins | Assembled height in the manual, plus assembly clearance |
| Under 7 feet | Only low profile models, if any | Low profile cabin options and seated headroom inside |
| Duct or beam crossing the spot | Depends on the lowest point | Move the sauna spot or choose a shorter cabin |
Low ceiling workarounds that actually help
If your ceiling is tight, start by moving the sauna spot. Basements are rarely flat in height, and a spot a metre away can sit under clear joists instead of a duct. A low profile cabin, built shorter than standard models, is the next option, and several brands offer one. Check seated headroom inside the cabin too, because a short cabin can still feel fine if the bench height suits you.
What does not help is forcing a tall cabin into a short space. Cutting into joists or ductwork to gain a few inches is structural work that needs a professional and a permit check, and it is rarely worth it for a sauna. Choosing a different spot or a shorter model is cheaper, safer, and faster. If the only spot you have is under a low beam, it may be the wrong room for a sauna, and that is a useful answer to get before you spend anything.
Floor and Drainage: What the Sauna Sits On
A basement floor is usually concrete, which is a solid base for an infrared sauna. Concrete does not rot, it handles weight well, and it is easy to clean. The main question is whether the floor stays dry. A cabin sitting on a slab that gets damp after rain will trap moisture underneath, so fix any seepage first, as covered in the moisture section above.
A level floor matters too. Most cabins need a flat, level surface so the panels join cleanly and the door closes properly. Check with a long spirit level, and shim or level the floor if one corner sits low. A thin waterproof mat under the cabin can protect the wood base from a cold slab and make cleaning easier, but check the manual first, since some makers ask for direct contact with the floor.
Drainage is simpler for an infrared sauna than for a steam room, because there is no plumbed water and no steam to condense. You do not need a floor drain for the sauna itself. What you do need is a way to deal with sweat, spills, and wet towels, which means a mop or towel nearby and a habit of wiping the bench after use. If your basement has a floor drain, keep it clear and know where it leads. A blocked drain is a flood risk for everything in the room, sauna included.
If you are comparing wet rooms, our guide to steam room waterproofing, tiling, and ceiling materials shows how much heavier the drainage and waterproofing demands get once steam is involved. An infrared setup in the same basement is far simpler, which is one reason many basement owners choose it.
Electrical Basics for a Basement Infrared Sauna
Electrical work is the part of this project to hand to a licensed electrician, without exception. Infrared saunas draw a steady load for 20 to 45 minutes at a time, and the circuit, the outlet, and the cable run all need to match the model you buy. This section is general planning guidance only. Your electrician and the model manual are the final word.
What to ask your electrician about
- Dedicated circuit: most infrared saunas need their own circuit, so ask whether your panel has capacity and what size circuit the model requires.
- Outlet type and location: check the plug type in the manual and where the outlet should sit relative to the cabin, so the cord reaches without crossing a walkway.
- GFCI protection: ask whether your local code requires GFCI protection for a basement sauna circuit, and have the electrician confirm what applies in your area.
- Panel capacity: an older panel may be full or near its limit, so ask the electrician to check before you order the sauna.
Never run an infrared sauna on an extension cord or a power strip, and never share its circuit with a freezer, a washer, or a space heater. If the nearest outlet is on the wrong side of the room, have the electrician add one in the right place rather than stretching a cord across the floor. Basements and water mix badly, so keep outlets away from the sump area and any spot that has ever flooded.
Budget for the electrical work as part of the sauna cost, not as an afterthought. A simple outlet addition is quick, but a new circuit, a panel upgrade, or a long cable run through a finished basement can cost real money. Getting a quote before you order the cabin means no surprises on delivery day.
Basement Infrared Sauna: Pre-Purchase and Pre-Install Checklist
Work through this list in order. Each step depends on the one before it, and a fail at any step is a reason to pause, not to push ahead.
- Walk the basement after rain and on a humid day, and note stains, smells, and damp spots.
- Run the plastic sheet test on the wall and floor where the sauna will sit, and leave it for two to three days.
- Measure relative humidity for a week, and plan a dehumidifier if it stays above 60 percent.
- Check the sump pump, floor drain, and any plumbing in the room.
- Measure ceiling height at the sauna spot, under every beam and duct, and along the delivery path.
- Compare the smallest measurement with the assembled height in the model manual.
- Choose a ventilation plan: passive vents, an exhaust fan, or an HVAC tie in, vented outdoors.
- Check the floor is level and dry, and decide on a mat if the manual allows one.
- Ask a licensed electrician about a dedicated circuit, outlet location, and panel capacity.
- Check with your local permit and code office whether the work needs a permit.
- Confirm the delivery route: door widths, stair headroom, and turning space.
- Order the cabin only after every check above passes.
Before you settle on a basement, it is worth comparing it with the other spots in your home. An infrared sauna in an apartment faces different limits around space and landlord rules, while a garage or closet infrared sauna conversion brings its own ventilation and insulation questions. A basement wins when it is dry, tall enough, and easy to ventilate, and loses when any of those three fails.
Frequently Asked Questions
Can you put an infrared sauna in a basement?
Yes, in many basements, provided the room is dry, tall enough for the cabin, and ventilated so moist air can leave after each session. Check moisture, headroom, and airflow first, and fix any seepage or dampness before the sauna arrives.
How do I stop moisture problems with a basement infrared sauna?
Start by finding and fixing the moisture source, then keep indoor relative humidity below 60 percent with a dehumidifier if needed. Ventilate the room during and after each session, leave the sauna door open to dry, and wipe down the bench and floor.
How much headroom do I need for an infrared sauna in a basement?
It depends on the model, so check the assembled height in the manual. Many compact cabins are listed around 72 to 79 inches tall, and most basements with 7 to 8 foot ceilings can fit them. Measure to the lowest beam or duct, not to the highest point of the ceiling, and leave about 5 cm of assembly clearance.
Does a basement infrared sauna need ventilation?
Yes. The cabin has its own small vents, but the basement room needs fresh air too, or humid air will linger after sessions. A quiet exhaust fan vented outdoors, run during and for 20 to 30 minutes after each session, is the most common setup.
Do I need a floor drain for an infrared sauna in a basement?
No, an infrared sauna does not need a floor drain, because it has no plumbed water and produces no steam. You only need a way to handle sweat and spills, such as wiping the bench after use. If the basement already has a floor drain, keep it clear.
Does an infrared sauna in a basement need its own electrical circuit?
Most models need a dedicated circuit, but the exact requirement is in the model manual. Ask a licensed electrician to check your panel capacity, the outlet type, and whether local code requires GFCI protection. Never use an extension cord or a power strip.
Can I install an infrared sauna in a basement with low ceilings?
Sometimes. Try moving the sauna spot to a place with clear joists, and look for a low profile cabin model. If the only spot sits under a low beam or duct and no low profile model fits, the room is probably not suitable, and choosing a different location is safer than altering structure.