
Choosing a sauna is the fun part. Choosing what it sits on is the part that decides whether it stays level, dry and enjoyable for years. A good foundation spreads the sauna’s weight, keeps water moving away from the timber, and gives doors and panels a stable frame to work with. A poor one can leave you with a door that sticks, a floor that feels uneven, and damp timber that ages far faster than it should.
This guide compares the four most common choices — a concrete slab, pavers, a deck, and a gravel pad — and explains how to match one to your sauna type, your ground, and your budget. It focuses on the foundation itself. If you are still planning the wider build, our step-by-step overview of how to build an outdoor sauna covers the rest of the project in order.
Why the Foundation Matters More Than It Looks
An outdoor sauna is heavy, it gets hot and steamy inside, and then it cools down again. That cycle, repeated over seasons, is unforgiving on a base that moves or traps water. Timber in constant contact with damp ground is at risk of rot, and a base that settles unevenly can twist a frame just enough to cause draughts, sticking doors, and gaps that let weather in.


Paid Links - As an Amazon Associate, I earn from qualifying purchases.
Levelling matters for a second, practical reason. Sauna kits are designed to be assembled on a flat, square surface. If the base is out of level, every following step — walls, roof, benches, heater mounting — becomes harder to get right. Starting level saves time during assembly and avoids forcing parts into place.
Finally, check what your sauna’s manufacturer asks for before you build anything. Some models specify a level, solid base, a minimum footprint, or a particular type of support. Those instructions should take priority over general advice, including this article. If the manual and a general guide disagree, follow the manual and ask the supplier if anything is unclear.
Build and safety note: This article is general guidance only, not a substitute for local building rules or a licensed professional. Check with your local permit and code office before you build, especially for a permanent slab or any electrical work. Use licensed professionals for electrical work and for structural concrete work, and always follow your sauna manufacturer’s instructions for clearances, ventilation, and heater installation.
What a Good Outdoor Sauna Foundation Must Do
Whatever material you choose, a good foundation does the same five jobs. It carries the full loaded weight of the sauna, including bathers, without sinking in one corner. It stays level through wet and dry seasons. It drains water away rather than pooling beneath the floor. It allows air to circulate and the underside to dry out after rain. And it keeps timber off bare soil wherever possible.
Drainage deserves special attention because it is easy to overlook on a dry building day. Rain, snowmelt, splash-back from the roof, and steam that condenses and escapes all end up around the base. If water sits there, it soaks into supports, invites mould and insects, and can soften the ground underneath. A slight fall away from the sauna, a free-draining layer beneath the base, and a site that is not the lowest point in the garden all help.
Frost and ground movement are the other quiet risk. In cold climates, wet ground can shift as it freezes and thaws, and clay soils can swell and shrink with moisture changes. No guide can predict how your particular soil will behave, which is why local knowledge — from your supplier, a local builder, or neighbours who have built on similar ground — is worth more than a generic rule. A base that can be re-levelled, or one built on a properly prepared sub-base, copes better with movement than a base laid straight onto soft topsoil.


Paid Links - As an Amazon Associate, I earn from qualifying purchases.
The Four Options at a Glance
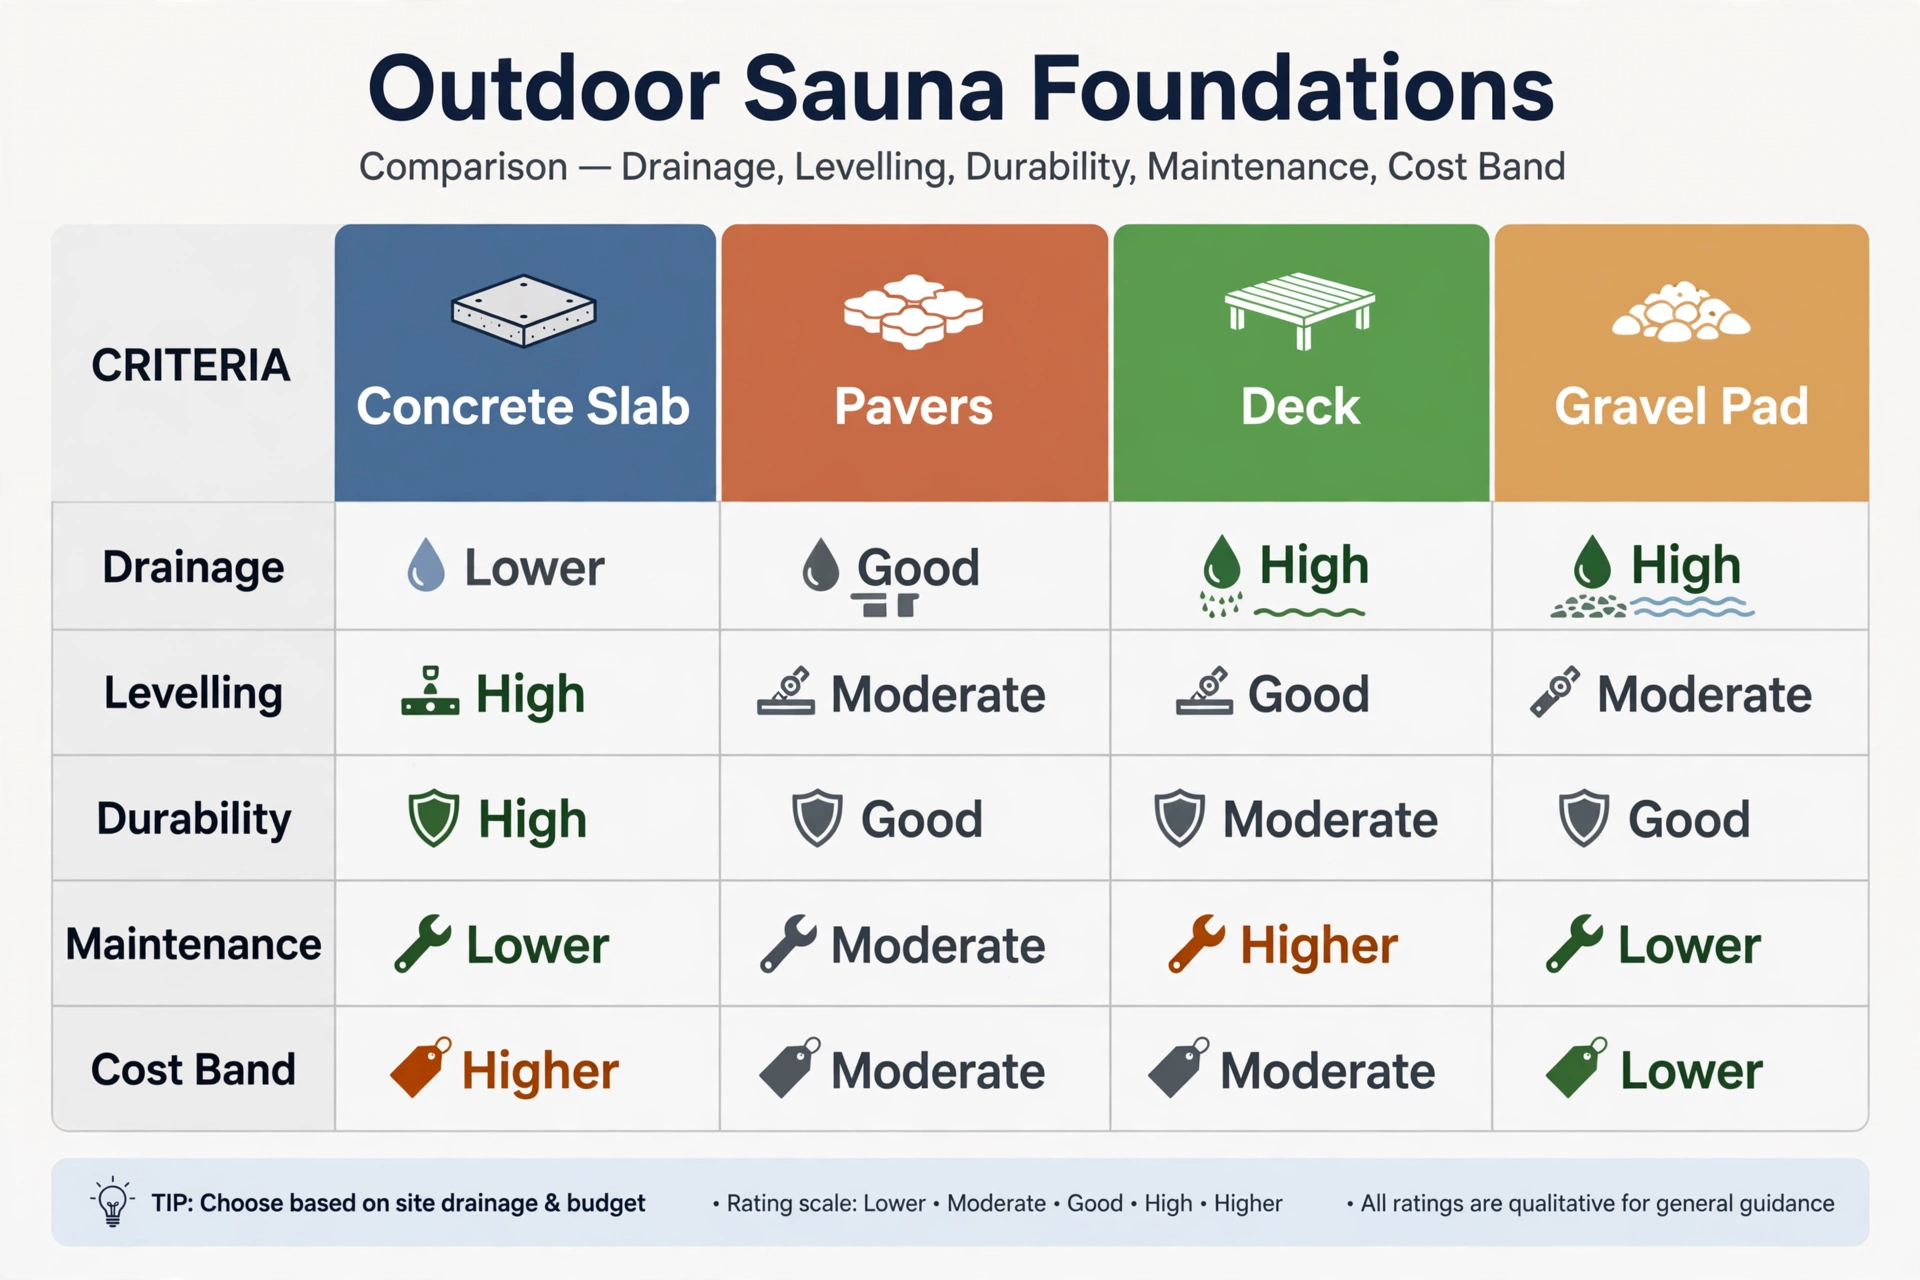
The chart below summarises the trade-offs in qualitative terms. Ratings are general guidance, not measurements, and the right choice for a particular site can differ from the chart’s headline rating. Concrete is a good example: the slab surface itself does not drain through, so it scores lower on surface drainage alone, but a properly sloped slab on a prepared gravel base can still direct water away very effectively as a complete system.
Option 1: Concrete Slab
A concrete slab is a flat, poured pad, usually laid on a prepared sub-base, that gives a sauna a permanent, rigid footing. It is the most substantial of the four options and the hardest to change later, which is both its strength and its drawback. For a large, heavy, permanent cabin sauna that will stay in one place for many years, it is often the most reassuring choice.
Its main advantages are stability and longevity. A well-made slab does not shift under load, resists wear, and gives a perfectly flat surface for assembly. It also creates a clean, tidy area around the sauna that is easy to sweep and keep clear. For heavier builds, that rigidity helps doors and windows stay aligned over time.
The downsides are cost, permanence, and drainage planning. A slab generally sits in the higher cost band of these four options, and prices vary widely by region, size, access, and installer, so get local quotes rather than relying on a national figure. Because concrete does not drain through, the slab needs a slight slope away from the sauna and a prepared base beneath it, or water can pool on the surface. Once poured, it cannot easily be moved or resized if you change your mind.
Best for: large or heavy permanent cabin saunas, level sites, and owners who want a long-term, low-maintenance base and are happy to commit to one location.
- Pros: very stable and level; durable; low ongoing maintenance; tidy, easy-to-clean surface.
- Cons: higher cost band; permanent; needs careful slope and sub-base for drainage; usually needs professional help.
- Watch out for: pouring onto unprepared topsoil, a flat slab with nowhere for water to go, and a slab that is smaller than the sauna footprint plus any overhang or step area.
Option 2: Pavers
Pavers — individual concrete or stone blocks laid on a prepared bed — offer a middle path between a full slab and a loose gravel pad. They give a firm, attractive surface that can be lifted and re-laid if a section settles, which makes them forgiving on ground that moves slightly over time. They suit many cabin and pod saunas and look at home in a garden patio setting.
Drainage is a genuine strength here. Joints between pavers let water through, and a properly prepared bedding layer helps it disperse rather than pool. Levelling is good when the bed is prepared carefully, though it takes more patience than pouring a slab: each paver must sit evenly, or the sauna floor will rock or flex. Weeds can grow through joints if they are not filled and maintained, and individual pavers can sink if the ground beneath was not compacted well.
Cost generally sits in the moderate band, again varying by paver type, area, and whether you lay them yourself or hire help. A paver base is also one of the easier options to extend later, for example to add a changing or cooling-off area beside the sauna. Just be sure the extension is laid to the same level and drainage standard as the original pad.
Best for: medium-sized saunas on fairly level ground, garden settings where appearance matters, and owners who want a firm surface with the option to adjust it later.
- Pros: firm and attractive; good drainage through joints; individual pavers can be re-levelled; easier to extend than a slab.
- Cons: levelling takes care during laying; joints need weeding and refilling over time; pavers can settle if the bed was poorly prepared.
- Watch out for: laying pavers directly on soil without a compacted bed, using thin decorative pavers under a heavy sauna without checking suitability, and ignoring the fall needed to shed water.
Option 3: An Existing or Newly Built Deck
Placing a sauna on a deck is appealing because the deck may already exist, it raises the sauna off wet ground, and air can circulate freely underneath. That airflow is a real advantage for drying: the underside of the sauna is less likely to sit in damp conditions after rain. A deck also gives you a ready-made area for stepping out, cooling off, and storing towels or a water bucket.
The critical question is load. A deck built for foot traffic and garden furniture is not automatically suitable for a sauna, which concentrates a large weight — the structure, the heater, and several people — over a relatively small footprint. Before committing, check your sauna’s total weight with the manufacturer and have a suitably qualified professional assess whether the deck’s joists, posts, and footings can carry it safely. If the deck needs strengthening, that work should happen before the sauna arrives, not after.
Maintenance is the other trade-off. Timber decking needs regular care to resist weather, and boards near a sauna see extra moisture from steam, splashing, and wet feet. Rot or soft spots under the sauna are hard to inspect once the building is in place, so the deck should be in genuinely good condition — not just good-looking — before you use it as a base. If your deck is old, sagging, or of unknown construction, a ground-level pad is usually the safer route.
Best for: sound, well-built existing decks that have been checked for the sauna’s weight, and situations where raising the sauna off damp ground and gaining a usable outdoor area matter most.
- Pros: raises the sauna off wet ground; excellent airflow and drying underneath; provides a usable surrounding area; no ground excavation if the deck already exists and is suitable.
- Cons: load capacity must be verified — not every deck is suitable; higher ongoing timber maintenance; hidden rot under the sauna is hard to inspect; a new deck adds moderate cost.
- Watch out for: assuming any deck can take a sauna, skipping a professional load check, and placing a sauna over deck boards that are already soft, uneven, or poorly drained.
Option 4: Gravel Pad
A gravel pad is a levelled, compacted area of aggregate, usually contained by edging, that a sauna sits on directly or on bearers laid across it. It is the simplest and generally lowest-cost option, and it is popular for barrel saunas, which often sit on cradles or feet that suit a free-draining surface. It is also the easiest base to remove or reshape if the sauna moves.
Drainage is its standout strength. Water passes through gravel rather than pooling, and the pad dries quickly after rain. Levelling is straightforward to achieve at first, but gravel can shift, rut, or be displaced by foot traffic and weather, so it needs periodic raking and topping up to stay level. Weed growth is possible unless a suitable membrane or regular maintenance is used, and a gravel surface is less comfortable under bare feet immediately around the sauna — many owners add a small timber or paver landing at the door for that reason.
How deep a gravel pad should be has no single correct answer. It depends on your soil, how wet the site is, the weight of the sauna, and what your supplier or local installer recommends for your ground. Rather than copying a depth from another project, ask for advice matched to your site, and make sure the pad extends beyond the sauna footprint so water and foot traffic do not erode its edges. A shallow scrape of gravel on soft topsoil is not a foundation; a properly excavated, compacted, and edged pad is.
Best for: barrel and lighter pod saunas, tighter budgets, well-drained sites, and owners who want a simple, removable base and are happy with light ongoing maintenance.
- Pros: excellent drainage; generally the lowest cost band; simple to build and remove; easy to re-level by raking and topping up.
- Cons: can shift and need regular maintenance; weed growth without care; less comfortable underfoot at the entrance; offers less rigidity than a slab for very heavy builds.
- Watch out for: gravel laid thinly over grass or topsoil, no edging to contain it, and a pad that stops exactly at the sauna walls with no margin.
How the Layers Work: Drainage and Levelling
Most good foundations share the same logic underneath, whatever the visible surface. A level base sits over a drainage layer, which sits over compacted ground. Water that reaches the base can move through or away from it instead of sitting against timber. The diagram below shows that idea in cross-section.
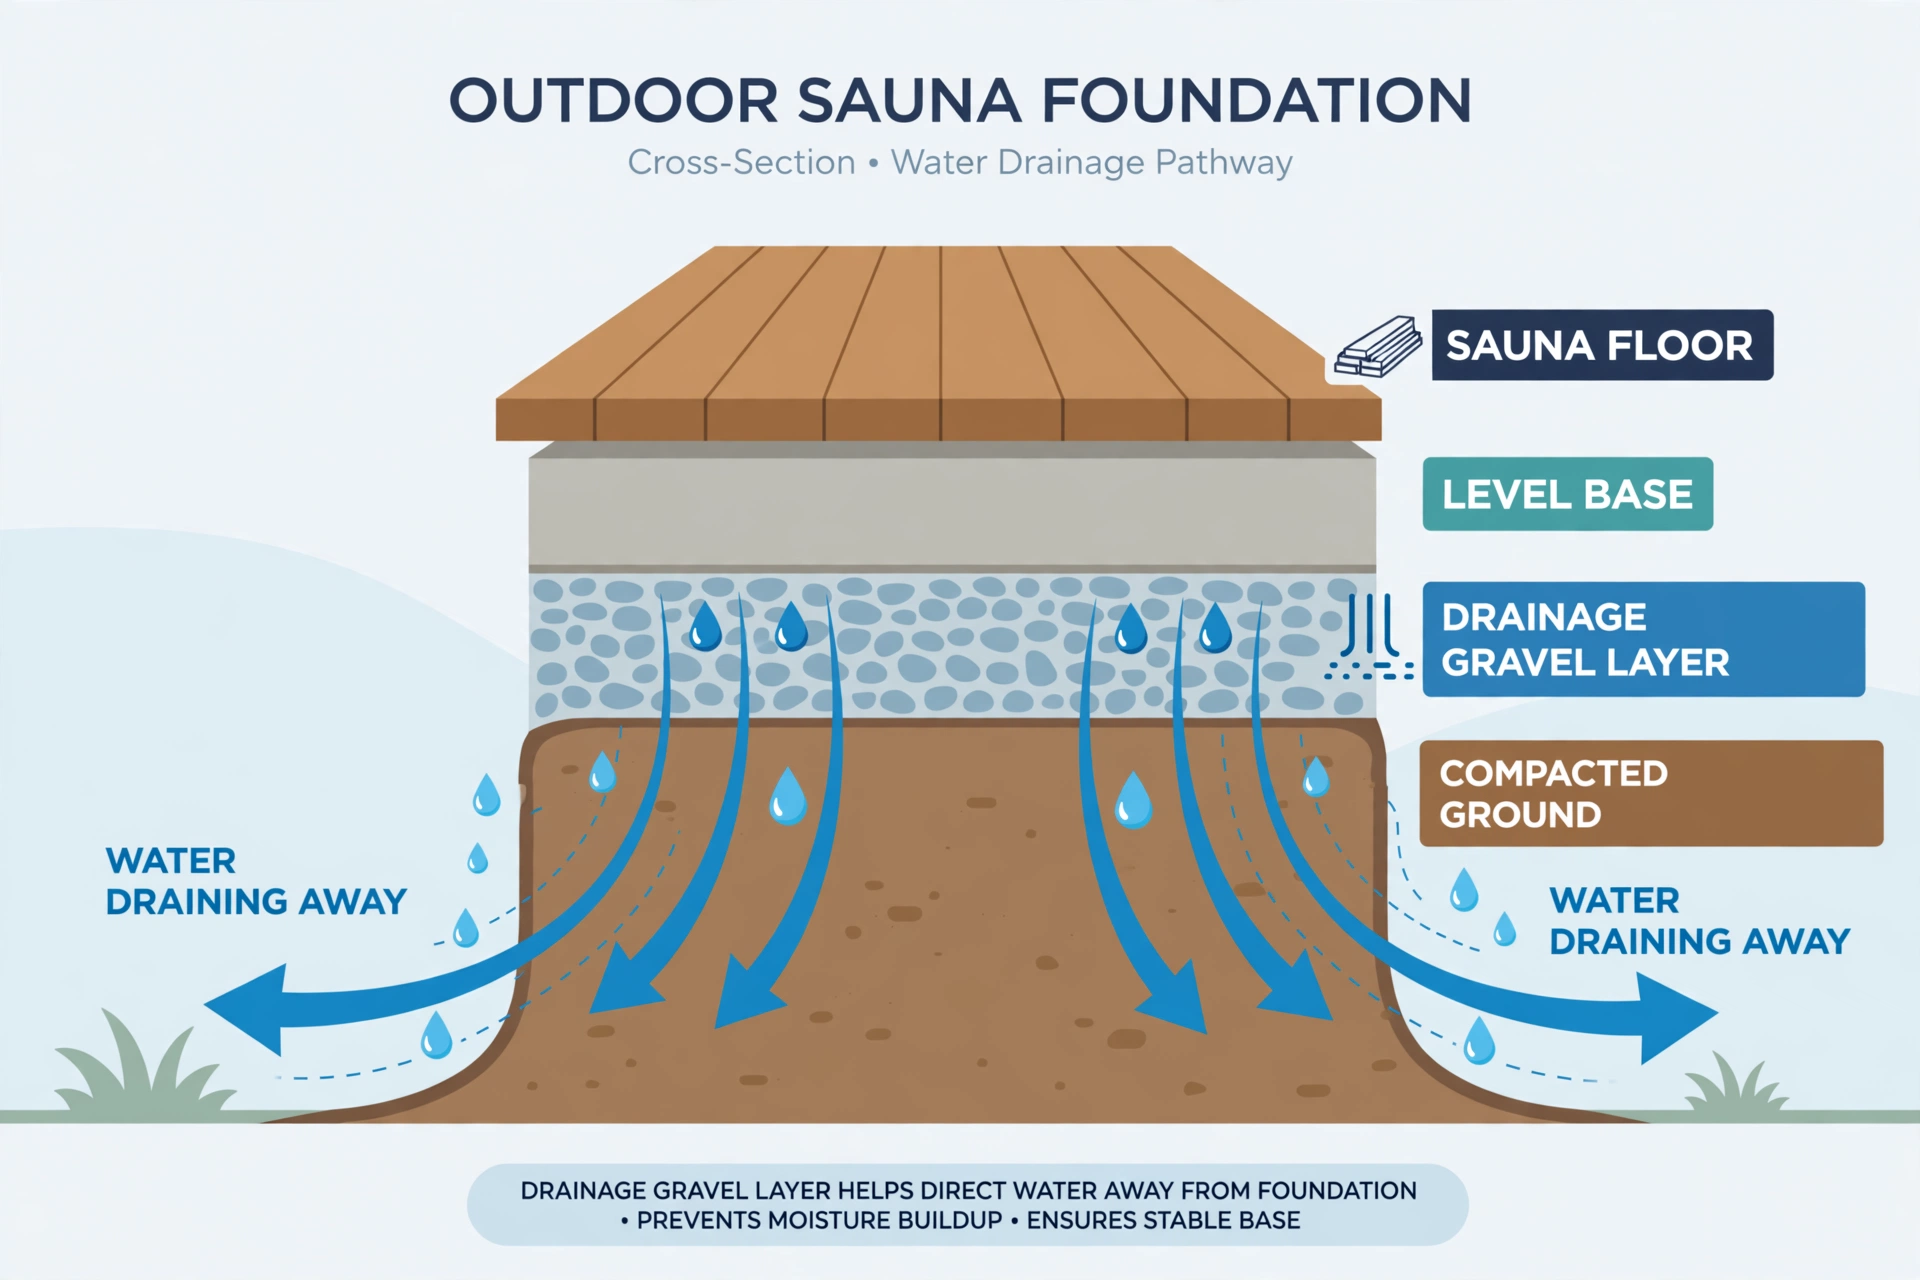
Levelling and drainage work as a pair. A perfectly level surface with no drainage still traps water, and a well-drained surface that slopes too much makes assembly difficult and feels wrong underfoot. The practical aim is a surface that is level where the sauna sits, with water directed gently away from the building and not towards a house wall, a neighbour’s boundary, or a low spot where it will collect.
Ventilation underneath matters too. Even a well-drained base benefits from airflow that lets the underside dry after wet weather and after steamy sessions. Avoid sealing the gap beneath a sauna with soil, mulch, or stored items. Leave access where possible so you can check for damp, debris, and early signs of rot without moving the whole building.
Side-by-Side Comparison
| Foundation | Drainage | Levelling | Durability | Maintenance | Cost band* | Best for |
|---|---|---|---|---|---|---|
| Concrete slab | Lower through the surface; good as a system with slope and sub-base | High | High | Lower | Higher | Heavy, permanent cabin saunas |
| Pavers | Good | Moderate | Good | Moderate | Moderate | Medium saunas; garden patios |
| Deck | High (airflow underneath) | Good | Moderate | Higher | Moderate | Sound existing decks, checked for load |
| Gravel pad | High | Moderate | Good | Lower | Lower | Barrel and lighter saunas; tighter budgets |
*Cost bands are broad planning estimates only. Actual prices vary by region, size, materials, access, and installer, so get local quotes before budgeting. For a fuller sense of overall project spending, see our guide to outdoor sauna costs, and remember that the foundation is only one part of the total.
How to Choose by Sauna Type
Sauna shape changes what the base must do. A barrel sauna distributes weight through cradles or feet and tolerates a free-draining gravel pad well, which is one reason gravel is so common for barrels. A rectangular cabin sauna has a larger, flatter footprint and benefits most from a rigid, level slab or well-laid pavers, especially as size and weight increase. A pod sauna sits somewhere in between: lighter pods can work on pavers or gravel, while heavier pods deserve the same care as a small cabin.
If you are still deciding between shapes, our comparison of barrel vs cabin vs pod saunas explains how size, heat-up, and space differ. Once the shape is settled, match the base to it rather than choosing a base first and hoping the sauna suits it. Also check the heater type early: a wood-fired heater and an electric heater have different installation needs, and the base, clearances, and any flue or cable route should be planned together. Our guide to wood-fired vs electric outdoor sauna heaters covers that choice in more detail. Whichever heater you choose, never leave a wood-fired stove unattended while it is lit.
How to Choose by Ground, Slope, and Climate
Start with the ground you actually have, not the ground in a brochure photo. Sandy, free-draining soil is forgiving and suits most bases. Clay holds water and moves with moisture, so drainage and a properly prepared sub-base matter more. Soft, peaty, or recently filled ground may compress unevenly and needs professional advice before a heavy sauna goes on it. If you are unsure what soil you have, dig a small test area and watch how water behaves after rain.
Slope changes the answer in two ways. A gentle slope can help drainage if water is directed away from the sauna, but a steeper slope makes levelling harder and may need terracing, retaining, or a raised deck approach. Building on the lowest, wettest part of a garden is rarely wise, even if it looks convenient. Choose a spot that is level or can be made level without major earthworks, and that stays reasonably dry after heavy rain.
Climate adds the final filter. In areas with hard winters, freeze-thaw movement and snow load around the base deserve attention, and a base that can be inspected and re-levelled has real value. In very wet climates, drainage and drying airflow matter more than almost anything else. In hot, dry climates, timber maintenance and ground shrinkage around the base are worth watching. Local builders and suppliers will know which of these dominates in your area — ask them before you commit.
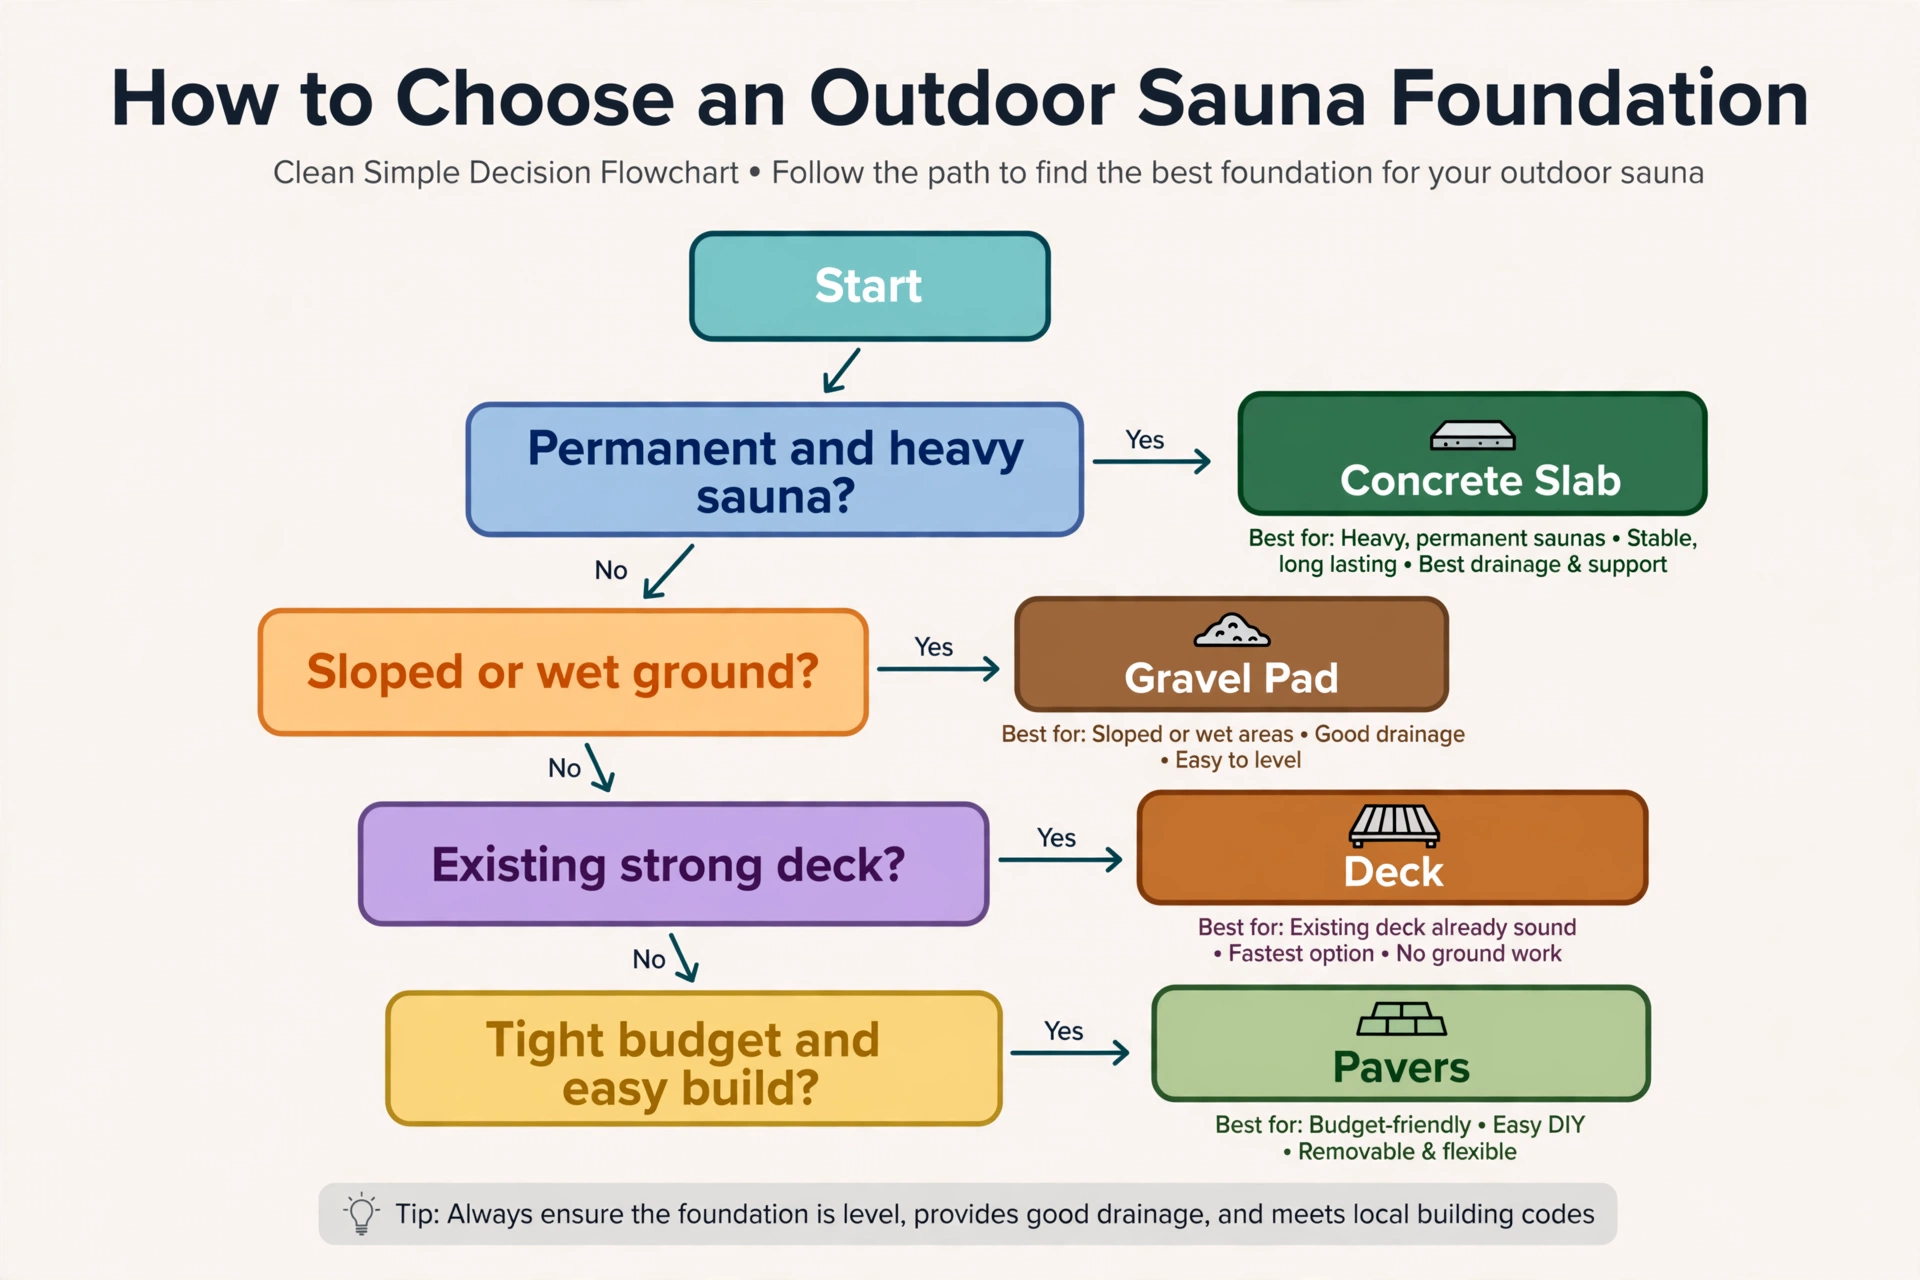
Budget, honestly assessed, is the last filter. A slab may be the best long-term base but a poor choice if it forces compromises elsewhere, such as a smaller sauna or a cheaper heater than you wanted. A well-built gravel or paver base, properly prepared and maintained, will serve most saunas far better than a poorly built slab. Spend on preparation — excavation, compaction, drainage, and levelling — before spending on a more expensive surface.
Step-by-Step Preparation Checklist
Use this checklist in order, and pause at any step where you are unsure. Getting the preparation right is what separates a base that lasts from one that needs fixing within a year.
- Read the manufacturer’s base requirements. Note the footprint, weight, support points, and any specified base type. Keep these beside you for every later decision.
- Walk the site after rain. Look for pooling, soft ground, runoff routes, and the lowest points. Avoid spots that stay wet, and note where water should be directed instead.
- Check access and services. Confirm how materials and the sauna itself will reach the site, and plan any electrical or flue route early with a qualified professional. Do not run cables or build around a heater as an afterthought.
- Check permits and rules. Ask your local permit and code office whether a permanent slab, a structure of your size, or any electrical work needs permission. Rules vary by area, so do not assume a neighbour’s project sets a precedent for yours.
- Mark out the full footprint plus a margin. Include the sauna, any overhang, steps, and a landing at the door. A base that is exactly sauna-sized leaves no room for drainage, maintenance, or safe footing.
- Prepare the ground properly. Remove topsoil and vegetation from the marked area as advised for your chosen base, compact the ground, and lay any drainage or bedding layer your base type needs. This unglamorous step is where most failures start.
- Level carefully and check twice. Use a long spirit level or a level and straightedge across the whole area, not just one corner. Recheck after compaction and again before the sauna is placed.
- Plan drainage and drying. Confirm water has a route away from the sauna, that the underside can dry, and that mulch, soil, and stored items will not be piled against the base.
- Inspect before assembly. Walk the finished base, check for soft spots, standing water, and loose material, and fix problems now. Once the sauna is on top, corrections become much harder.
Common Mistakes to Avoid
The most common mistake is building straight onto grass or topsoil. Grass compresses, rots, and holds moisture, and a sauna placed on it will settle unevenly. Even a simple gravel pad needs the topsoil and vegetation removed and the ground prepared first. A related mistake is skipping edging on a gravel pad or joint filling on pavers, which lets the surface spread, shift, or fill with weeds.
Another frequent error is making the base too small. A pad that matches the sauna walls exactly gives no margin for water runoff, for a safe step out of the door, or for inspecting the base later. Slightly larger is almost always better, provided drainage still leads away from the building.
Finally, do not treat the foundation as separate from the heater and the structure. Clearances must follow the manufacturer’s instructions, electrical work must be done by a licensed professional, and a wood-fired stove must never be left unattended while lit. If any part of the plan feels uncertain — load, drainage, permits, or wiring — pause and get qualified advice. A short delay before building is far cheaper than rebuilding a base under a finished sauna.
Frequently Asked Questions
Can you put an outdoor sauna directly on grass?
No, not as a long-term base. Grass compresses, holds moisture, and rots, so a sauna placed directly on grass is likely to settle unevenly and expose its timber to damp. Remove the grass and topsoil, prepare the ground, and build a proper gravel, paver, slab, or deck base instead.
Do you need a concrete slab for an outdoor sauna?
No, a concrete slab is not required for every outdoor sauna. Many barrel and lighter pod saunas work well on a properly prepared gravel pad or pavers, and a sound deck checked for load can also be suitable. A slab is most valuable for large, heavy, permanent cabin saunas where maximum stability and longevity matter.
How deep should a gravel pad be for a sauna?
There is no single correct depth for every site. The right depth depends on your soil, how wet the site is, the weight of the sauna, and advice from your supplier or a local installer for your ground. Ask for guidance matched to your site rather than copying a depth from another project.
Can an outdoor sauna go on a deck?
Yes, but only if the deck can safely carry the sauna’s full loaded weight. Check the sauna’s total weight with the manufacturer and have a suitably qualified professional assess the deck’s joists, posts, and footings before placing the sauna. A deck built only for foot traffic and furniture may not be suitable.
Which foundation is cheapest for an outdoor sauna?
A gravel pad is generally the lowest-cost option of the four, followed by pavers and a deck in the moderate band, with a concrete slab generally in the higher band. These are broad planning estimates only, and actual prices vary by region, size, materials, access, and installer, so get local quotes before budgeting.
What is the best foundation for a barrel sauna?
A properly prepared gravel pad is a popular and effective choice for many barrel saunas because barrels suit a free-draining surface and often sit on cradles or feet. Pavers are also a good option, and a slab works well too if you want a permanent, highly stable base. Choose based on your ground, drainage, and how permanent the sauna will be.
Does an outdoor sauna foundation need drainage?
Yes, every outdoor sauna foundation needs a way for water to move away from the sauna. Without drainage, water can pool beneath the floor, keep timber damp, and soften the ground underneath. Plan a drainage layer, a gentle fall away from the building, and airflow so the underside can dry.
The Short Answer
There is no single best foundation for every outdoor sauna — only a best match for your sauna, ground, and budget. A concrete slab wins for heavy, permanent cabins. Pavers balance firmness, drainage, and looks. A sound, load-checked deck is excellent where one already exists. A well-prepared gravel pad is the simplest, lowest-cost route for barrels and lighter saunas.
Whichever you choose, preparation decides the outcome. Level carefully, drain water away, let the underside dry, follow the manufacturer’s instructions, and check local rules and load capacity before the sauna arrives. Get those basics right, and the foundation will quietly do its job for years — which is exactly what a good foundation should do. As with any sauna use, keep sessions sensible: stay hydrated, keep sessions short if you are new to saunas, and step out if you feel unwell.