
A steam room can have a perfectly sized generator and flawless waterproofing and still feel wrong. If the bench is too low, you sit in cool air while the steam gathers above your head. If the door leaks, the generator runs longer and the room never quite fills. If the glass panel stops short of the ceiling, steam slips out over the top and fogs the bathroom instead of warming you.
Bench, door and glass are the three parts of a steam room you touch, sit on and look through every single session. They decide how hot the room feels, how fast it heats up, how much steam escapes and how safe it is to get in and out. This guide walks through layout, seating height and sealing step by step, with the dimensions builders and manufacturers actually use, so you can plan the room once and enjoy it for years.
Planning note: This guide gives general layout and dimension guidance only. It is not a substitute for your local building code or a licensed professional. Check with your local permit and code office before building, and use licensed electricians and plumbers for installation work. Steam rooms also need proper waterproofing, drainage and ventilation to stay mould-free, so plan those systems at the same time as the bench and door.


Paid Links - As an Amazon Associate, I earn from qualifying purchases.
Why Bench, Door and Glass Decide How a Steam Room Feels
Steam is light. It rises to the ceiling within seconds of leaving the steam head, then slowly fills the room downward. That single fact explains almost every layout decision in a steam room.


Paid Links - As an Amazon Associate, I earn from qualifying purchases.
A bench that sits low puts your body in the coolest layer of air. A door that seals badly lets the warmest layer escape. A glass panel with a gap at the top acts like an open window.
The three parts work as a system. A high bench is wasted if the door leaks, because the steam never builds up enough to reach you. A perfectly sealed door is wasted if the bench is so low that you never sit in the steam layer.
And a beautiful glass wall is wasted if condensation drips on the people sitting below it. Plan the three together, before the tile goes up, and the room will heat faster, hold steam longer and feel far more comfortable.
It also pays to think about who will use the room. A room built for one person showering after a workout needs a very different bench from a room built for two people to sit and talk. A household with older users or anyone with limited mobility needs lower steps, a wider door and a handle that is easy to grip with wet hands. Sketch the bench, door and glass on paper first, then check the numbers in this guide against your room.
Steam Room Layout Basics: Start With the Steam, Not the Bench
Most people start planning with the bench. Builders start with the steam.
The steam head is the point where hot vapour enters the room, and its position shapes everything else. Put the steam head on the wall opposite the door, low down and away from where people sit, so nobody can accidentally touch it or sit directly above it. The door then sits on the far side of the room, which also keeps the entry clear of the hottest, wettest zone.


Paid Links - As an Amazon Associate, I earn from qualifying purchases.
Ceiling height matters just as much. Most home steam rooms use a ceiling of about 7 feet (84 inches).
A ceiling much higher than that takes longer to fill with steam and wastes generator capacity. A ceiling lower than 7 feet can feel cramped and leaves too little clearance above the top bench. If your ceiling is higher than 7 feet, talk to your generator supplier about sizing, because the room volume, not just the floor area, decides the generator size.
Ceilings in steam rooms should also slope slightly, usually by about 1 to 2 inches over the width of the room, so condensation runs down to a wall instead of dripping on the people below. A flat ceiling collects droplets that fall straight down, which is uncomfortable and can stain the bench. This is a small detail that is almost impossible to fix after the tile is set, so decide it before the build starts. Our guide to steam room waterproofing, tiling and ceiling materials covers the ceiling and wall build-up in detail.
Matching the layout to the room size
Room size sets how many people can sit comfortably and which bench shapes fit. The table below gives a starting point for the most common home steam rooms. Treat these as planning ranges, not building code, and confirm them with your installer.
| Room size (approx.) | Comfortable capacity | Bench layout that usually works best | Notes |
|---|---|---|---|
| 3 x 4 ft (shower conversion) | 1 person | Single straight bench, one tier | Keep the bench shallow (about 18 in deep) so the door can still swing clear |
| 4 x 5 ft | 1 to 2 people | Single straight bench, or L-shape | A two-tier bench fits if the ceiling is 7 ft or higher |
| 5 x 6 ft | 2 to 3 people | L-shaped bench, two tiers | The corner seat becomes the warmest spot in the room |
| 6 x 8 ft | 3 to 4 people | L-shape or U-shape, two tiers | Allow about 24 in of bench length per person |
| 8 x 10 ft and larger | 4 to 6 people | U-shape, two tiers | Consider a second steam head or a larger generator; check the sizing guide first |
One more layout rule is easy to forget: leave clear floor space in front of the bench and the door. A person stepping down from a warm bench is often light-headed, so the floor in front of the bench should be clear of steps, hoses and loose mats. The door needs the same treatment on the outside, since it swings out into the bathroom. Measure the swing arc on the floor before you fix the door position.
Bench Seating Height: The Numbers That Matter
Bench height is the single most important comfort decision in a steam room. Get it right and the steam wraps around your shoulders within a minute or two. Get it wrong and you sit below the steam layer wondering why the room feels lukewarm even though the generator is working hard.
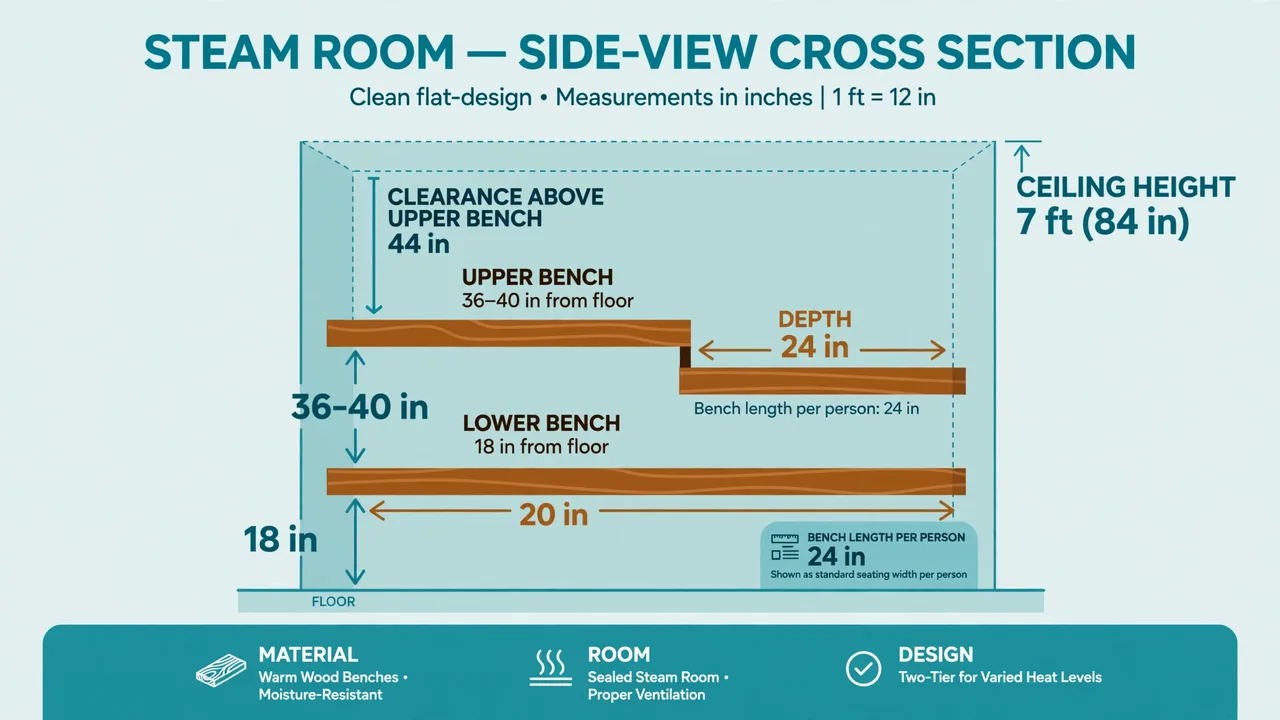
| Measurement | Common guidance | What it means in practice |
|---|---|---|
| Single-tier bench height | 17 to 19 in above the floor | Standard sitting height; matches the ADA bench range of 17 to 19 in and suits most adults |
| Lower bench (two-tier room) | About 18 in above the floor | Doubles as a step up to the top bench and as a footrest for people sitting above |
| Upper bench (two-tier room) | 36 to 40 in above the floor | Puts your head and shoulders into the warm steam layer under a 7 ft ceiling |
| Step between tiers | 16 to 18 in | A comfortable climbing height for most adults; bigger steps feel like climbing furniture |
| Clearance, top bench to ceiling | About 40 in minimum; 43 to 47 in is comfortable | Less than 40 in feels cramped and puts your head in the hottest air; more is better |
| Bench depth, lower tier | 18 to 20 in | Enough for sitting with feet on the floor or on a footrest |
| Bench depth, upper tier | 20 to 24 in; 24 in to lie down | Deeper benches let you stretch out; 24 in is the usual minimum for lying flat |
| Bench length per person | About 24 in per relaxed bather | Inside corners do not count as seats; they are turning and foot space |
These figures come from a mix of sources that agree with each other: the ADA bench standard of 17 to 19 inches for seat height, Finnish sauna design practice that measures the top bench from the ceiling down (about 39 to 47 inches below the ceiling, with roughly 43 inches as the target), and the working guidance published by steam room and sauna manufacturers. The numbers are planning guidance, not law. Your installer and your generator supplier can confirm what fits your exact room and ceiling height.
Why the top bench sets the experience
Heat rises, and in a steam room the difference between floor and ceiling can be striking. The air near the ceiling can run 20 to 30 degrees Celsius hotter than the air at floor level. That is why the top bench is measured from the ceiling down, not from the floor up. Under a 7-foot ceiling, a top bench at 36 to 40 inches leaves roughly 44 to 48 inches of clearance above it, which puts a seated person right in the warm layer without their head touching the ceiling.
A top bench at 34 inches or lower behaves like ordinary low seating. Your feet stay cold, your head stays below the steam, and the second tier adds little to the session. On the other hand, a top bench above 40 inches under a standard 7-foot ceiling leaves too little headroom and can feel oppressive. If your ceiling is 8 feet or higher, a third tier becomes possible, but most home rooms never need one.
Steps, climbing and safe exits
Climbing to a top bench that sits 36 to 40 inches off the floor is a real physical step, and it happens while you are hot, wet and possibly light-headed. Keep the first step from the floor to the lower bench near 12 inches, and never much beyond 14 inches. The step between tiers should sit in the 16 to 18 inch range. A lower bench that doubles as a step makes the climb far safer than a single high bench with no intermediate level.
Add a grab handle or a sturdy handhold near the bench if anyone in the household is older or less steady on their feet. Keep the floor in front of the bench dry and non-slip, and never place the steam head where a climbing person could brush against it. If you are converting a shower, read our guide to building a steam sauna at home before you fix the bench position, because the steam head, drain and bench all have to share the same small space.
Bench Layouts That Work in Real Rooms
There are only a few bench shapes that work well in steam rooms, and the right one depends on the size and shape of your room. The three below cover almost every home build.
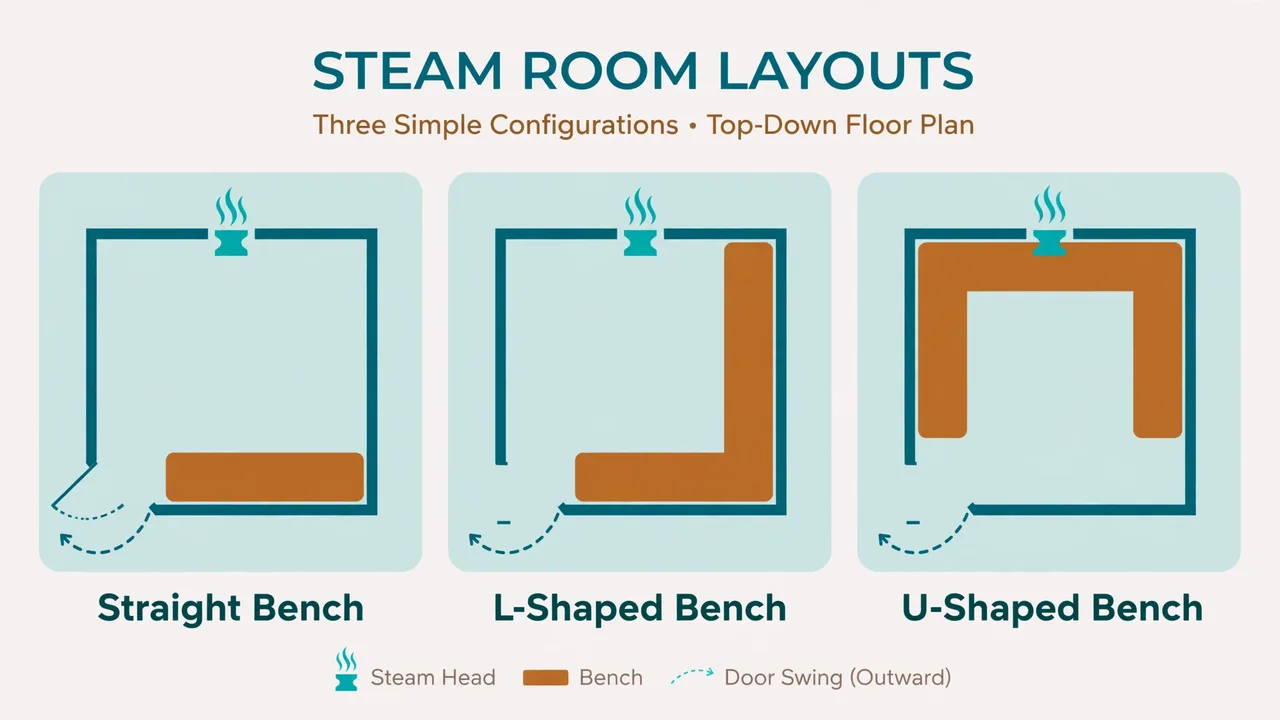
| Layout | Best for | Strengths | Watch out for |
|---|---|---|---|
| Single straight bench | Small rooms, shower conversions, 1 to 2 people | Simple to build, cheapest, leaves the most floor clear | Only one warm spot; no room to lie down unless the bench is long |
| L-shaped bench | Medium rooms, 2 to 3 people | Corner seat is the warmest in the room; two people can sit facing different directions | The inside corner is not usable seating; plan bench length without it |
| U-shaped bench | Large rooms, 4 or more people | Most seats, easy conversation, great for families | Needs a big room; the middle of the U can trap cool air if the steam head is poorly placed |
Single straight bench: small, simple and honest
A single straight bench along one wall is the right answer for most shower conversions and small steam rooms. It is the simplest shape to tile, the easiest to waterproof and the cheapest to build. Keep it about 18 to 20 inches deep for sitting, or 24 inches deep if you want to lie down. Put the steam head on the opposite wall, low down, so the steam crosses the room and rises past the bench.
The main weakness of a straight bench is that everyone sits in a row, facing the same wall. That is fine for one or two people, but it feels cramped with three. If the room is only 3 feet wide, a straight bench is usually the only shape that fits without blocking the door swing.
L-shaped bench: the best all-rounder
An L-shaped bench runs along two walls and meets in a corner. The corner seat sits furthest from the door and closest to the rising steam, which makes it the warmest seat in the room. Two people can sit at right angles and talk comfortably, which a straight bench never allows. This is the layout most medium-sized home steam rooms end up with, and for good reason.
Remember that the inside corner itself is not a seat. It is turning space for feet and a place where the two bench runs meet. When you count seating, measure each straight run separately and allow about 24 inches per person on each run. A bench that looks long enough on paper can seat one fewer person than expected once the corner is taken out.
U-shaped bench: for bigger rooms and bigger groups
A U-shaped bench wraps around three walls and seats the most people. It suits rooms of about 6 by 8 feet and larger, and it works well for families who use the steam room together. The open side of the U faces the door, so everyone can get in and out without climbing over anyone else.
The U-shape needs a bigger generator and careful steam head placement, because the middle of the U can stay cooler than the corners. Place the steam head on the wall opposite the open side of the U, low down, so the steam rises evenly across all three bench runs. If the room is large, ask your supplier whether a second steam head or a larger generator is needed. Our guide to steam sauna electrical and plumbing requirements explains what the generator and its supply need from the rest of the house.
Bench Materials That Survive Constant Steam
A steam room bench lives in 100 percent humidity and regular temperature swings, so the material choice matters more here than in a dry sauna. The two options that hold up best are tile over a properly waterproofed base, and naturally moisture-resistant wood such as teak or cedar. Tile is the most durable choice and the easiest to clean, but it feels cold when you first sit down. Wood feels warm immediately and is kinder on bare skin, but it needs more care and will eventually need refinishing or replacement.
Whatever material you choose, the bench must slope very slightly toward the room, about a quarter inch over its depth, so water runs off instead of pooling on the seat. The front edge should be rounded or bullnosed, not sharp, because wet skin and sharp tile edges do not mix. Avoid painted or varnished surfaces inside the steam room. Paint and varnish peel in constant steam, and the fumes from some finishes are unpleasant in hot, enclosed air.
Do not use ordinary plywood, MDF or untreated softwood for a bench base. These materials swell, warp and grow mould in constant moisture.
If the bench is built from wood, use a species rated for wet use and fix it with stainless steel screws, because ordinary steel fixings rust quickly in a steam room. The waterproofing layer underneath the bench matters as much as the surface. Our guide to steam room waterproofing, tiling and ceiling materials explains which membranes and boards survive constant steam.
The Door: Swing, Size and Seals
The door is the weakest point in almost every home steam room. It is the only moving part, the only place where two surfaces have to meet perfectly every time, and the part that gets opened and closed while wet. A door that seals well keeps the steam in, shortens heat-up time and cuts running costs. A door that leaks does the opposite, and it also lets moisture escape into the bathroom, where it can damage paint, plaster and fittings.
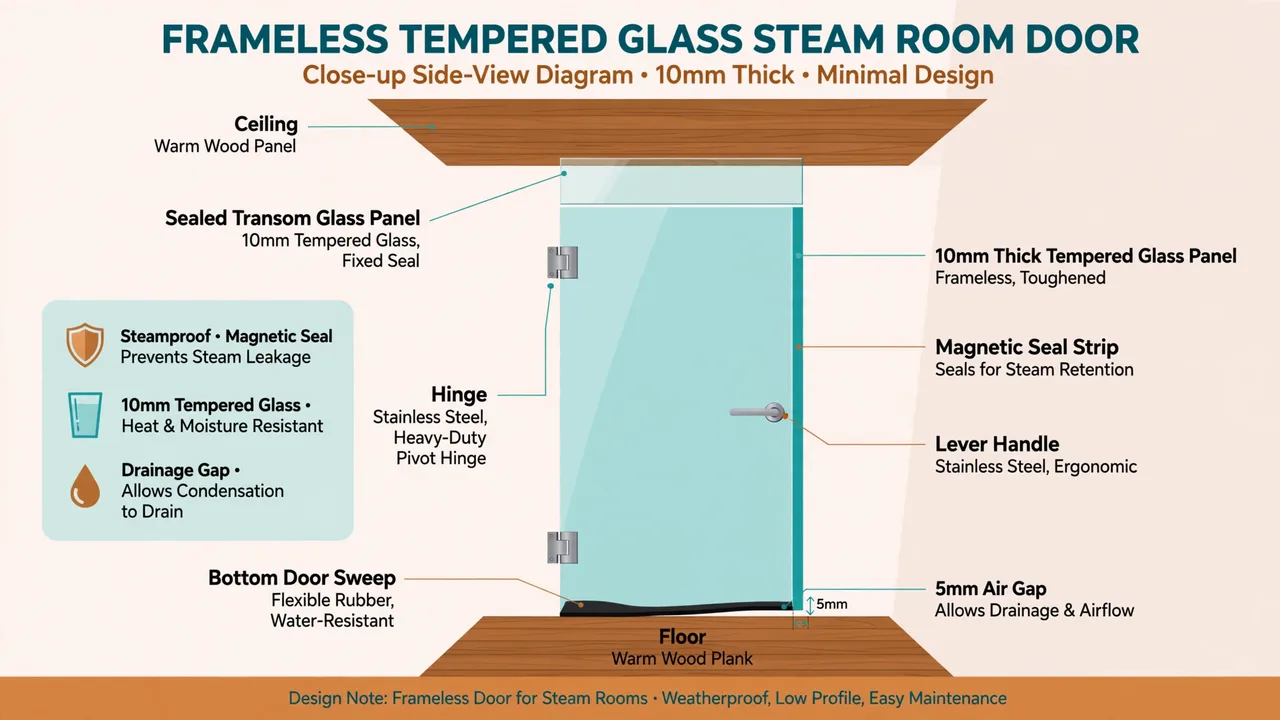
Why the door must swing out
Steam room doors should always swing outward, into the bathroom, never inward into the steam room. The reason is safety. If someone feels faint or unwell inside the steam room, an outward-swinging door can be pulled open from outside, and the person can fall out onto the bathroom floor. An inward-swinging door can be blocked by a person who has collapsed against it, which turns a minor incident into a serious one.
An outward swing also keeps the inside of the steam room clear. An inward-swinging door sweeps across the floor space in front of the bench, which is exactly where people step down. Before you fix the hinge side, stand in the bathroom and check that the open door does not hit a vanity, a towel rail or another door. The swing arc needs clear floor on the outside, so plan the bathroom layout at the same time as the steam room.
Door size, glass and seals
A standard steam room door is about 24 to 30 inches wide, with wider openings of 32 to 36 inches for easier access. Narrower doors seal more easily and lose less steam when opened, but they are harder to get through with a towel or a mobility aid. Choose the widest door the room allows without stealing bench space, and keep the height standard, usually around 72 to 80 inches, so the top of the door sits close to the ceiling or meets a sealed transom panel.
- Glass thickness: Steam-rated doors usually use tempered safety glass that is 3/8 inch (10 mm) or 1/2 inch (12 mm) thick. The thicker glass is heavier and more rigid, which helps it hold a tight seal. Never use ordinary annealed glass in a steam room door.
- Full-perimeter seals: A steam door needs gaskets or magnetic strips around its edges, not just at the bottom. Magnetic strips on the vertical edge snap the door shut and hold it closed against steam pressure. Vinyl or polycarbonate sweeps close the gaps at the sides and top.
- Bottom sweep and air gap: The bottom of the door carries a sweep with a raised drip rail that stops water running out. Some steam doors, such as the Tylo steam door, are deliberately built with a small gap at the bottom that acts as an air intake, because steam is lighter than air and rises. Follow your door manufacturer’s guidance on this gap rather than sealing it shut.
- Heavy-duty hinges: Thick glass is heavy, so the hinges must be rated for the weight and fixed with gaskets or silicone so steam cannot leak around the mounting points. Check the hinges every few months for sagging, because a door that drops even a few millimetres will stop sealing.
- Handle you can grip wet: Stainless steel with a wood grip stays cooler than an all-metal handle and is easy to hold with wet hands. Avoid small knobs, which are hard to grip when your hands are wet and soapy.
If you are choosing between a framed door and a frameless one, know the trade-off. A framed door seals more reliably because the frame carries the gaskets. A frameless door looks cleaner and lets in more light, but it relies on small polycarbonate seals and will usually let a little steam escape.
For a dedicated steam room, sealing matters more than looks, so a framed door or a frameless door with full magnetic seals is the safer choice. Our roundup of sauna glass doors compares framed, frameless and prehung options and explains which suits which room.
Glass Panels, Transoms and Windows
Glass makes a steam room feel open and lets in light, which matters in a small tiled room. But glass is also the part most likely to leak steam, because every edge where glass meets tile, wall or ceiling is a joint that has to stay sealed through endless cycles of heat and cooling. The rule is simple: fixed glass panels must be sealed along every edge, and the glass must either run all the way to the ceiling or meet a sealed transom panel above the door.
A transom is the glass panel that sits directly above the door, filling the gap between the top of the door and the ceiling. A fixed transom is sealed permanently and gives the best steam containment.
An operable transom is hinged so it can be opened inward, which lets you vent the room quickly after a session. If you choose an operable transom, make sure it closes tightly and seals fully when shut, or it becomes a permanent leak. Either way, the transom and all fixed panels should be sealed with a professional-grade 100 percent silicone sealant on the interior side, applied as one continuous bead with no pinholes or breaks.
Use tempered safety glass for every panel, at least 3/8 inch (10 mm) thick, and 1/2 inch (12 mm) for large panels or frameless doors. Tempered glass is required by building codes in wet locations because it breaks into small, rounded pieces instead of sharp shards. Check your local code for the exact requirement, because glazing rules vary by area. Frosted or tinted glass adds privacy without blocking light, which suits steam rooms that open onto a shared bathroom.
Windows in a steam room need the same treatment as glass panels. A small, high window can be a lovely feature, but it must be tempered glass, properly sealed, and set in a frame that can handle constant moisture. Wooden window frames swell and rot in steam rooms unless they are made from a moisture-resistant species and maintained. If the window cannot be sealed properly, it is better to leave it out and rely on the glass door and a good light fitting instead.
Sealing Mistakes That Let Steam Escape
Most steam rooms do not leak through one big hole. They leak through a dozen small gaps that add up. Here are the mistakes that cause most of the loss, in the order you are most likely to meet them.
- Leaving a gap above the door. If the glass stops short of the ceiling with no transom, steam pours out over the top of the door. Extend the glass to the ceiling or fit a sealed transom.
- Using a standard shower door. Ordinary shower doors are built to stop splashes, not steam. They have gaps at the sides and top that let steam escape in seconds. A steam room needs a steam-rated door with full-perimeter seals and magnetic closure.
- Broken or patchy silicone beads. Fixed glass panels need one continuous bead of 100 percent silicone on the interior side. A bead with pinholes, gaps or breaks is a leak. Check the silicone every few months and replace it when it pulls away from the tile or glass.
- Magnetic seals that no longer meet. The magnetic strip on the door must meet the strip on the jamb in parallel along its whole height. If the door has sagged on its hinges, the magnets meet at an angle and leave a gap. Adjust the hinges until the seal is parallel again.
- Worn or missing door sweeps. The sweep at the bottom of the door takes the most wear and the most water. When it hardens, cracks or falls off, steam and water escape at floor level. Sweeps are cheap and easy to replace, so treat them as a consumable.
- Sealing the steam head and pipe penetrations badly. Every pipe, cable and fixing that passes through the wall is a potential leak. Seal around steam pipes, light fittings and control cables with silicone rated for heat and moisture, and check them when you check the door seals.
- Forgetting the ceiling joint. The joint where the walls meet the ceiling is a common leak point, especially if the ceiling is flat and condensation collects there. Seal it properly during the build, and keep the slight ceiling slope so water runs to the wall instead of dripping.
A simple test finds most leaks. Run the generator for ten minutes with the door closed, then hold a strip of tissue paper near the door edges, the transom and the panel joints.
If the tissue flutters or fogs on one side, steam is escaping there. Fix the worst leak first, then test again. Small leaks are normal in a home steam room, but a room that never fills with steam has a sealing problem, not a generator problem.
Ventilation and Drying After Every Session
A steam room is not maintenance-free, and the bench, door and glass are the parts that show neglect first. After every session, leave the door open and run the bathroom extractor fan until the room is dry.
Wipe the glass with a squeegee so water spots and mineral deposits do not build up. Leave the bench clear so air can circulate around it. These three habits take about two minutes and prevent most mould and moisture problems.
Ventilation matters during the build as well as after each session. The room needs a way to bring in fresh air and a way to exhaust damp air, or the steam will condense on the coldest surfaces and stay there.
A small vent near the floor by the door, combined with the extractor fan, is the usual arrangement. The gap at the bottom of some steam doors doubles as this air intake, which is why you should not seal it without checking the manufacturer’s instructions. Our guide to steam shower drain and ventilation covers the fan, vent and drain layout in detail.
Cleaning is part of sealing, too. Mineral deposits from hard water build up on glass and in door seals, and they stop the seals from closing properly. Wipe the door seals and the glass after sessions, and descale the generator on the schedule in its manual. Our guide to how to clean a steam sauna gives a simple routine that keeps the room, the bench and the door in good shape.
10 Layout Mistakes to Avoid
| # | Mistake | What goes wrong | Do this instead |
|---|---|---|---|
| 1 | Bench too low | You sit below the steam layer and feel cold | Set the top bench 36 to 40 in high under a 7 ft ceiling |
| 2 | Door swings inward | Blocked exit in an emergency; door sweeps the bench area | Always swing the door outward into the bathroom |
| 3 | Glass stops below the ceiling | Steam escapes over the top of the door | Run glass to the ceiling or fit a sealed transom |
| 4 | Standard shower door | Gaps at the sides and top leak steam constantly | Use a steam-rated door with full-perimeter seals |
| 5 | Steam head next to the bench | Burn risk; steam hits sitters directly | Put the steam head opposite the door, low and away from seats |
| 6 | Flat ceiling | Condensation drips on people below | Slope the ceiling 1 to 2 in so water runs to a wall |
| 7 | No step to the top bench | Dangerous climb, especially when light-headed | Use a lower bench as a step; keep the first step near 12 in |
| 8 | Bench too shallow to lie on | Nobody can stretch out, even in a big room | Make the upper bench 24 in deep where space allows |
| 9 | Painted or varnished bench | Finish peels in steam; fumes in hot air | Use tile, teak or cedar with no paint or varnish inside |
| 10 | No drying routine | Mould on the bench, seals and grout | Leave the door open and the fan on after every session |
Pre-Build Checklist
Run through this list with your installer before any tile is ordered. Catching a layout problem on paper costs nothing. Catching it after the tile is set costs a rebuild.
- Room size and ceiling height measured, and the generator sized for the room volume.
- Bench layout chosen (straight, L-shape or U-shape) and bench length counted at 24 inches per person, corners excluded.
- Bench heights set: lower bench about 18 inches, upper bench 36 to 40 inches, with about 40 inches or more of clearance to the ceiling.
- Steps planned: first step near 12 inches, step between tiers 16 to 18 inches, grab handle added if needed.
- Steam head position fixed on the wall opposite the door, low down and away from seats.
- Door swings outward, with clear floor space outside for the full swing arc.
- Door is steam-rated, with tempered glass 3/8 inch or 1/2 inch thick, magnetic seals and a bottom sweep.
- Glass runs to the ceiling or meets a sealed transom above the door; all fixed panels sealed with continuous silicone beads.
- Ceiling slopes 1 to 2 inches so condensation runs to a wall, not onto the bench.
- Ventilation and drainage planned: extractor fan, air intake near the floor, and a drain that can handle the water.
- Local code and permit office checked; licensed electrician and plumber booked for installation work.
- Drying routine agreed: door left open and fan running after every session, glass squeegeed, bench left clear.
Frequently Asked Questions
How high should a steam room bench be?
A single-tier bench usually sits 17 to 19 inches above the floor. In a two-tier room, the lower bench sits at about 18 inches and the upper bench at 36 to 40 inches under a 7-foot ceiling. The step between tiers should be 16 to 18 inches. These are planning figures from manufacturer guidance and Finnish design practice, not building code, so confirm them with your installer.
How deep should a steam room bench be?
Allow 18 to 20 inches of depth for sitting on the lower bench, and 20 to 24 inches on the upper bench. If you want to lie down, make the upper bench 24 inches deep. Allow about 24 inches of bench length per person, and do not count inside corners as seats.
Should a steam room door swing in or out?
Out, always. An outward-swinging door can be opened from outside if someone feels unwell inside, and it keeps the floor in front of the bench clear. An inward-swinging door can be blocked by a person who has fallen against it. Check that the open door does not hit anything in the bathroom before you fix the hinge side.
What thickness of glass do I need for a steam room door?
Tempered safety glass that is 3/8 inch (10 mm) or 1/2 inch (12 mm) thick is the usual choice for steam-rated doors. Use tempered glass for every panel, because building codes require safety glazing in wet locations. Check your local code for the exact requirement before ordering.
Why is there a gap at the bottom of my steam room door?
Many steam doors are deliberately built with a small gap at the bottom that acts as an air intake. Steam is lighter than air and rises, so the gap lets cooler air in at floor level without letting much steam out. Follow your door manufacturer’s guidance on this gap rather than sealing it shut.
Do I need a transom above a steam room door?
You need either a transom or glass that runs all the way to the ceiling. If the glass stops short of the ceiling with nothing above the door, steam escapes over the top. A fixed transom seals permanently and holds steam best, while an operable transom can be opened to vent the room after a session.
What is the best material for a steam room bench?
Tile over a properly waterproofed base is the most durable and easiest to clean, but it feels cold at first. Teak or cedar feels warm immediately and suits bare skin, but needs more care over time. Avoid painted or varnished surfaces, ordinary plywood, MDF and untreated softwood, because they peel, swell or grow mould in constant steam.
How do I stop my steam room door from leaking?
Check the magnetic seals first, then the bottom sweep, then the silicone around fixed panels. Adjust the hinges until the magnetic strips meet in parallel along their whole height, replace a worn sweep, and reapply silicone where the bead has broken or pulled away. A tissue-paper test with the generator running will show you exactly where the steam is escaping.
Final Thoughts
A good steam room is not built from one expensive part. It is built from three ordinary parts, planned together: a bench at the right height, a door that swings out and seals shut, and glass that runs to the ceiling with no gaps left over. Get those three right, add proper waterproofing, drainage and ventilation, and the room will heat quickly, hold its steam and feel comfortable every time you use it.
Use the checklist above with your installer before you order tile or glass, and measure twice before anything is cut. A steam room is a small space, so every inch matters, and the cheapest time to fix a layout mistake is on paper. Once the room is built, enjoy it sensibly: hydrate before and after, start with short sessions, leave immediately if you feel dizzy or unwell, skip alcohol before and during sessions, and check with a doctor first if you are pregnant, live with a heart or circulation condition or low blood pressure, or take medication that affects heat tolerance.
References
- Home Sauna Tips, “Sauna Bench Height and Dimensions: The Numbers That Work” — homesaunatips.com/build/benches/
- Peak Primal Wellness, “Sauna Bench Design Guide: Height, Materials & Layout Tips” — peakprimalwellness.com
- EngineerFix, “What to Know About a Steam Shower Door With Transom” — engineerfix.com
- EngineerFix, “What Are the Requirements for a Steam Shower Glass Enclosure?” — engineerfix.com
- Superior Saunas, “Tylo Steam Door 60G” — superiorsaunas.com
- Corada, “Benches” (ADA Standards, Section 903) — corada.com