
Backyard Contrast Therapy: Pairing an Outdoor Sauna with a Cold Plunge
Backyard contrast therapy is simple in idea and very practical in execution: warm up in an outdoor sauna, cool down in a cold plunge, rest, and repeat only if you feel good. Doing it outside changes the experience in ways an indoor routine never has to consider. You are managing weather, footing, water, privacy, and the walk between heat and cold.
This guide is written for a backyard setup, not a gym or spa. It focuses on layout, outdoor plunge choices, heater rhythm, seasonal care, and a calm session flow you can adapt to your space. It does not replace the instructions that came with your sauna or plunge, and it does not promise health results.
Please read this first: a safety note
This article is not medical advice. Saunas and cold plunges are wellness tools, not treatments, and they do not cure illness, detox the body, or guarantee weight loss.


Paid Links - As an Amazon Associate, I earn from qualifying purchases.
Hydrate before and after, start short, and leave the heat or the cold immediately if you feel dizzy, unwell, nauseous, or unusually uncomfortable. Do not drink alcohol before or during a session.
Check with a doctor first if you are pregnant, live with a heart or circulation condition or low blood pressure, or take medication that affects heat tolerance. For cold plunges, enter gradually, never plunge alone when you are new to cold exposure, and keep your head above water unless you are experienced and supervised. Exit if numbness or shivering becomes uncontrollable, and be conservative with children and older adults.
Electrical, plumbing, and drainage work is general guidance only here. Check local code, follow the manufacturer’s instructions for your equipment, and use licensed professionals where required. Never invent a shortcut around a safety device or a manufacturer’s limit.
Why the backyard changes contrast therapy
Inside, the hardest part is often just getting started. Outside, the hardest part is the space between the sauna and the plunge. A muddy path, a slippery deck, a gate that sticks, or a plunge left uncovered can turn a relaxing ritual into a chore.
That is also what makes a backyard setup rewarding. You control the pace, the privacy, and the rest area. There is no queue, no shared changing room, and no rush to finish before someone else needs the room.
The goal is a short, obvious flow. You should be able to step out of the sauna, reach the plunge without crossing a hazard, and then sit somewhere warm and dry to rest. If any part of that flow feels awkward on a dry day, it will feel worse in rain, ice, or darkness.


Paid Links - As an Amazon Associate, I earn from qualifying purchases.
Plan the layout before you buy anything else
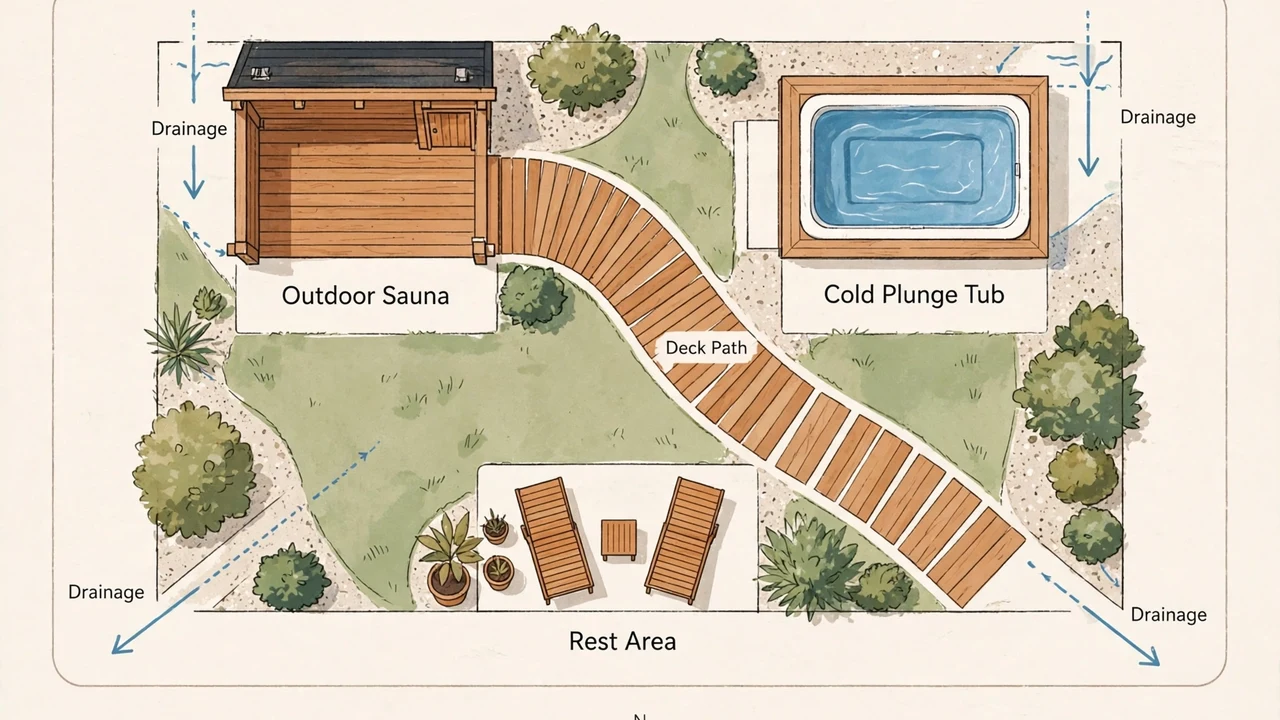
Start with the route, not the tub. Walk the path you would take barefoot, in a towel, after a sauna session. Notice slopes, steps, drains, low branches, and places where water will pool.
Keep the sauna, plunge, and rest area close together, with a clear, non-slip route between them. A short walk is better than a scenic one when you are wet, warm, and cooling down quickly. Privacy matters too, so consider fencing, screening plants, and sightlines from neighbours before you settle the layout.
Think about drainage from the start. Splash water, rain, and plunge water need somewhere safe to go, away from the sauna base and away from paths where it could freeze. If you are unsure about drainage, ask a qualified professional rather than guessing, and follow local rules.
A simple layout checklist
- A clear, non-slip path from the sauna door to the plunge, with no trip hazards.
- A towel hook or bench within easy reach of both the sauna and the plunge.
- A dry rest area with seating, where you can sit, sip water, and warm up gradually.
- A covered spot for the plunge, or a good cover, so leaves and debris stay out.
- Lighting for evening sessions, placed so you can see the path and the plunge edge.
- Storage for towels, a robe, and footwear, close enough that you do not have to go back inside wet.
Decking can help, but it needs care outdoors. Choose a surface that stays grippy when wet, and keep it clean and free of algae and ice. A mat by the plunge can catch drips, but it should not become a slipping hazard itself.
Choosing an outdoor plunge option
There is no single right plunge for every backyard. The best choice depends on your space, budget, climate, how much maintenance you want, and whether you want chilled water on demand or a simpler seasonal setup. Before you compare prices, also look at the wider picture of outdoor sauna costs, since the sauna, base, electrics, and plunge together make up the real project cost.
Chilled plunge tub
A purpose-built chilled tub keeps water cold without daily ice runs, which is a real advantage in warmer months. It usually needs power, a level base, and room for access and servicing, so check the manufacturer’s requirements before you place it. It also tends to be the most convenient option for regular use, if it fits your budget and space.
Stock tank or ice bath
A stock tank or simple ice bath is a lower-cost, lower-tech route, and it suits many backyards. You add cold water and ice as needed, which gives you control but also a regular chore. It still needs a cover, a stable base, and a plan for emptying and refilling, so do not treat it as a set-and-forget option.
Cold shower
A cold outdoor shower is a practical alternative if a full plunge is not possible, or if you are still learning how you respond to cold. It is easier to control, easier to drain, and easier to stop quickly. It does not give the same full-body immersion, but for many people it is a calmer first step.
Natural cold water, only where it is safe
A lake, river, or sea swim can be part of contrast therapy in some places, but it brings risks that a backyard tub does not. Currents, depth, cold shock, slippery banks, and getting out safely all matter, and conditions can change quickly. Use natural water only where it is known to be safe, legal, and supervised as needed, and never go alone when you are new to cold exposure.
Quick comparison
- Chilled tub: most convenient, needs power and servicing access.
- Stock tank or ice bath: simpler and flexible, needs ice, a cover, and regular water changes.
- Cold shower: easiest to control and drain, partial immersion only.
- Natural cold water: beautiful but variable, use only where safe and allowed.
Heater rhythm: wood-fired versus electric outdoors
Your heater shapes the rhythm of the whole session. A wood-fired stove and an electric heater both warm an outdoor sauna, but they ask for different preparation, attention, and cool-down habits. The right choice also depends on your sauna shape, so it helps to compare a barrel, cabin or pod sauna alongside the heater decision.
Wood-fired heat tends to feel more hands-on. You build and tend the fire, watch the heat rise, and let the stove and stones cool in their own time. That ritual suits people who enjoy the process, but it also means you need dry wood storage, safe ash handling, and time for the sauna to cool before you close it up.
Electric heat tends to be more predictable and easier to switch on and off. You still need a proper electrical installation by a qualified professional, and you must follow the manufacturer’s instructions for your heater and sauna. For a fuller comparison, see this guide to the wood-fired vs electric outdoor sauna heater choice.
Whichever heater you use, plan the cool-down as part of the session. Leave ventilation and access as the manufacturer directs, let hot surfaces cool before you handle anything near the stove or heater, and do not rush to cover or lock up a sauna that is still hot inside.
A sample backyard session flow
This flow is deliberately gentle. It is not a training protocol, and it is not a test of endurance. Shorten any step, skip a round, or stop entirely if you feel unwell.
- Prepare: drink water, lay out towels and a robe, check the path, and make sure the plunge cover is off and the water is clear.
- Warm up: sit in the sauna for a short, comfortable period. Relax, breathe normally, and step out before you feel overheated.
- Cool down gradually: step outside, stand for a moment, then enter the plunge slowly. Keep your head above water, breathe steadily, and exit as soon as you want to.
- Rest and rewarm: dry off, put on a robe, sit in the rest area, and drink water. Wait until you feel settled before deciding on another round.
- Repeat only if comfortable: one more gentle round is plenty for most people. End with rest, not with a final extreme plunge.
- Close up: cover the plunge, tidy towels, check that the sauna is cooling safely, and leave the area clean and dry.
Notice what this flow does not do. It does not ask you to stay in the cold until you are numb, to hold your breath under water, or to push through dizziness. Comfort, control, and a calm exit are the point.
Winter operation: freeze, ice, snow, and footing
Winter is when a backyard contrast setup is most satisfying, and when it needs the most care. Cold air, snow, and ice affect the sauna, the plunge, the path, and you.
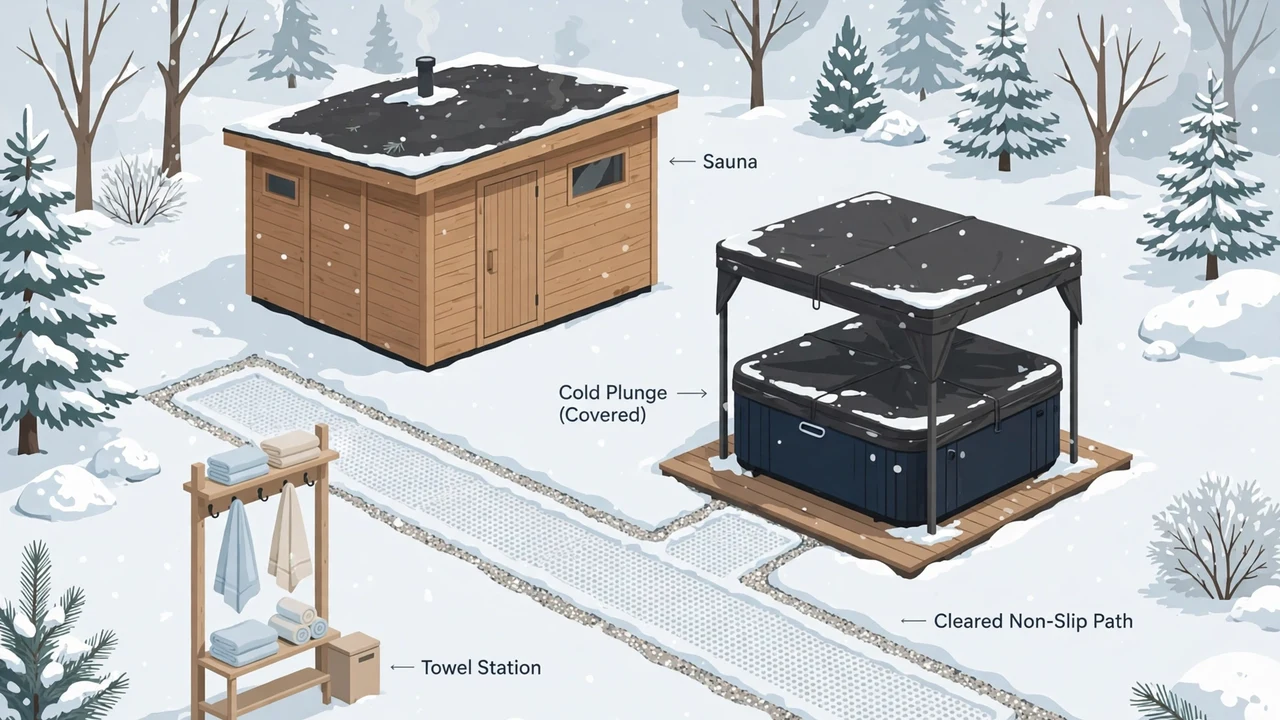
Protect the plunge from freezing as the manufacturer directs. That may mean a cover, insulation, circulation, or draining it in a hard freeze, depending on the product you own. Do not force a frozen lid, pump, or fitting, and do not use makeshift heating on equipment that was not designed for it.
Manage ice on the path as a safety job, not an afterthought. Clear snow before sessions, keep a safe, non-slip route, and store footwear and towels where they stay dry. If the path to the plunge is icy, skip the plunge that day. A cold shower indoors, or simply resting after the sauna, is a better choice than a fall.
Keep the sauna itself winter-ready too. Clear snow from the roof and around the base as the manufacturer directs, keep vents clear, and protect wood from standing water and ice build-up. After a session, let the sauna cool and dry as instructed, so damp and frost do not cause damage over time.
Summer and warm-climate notes
In warm weather, the challenge flips. The sauna still needs to feel like a distinct warm space, while the plunge needs to stay cold enough to feel refreshing.
Shade helps both. A plunge in full sun warms quickly and grows debris faster, while a shaded rest area makes the rest phase far more pleasant. A good cover, used between sessions, keeps out leaves, insects, and sunlight.
Hydration matters even more in summer. Drink water before and after, keep sessions short, and rest in the shade. If the day is already very hot, a shorter sauna, a cooler shower, or skipping the session may be the wiser choice.
Water care outdoors
Outdoor water needs regular attention, because wind, leaves, pollen, insects, and sunlight all reach it. A cover is the simplest daily habit, and it makes every other job easier.
Remove debris promptly, wipe surfaces as the manufacturer directs, and change the water regularly. How often depends on your plunge type, use, and weather, so follow the manufacturer’s guidance rather than a fixed rule from the internet. Do not add chemicals unless they are approved for your specific product, and never guess a dose.
Plan where changed water will go. It should drain safely, without flooding the sauna base, a path, or a neighbour’s garden. If you are unsure, ask a qualified professional about drainage before you set the plunge in place.
Putting it together for your backyard
A good backyard contrast setup is not the most expensive one. It is the one with a safe path, a plunge you will actually maintain, a heater rhythm you enjoy, and a rest area you want to sit in.
Start with layout and safety, choose a plunge that fits your climate and maintenance habits, and keep sessions short and calm. Over time, you will learn how your sauna heats, how your plunge holds cold, and how your body responds in each season. Let that experience, not a rigid protocol, shape your routine.
Frequently asked questions
Do I need both a sauna and a cold plunge to try contrast therapy?
No. You can start with a sauna and a cold shower, or a sauna followed by cool outdoor rest, and add a plunge later if you want full immersion.
How far should the plunge be from the sauna?
Close enough for a short, clear, non-slip walk, with towels and a dry rest area nearby, and with safe drainage away from paths and the sauna base.
Can I use a cold shower instead of a cold plunge?
Yes. A cold shower is easier to control, easier to drain, and easier to stop quickly, although it does not give the same full-body immersion as a plunge.
Is contrast therapy safe in winter?
It can be, with preparation: a cleared non-slip path, freeze protection for the plunge as the manufacturer directs, gradual cold entry, and stopping if you feel unwell or the path is icy.
How do I keep outdoor plunge water clean?
Use a cover between sessions, remove debris promptly, change the water regularly, and follow the manufacturer’s guidance, without guessing chemical doses.