Building your own outdoor sauna is one of the most rewarding DIY projects you can take on.
Whether you’re looking to relax after long days, boost wellness, or add value to your home, learning how to build an outdoor sauna gives you full control over design, budget, and performance.
This guide walks you through everything—from planning and materials to installation and costs—so you can confidently build a sauna from scratch.
Learn how to build an outdoor sauna with our complete 2026 DIY guide. Discover step-by-step plans, material costs, and heater tips to build a backyard retreat on any budget.
Disclaimer: This content is for educational purposes only. Always follow local building codes and consult licensed professionals for electrical and structural work.
Key Takeaways
- Planning is Crucial: Whether you use outdoor sauna plans pdf guides or sketch your own, deciding on size and location first saves headaches later.
- Materials Matter: Always use softwoods like Cedar, Spruce, or Aspen for interiors to avoid burning skin and resist rot.
- Ventilation is Key: A good airflow system (intake below the heater, exhaust opposite) is essential for safety and a better sauna experience.
- Budget Flexibility: You can learn how to build an outdoor sauna on a budget by using reclaimed materials or converting a shed, but never skimp on the heater or insulation.
- Time Investment: For a beginner, how long does it take to build an outdoor sauna usually averages between 40 to 80 hours of labor.
Why Build an Outdoor Sauna at Home?
If you’re wondering how to build an outdoor sauna at home, you’re not alone. Outdoor saunas are growing in popularity because they:
- Improve circulation and relaxation
- Support muscle recovery
- Increase property value
- Offer a private wellness retreat
Plus, building it yourself makes it significantly cheaper—especially if you’re searching for how to build an outdoor sauna cheap.
Step 1: Planning and Design
Before you grab a hammer you need a good plan. This phase determines project success.
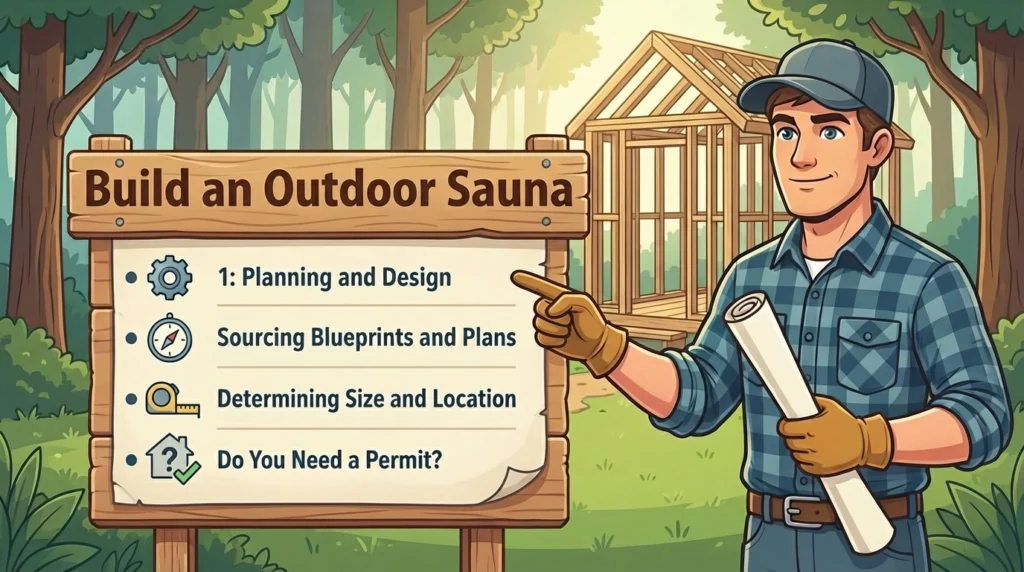
Sourcing Blueprints and Plans
If you aren’t an architect, don’t worry. There are excellent resources available. You can search for outdoor sauna plans free online, though the quality varies.
For more detailed specifications, many professionals offer outdoor sauna plans pdf free download options or paid packages that include material lists.
For people specifically looking for traditional heat sources, then look for wood fired sauna plans pdf as these have different clearances and flooring considerations as compared to electric units.
Pro Tip: If you are downloading diy sauna plans pdf make sure that they are in accordance with the local building code. If you are in Europe, specifically to search for guides on how to build an outdoor sauna uk might bring better results in terms of metric measurements and insulation standards that will suit damp climates.
Determining Size and Location
- Location: Select a location that has good drainage. If you are thinking about how to make an outdoor sauna floor on uneven ground, you are going to need a lot of work done on grading.
- Size: A standard 6’x8′ footprint is sufficient for 3-4 people to sleep comfortably. Smaller saunas will heat up faster and they will be cheaper to sell, which is great if you are figuring out how to build an outdoor sauna on a budget.
Do You Need a Permit?
In many municipalities, a structure with a certain square footage (often 100 – 200 sq ft) doesn’t require a permit.
However, if you are installing new electrical lines for an electric heater, then you almost certainly need a permit and inspection. Always consult with your local authority.
Step 2: Calculating Costs and Budgeting
One of the most common questions is: how much does it cost to build an outdoor sauna? The answer varies wildly based on size, materials, and the heater type.
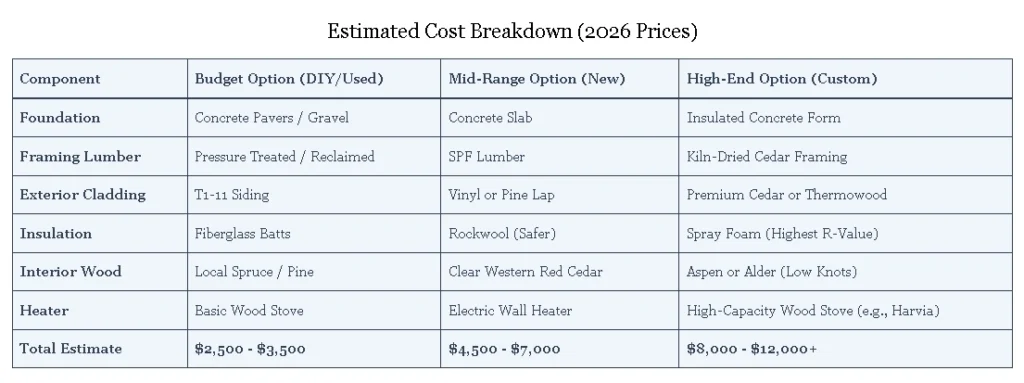
Estimated Cost Breakdown (2026 Prices)
| Component | Budget Option (DIY/Used) | Mid-Range Option (New) | High-End Option (Custom) |
|---|---|---|---|
| Foundation | Concrete Pavers / Gravel | Concrete Slab | Insulated Concrete Form |
| Framing Lumber | Pressure Treated / Reclaimed | SPF Lumber | Kiln-Dried Cedar Framing |
| Exterior Cladding | T1-11 Siding | Vinyl or Pine Lap | Premium Cedar or Thermowood |
| Insulation | Fiberglass Batts | Rockwool (Safer) | Spray Foam (Highest R-Value) |
| Interior Wood | Local Spruce / Pine | Clear Western Red Cedar | Aspen or Alder (Low Knots) |
| Heater | Basic Wood Stove | Electric Wall Heater | High-Capacity Wood Stove (e.g., Harvia) |
| Total Estimate | $2,500 – $3,500 | $4,500 – $7,000 | $8,000 – $12,000+ |
If you are researching how to build an outdoor sauna cheap, focus on the interior finish. Using local spruce or pine instead of imported cedar can save you 40% on material costs without sacrificing the sauna experience.
Step 3: Foundation and Flooring
The foundation is the most important structural element. You cannot build a sauna directly over the grass.
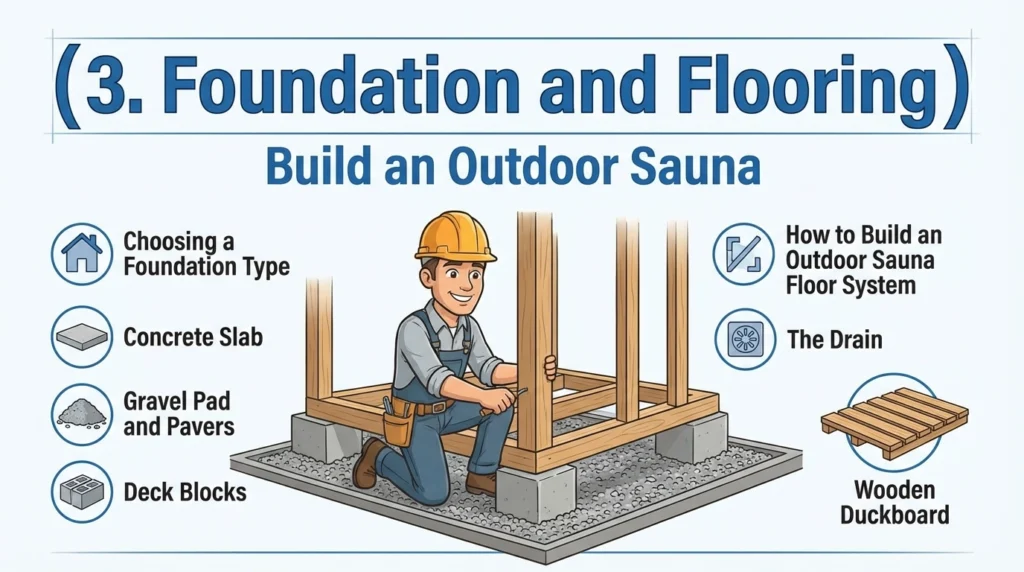
Choosing a Foundation Type
- Concrete Slab: The Gold Standard. It is permanent, flat and fireproof.
- Gravel Pad and Pavers: Great for drainage, easier for DIYers.
- Deck Blocks: Acceptable for smaller, lighter structures.
How to Build an Outdoor Sauna Floor System
When thinking of how to build an outdoor sauna floor, you will need to choose “wet” floor (drainage) or “dry” floor (bucket system).
- The Drain: If you have a concrete slab, slope your floor slightly to a floor drain. This makes cleaning easy.
- Wooden Duckboard: Most DIYers make a raised (duckboards) wooden floor over the concrete. This means that your feet are not on the cold concrete. Do not insulate the floor joists if on a concrete slab, use the thermal mass of the concrete to help heat the room.
Safety Note: If using a wood stove the floor must be protected with a non-combustible hearth that extends well beyond the footprint of the stove. Detailed wood fired sauna plans pdf guides are usually specifying these clearance requirements.
Step 4: Framing the Structure
Now we get into the nuts and bolts of how to build an outdoor sauna step by step.
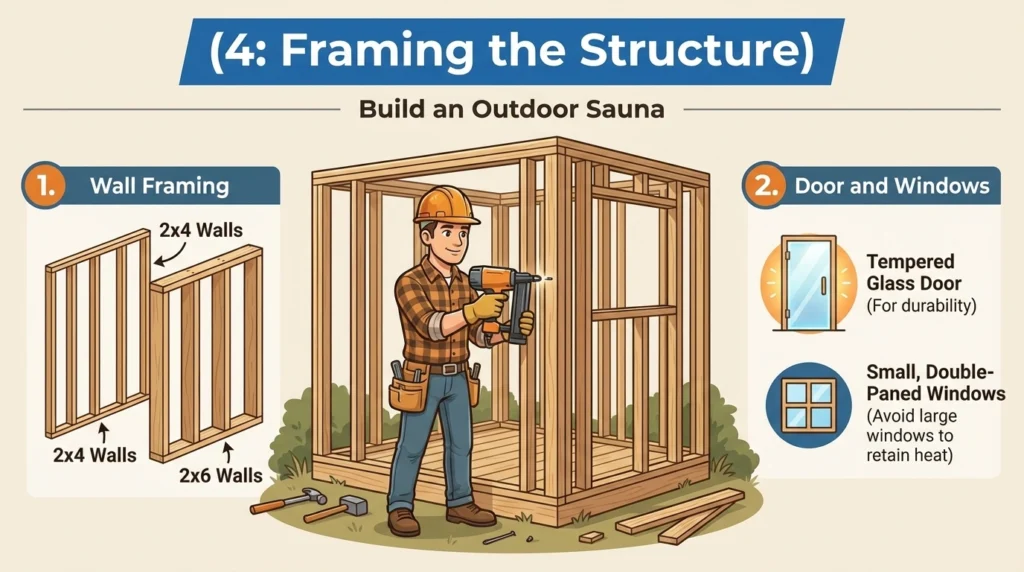
Wall Framing
Use conventional framing techniques (2×4 or 2×6 studs spaced 16″ on center).
- 2×4 Walls: Good enough for electric heaters in mild climates.
- 2×6 Walls: Suited for wood stoves and colder climates to permit greater insulation (R-19).
Door and Windows
The door is a weak point in terms of heat loss. It needs to swing outwards, for safety (in case pressure has you inside, it can’t get out).
- For durability, use a tempered glass door.
- Windows should be small and double-paned. Avoid large windows as they lose heat at a fast rate.
Step 5: Insulation and Vapor Barrier
This is the secret sauce of a good sauna. Many people watch how to build an outdoor sauna youtube videos and see the framing, but they do not take the insulation step seriously enough.
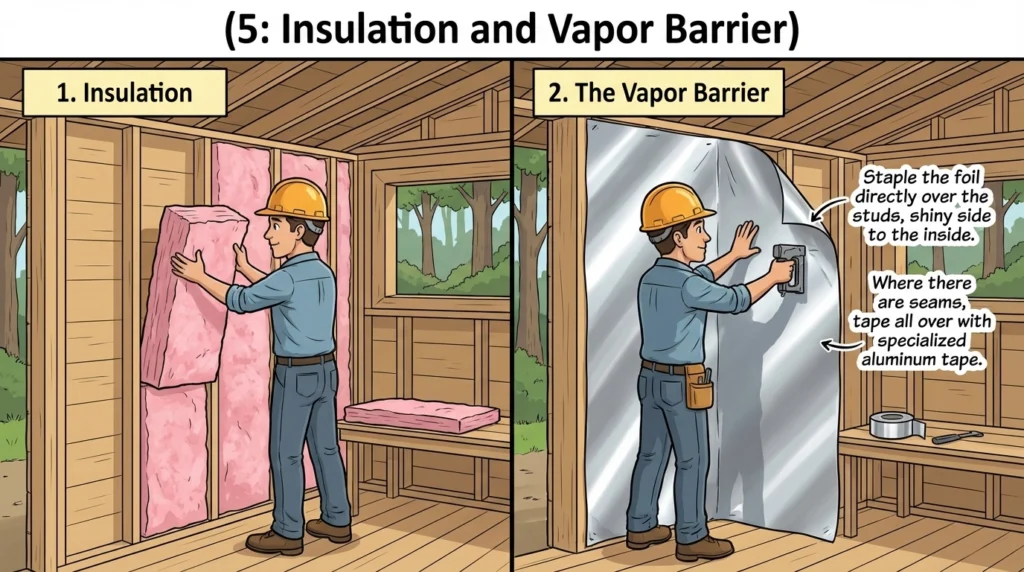
Insulation
Fiberglass batts are the least expensive to use. However, Mineral Wool (Rockwool) is better as it resists mold and can withstand high temperatures without melting.
The Vapor Barrier
This is non-negotiable. You need a certain aluminum foil vapor barrier.
- Staple the foil directly over the studs, shiny side to the inside.
- Where there are seams, tape all over with specialized aluminum tape.
This makes a barrier against radiant heat being absorbed into the room and helps to prevent moisture from rotting your framing. Without this, your sauna will rot from the inside out in 2 years.
Step 6: Interior Cladding and Benches
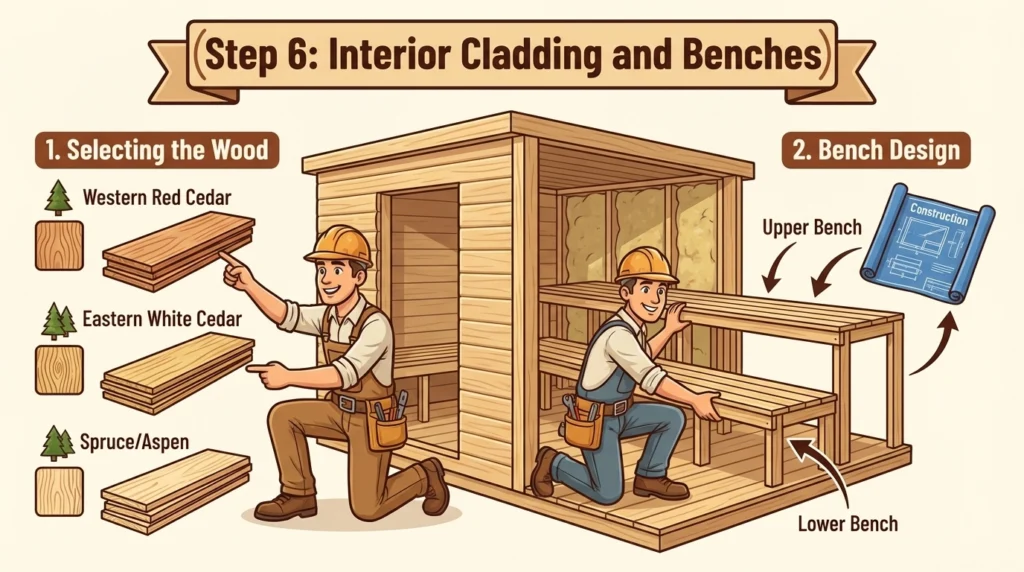
Selecting the Wood
Never go with hardwoods (like Oak or Teak) or resinous softwoods (like Pine with heavy sap) for the interior. Hardwoods become too hot and can cause burns to the skin, resinous woods release sticky sap when heated.
- Western Red Cedar: The Tickle of the Best. Smells amazing, lasts without rotting.
- Eastern White Cedar: A low cost alternative.
- Spruce/Aspen: Generally found in saunas in Europe. Very light color (low heat retention – comfortable to sit on).
Bench Design
Your benches should be constructed in a way that they can be broken down in order to clean beneath them.
- Upper Bench: This is the hot seat. Needs to be wide enough to be able to lie down.
- Lower Bench: For a cooler time.
- Construction: Screws, not nails. Nails can be loosened by the expansion of the wood. Make sure there is a space (approx. 1/2 inch) between boards so that there is room for air to circulate.
Step 7: Heating Your Sauna
The central part of the sauna is the heater.
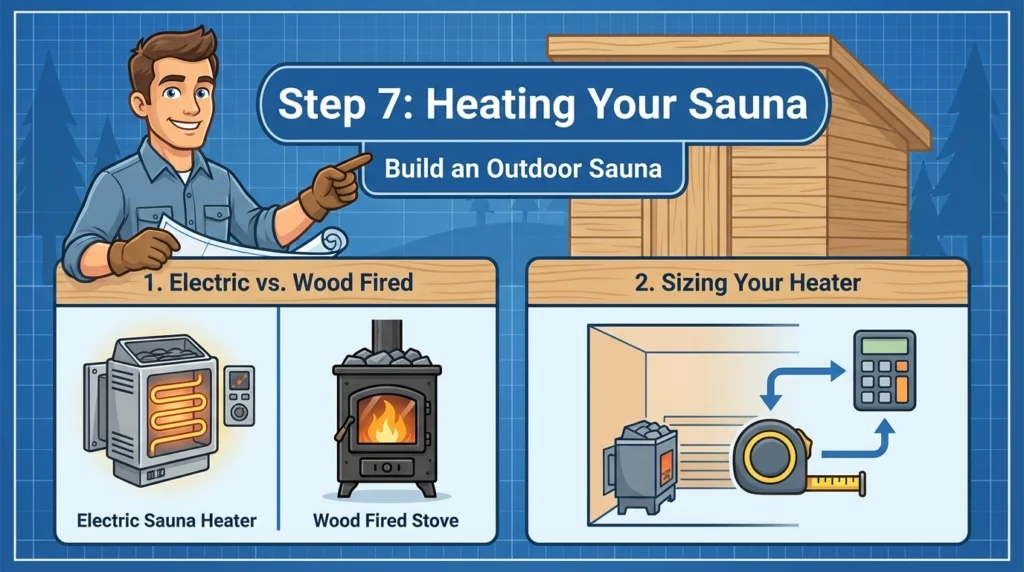
Electric vs. Wood Fired
- Electric Sauna Heaters: Easy to control, turn on by a switch. Requires a separate high voltage line (typically 240V). You will need the services of a certified electrician for this part of how to build an outdoor sauna at home.
- Wood Fired Stoves: The Traditional Option. Provides a soft and humid heat and a crackling sound. Requires chimney and strict fire safety clearances. If you take this route, make sure you adhere to wood fired sauna plans pdf specifications as to flue installation and roof flashing.
Sizing Your Heater
A too small heater will never get to 180°F (80°C). A heater that is too much will waste energy. Use the cubic feet of your room to determine the size of the heater (typically 1kW for every 50 cubic feet).
Step 8: Ventilation
Even if you have the best sauna heater, to have a poor ventilation will ruin the experience. You need oxygen to have a fire and you need oxygen to circulate heat.
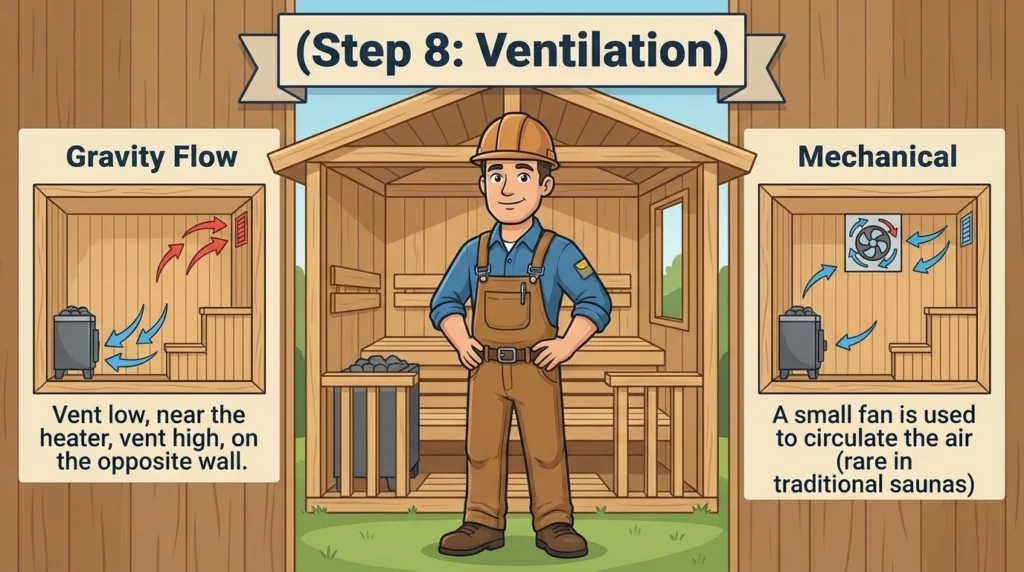
There are two methods for common venting strategies:
- Gravity Flow: Vent low, near the heater, vent high, on the opposite wall.
- Mechanical: A small fan is used to circulate the air (rare in traditional saunas)
Keep the vent low to the floor on the other wall of the heater to suck the cold air across the floor and up the heater.
Difficulty and Timeline: Is it Hard?
Many beginners ask this question – how hard is it to build an outdoor sauna?
If you have basic carpentry skills (using a saw, drill and level), the framing is easy. The tricky parts are the electrical connections and fine carpentery of the benches.
- Difficulty Level: 6/10.
- Time: How long does it take to construct an outdoor sauna? A solo builder working the weekends will probably take 3-4 weekends. A team of two can complete the shell in one week.
How easy is it to construct an outdoor sauna? It is easier than the house, but harder than a simple shed due to the insulation and interior finishing attention to detail.
You May Also Like To Read:
- Outdoor Sauna Tent Guide, Benefits, Setup & Buying Tips
- Outdoor Sauna: Everything You Need to Know Before Buying
FAQs
Can I build a sauna out of a shed?
Yes. Converting a shed is one of the popular routes that those learning how to build an outdoor sauna cheap. You must ensure that the shed is insulated and has a vapour barrier. You cannot just put a heater in a raw wooden shed, it will be drafty and unsafe.
Do I need a drain for my outdoor sauna?
It is highly recommended. Even “dry” saunas emit humidity, and you will have to clean the floor from time to time. A simple sloped floor to a drain pipe running away from the foundation is best.
What is the best wood for a sauna?
Western Red Cedar is the most popular in the North American markets because of its aroma and also because of its resistance to rot. In Europe, Spruce is king. Do not use treated lumber or plywood within the hot room.
Can I use ordinary glass for the door?
Absolutely not. You have to make with tempered safety glass. A regular glass can be shattered by thermal stress, and can cause severe injury.
How do I protect the sauna against rain?
Be sure to have proper roofing felt (tar paper) and shingles. The siding also needs to be at least 6 inches from the ground so that it’s not prone to splash-back rot.
Final Thoughts
Building a backyard sanctuary is more than just a weekend project; it is an investment in your well-being and your home’s value.
While the process of learning how to build an outdoor sauna involves a fair bit of sweat equity—from wrestling with insulation rolls to figuring out the perfect bench heights—the result is a timeless retreat that you’ll enjoy for decades.
Don’t get discouraged if the framing isn’t perfect or if the cladding takes a little longer than expected. The beauty of a DIY project is the character it holds.
Whether you opted for a high-end cedar finish or figured out how to build an outdoor sauna cheap using locally sourced spruce, the steam will feel just as good.
Remember to respect the fire safety aspects, double-check your vapor barrier taping, and perhaps invite a friend over to help lift the heater into place.
Once that first batch of rocks is hot and you pour your first ladle of water over them, creating that distinctive löyly (steam), all the planning and hammering will fade away.
You will realize that the effort you put into understanding how to build an outdoor sauna step by step has paid off in the most relaxing way possible.
Now, go grab your tape measure and start planning—your own personal spa awaits.